
Laser Cutting Resources
Laser cutting uses a high power laser to burn through a material or mark its surface. Review the provided resources below to better understand how to prepare files for laser cutting and what opportunities this technology offers.
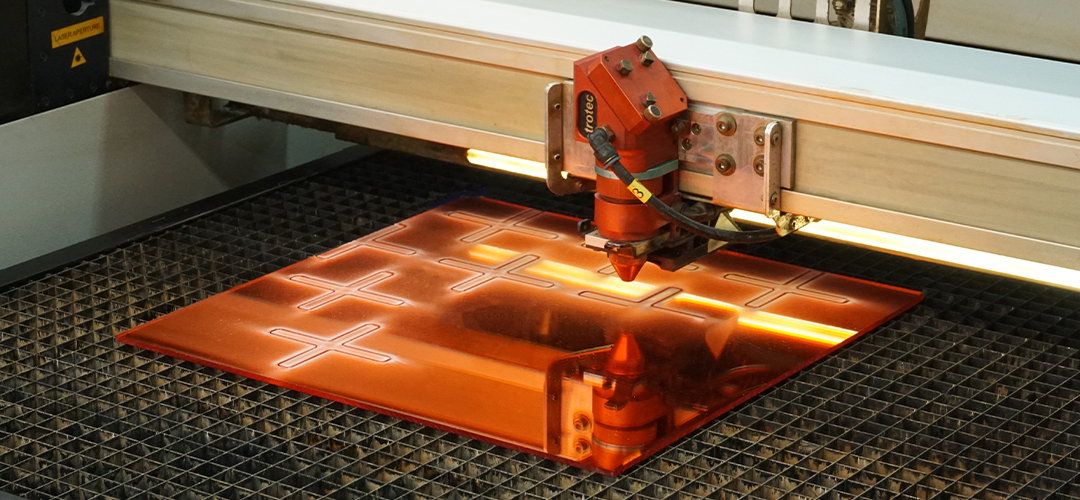
The Design + Technology Lab has 3 laser cutters. Each has a different maximum bed size that you should keep in mind when planning your laser cutting projects.


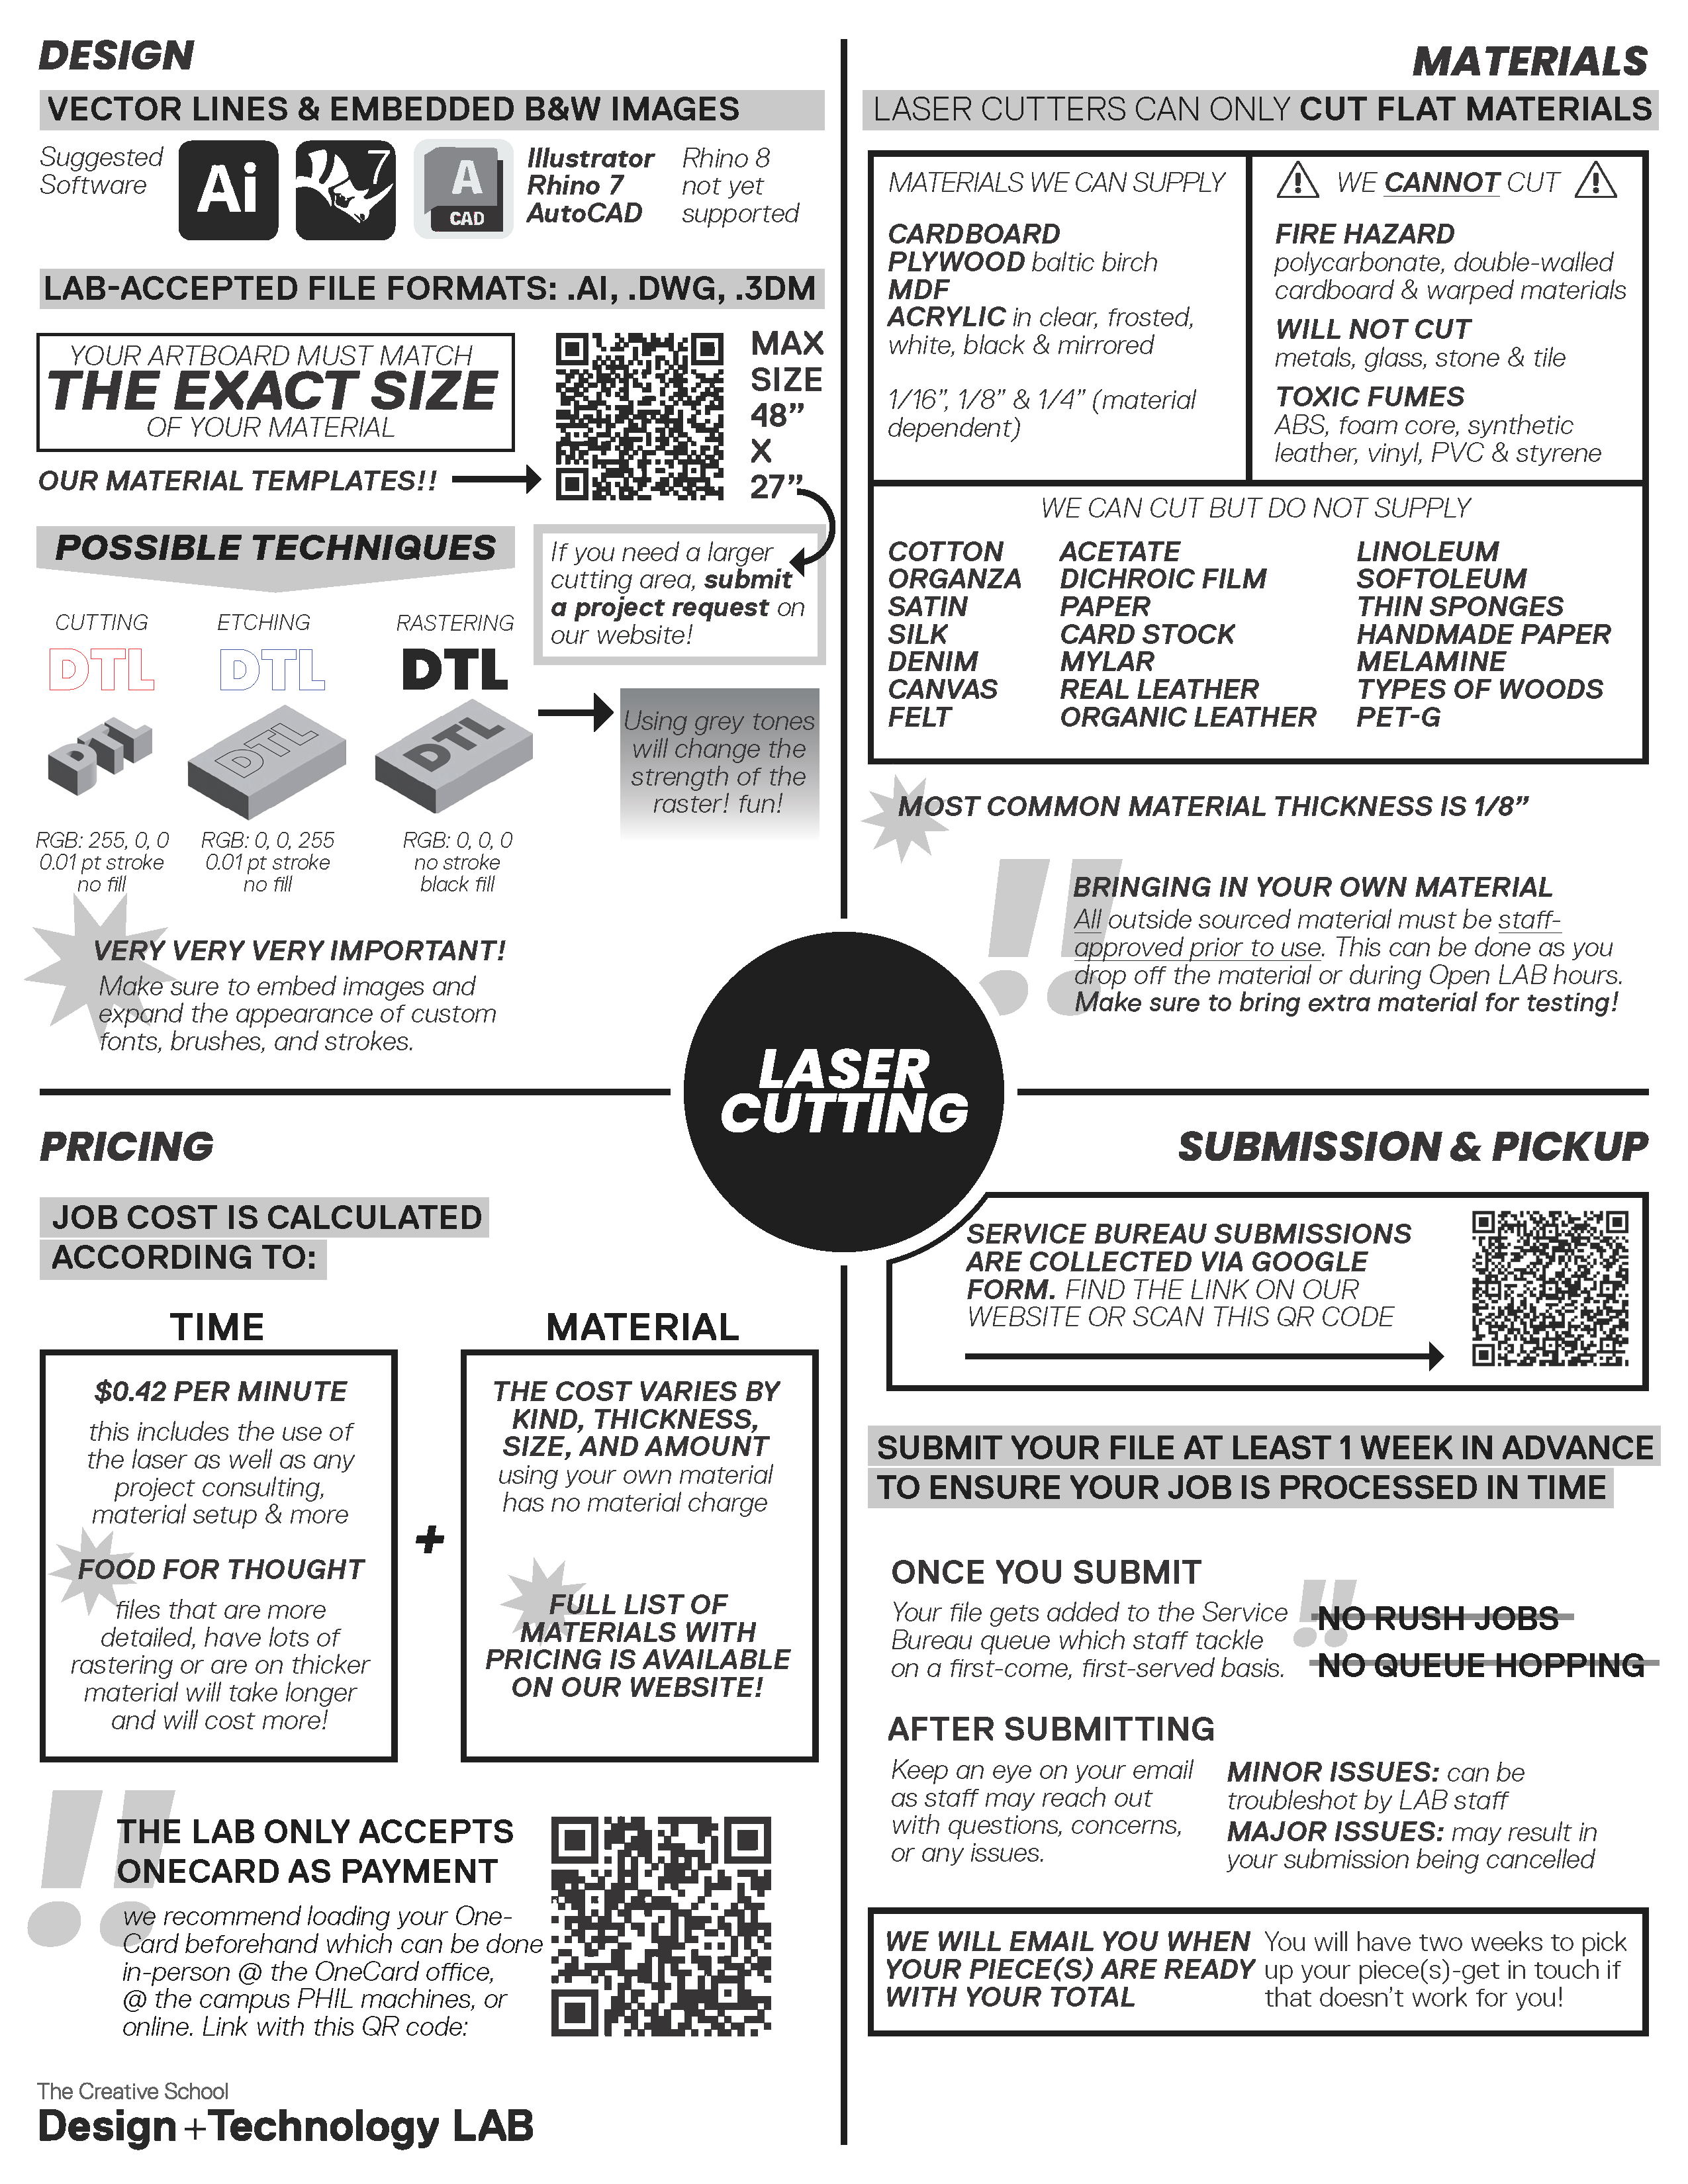
All laser cutting is charged at $0.42/minute.
This includes file and material set-up as well as actual cutting time.
Protective paper masking can be added for an additional $3. Please make a note in the special instructions.
| Thickness | Size | Price |
|---|---|---|
| 5/32" | 32" x 18" |
$1.08 |
| 5/32" | 32" x 12" | $0.72 |
| Thickness | Size | Price |
|---|---|---|
| 1/8" | 32" x 18" |
$3.01 |
| 1/8" | 32" x 12" | $2.01 |

| Thickness | Size | Price |
|---|---|---|
| 1/8" | 30" x 18" |
$11.59 |
| 1/8" | 30" x 12" | $7.73 |
| Thickness | Size | Price |
|---|---|---|
| 1/16" | 32" x 18" |
$11.11 |
| 1/16" | 32" x 12" | $7.41 |
| 1/8" | 32" x 18" |
$23.49 |
| 1/8" | 32" x 12" | $15.66 |
| 1/4" | 32" x 18" |
$35.57 |
| 1/4" | 32" x 12" | $23.71 |
| Thickness | Size | Price |
|---|---|---|
| 1/8" | 32" x 18" |
$26.87 |
| 1/8" | 32" x 12" | $17.91 |
| Thickness | Size | Price |
|---|---|---|
| 1/8" | 32" x 18" |
$26.87 |
| 1/8" | 32" x 12" | $17.91 |
| Thickness | Size | Price |
|---|---|---|
| 1/8" | 32" x 18" |
$34.65 |
| 1/8" | 32" x 12" | $23.10 |
| Translucent White Acrylic |
|---|
| Thickness | Size | Price |
|---|---|---|
| 1/4" | 32" x 18" |
$46.31 |
| 1/4" | 32" x 12" | $30.87 |
*While quantities last
Online Laser Cutting Workshop Recording - Sept 2024
Available to TMU account holders only.
Solution: Re-export your file as one of the accepted file formats. The Lab accepts vector line files as .ai, .dwg, or .3dm. The most popular softwares for generating vector line files are Adobe Illustrator, Autocad, and Rhino*.
*The Lab currently only accepts files created by Rhino 7.


Each job done on a different piece of material should be exported as its own file and have its own submission form filled out.
The Lab currently operates only on Rhino 7. Any submissions made as Rhino 8 files are unable to be opened by our computers. See the following instructions to re-export your file as a Rhino 7 file:
Step 1: From the File menu, click “Export Selected” or “Save As”.
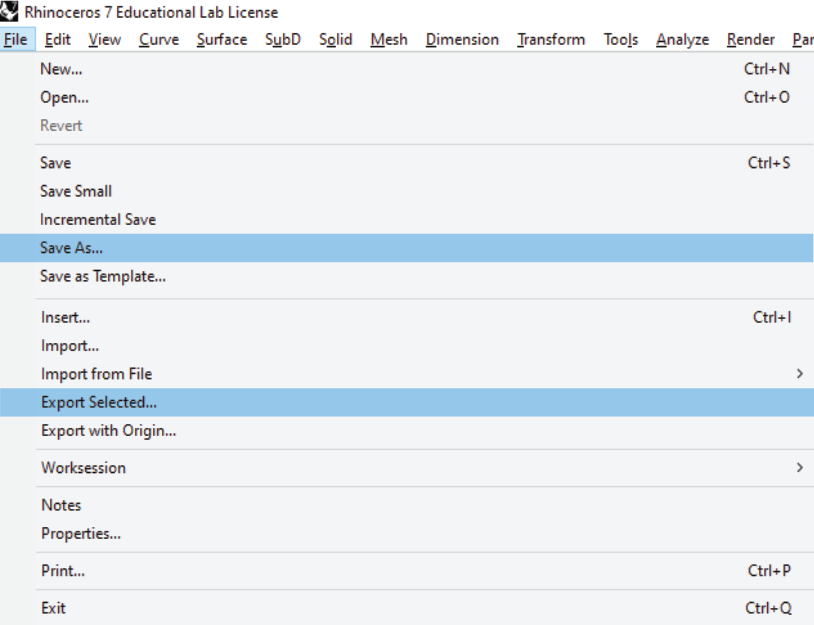
Step 2: In the File name box, type an appropriate file name.
D+TL naming conventions: “FirstInitial-LastName-FileName-FileNumber (if applicable)”
e.g. D-TechnologyLab-HomerHead-01.ai
Step 3: In the dialog box, in the Save as type box, select the Rhino 7 version.
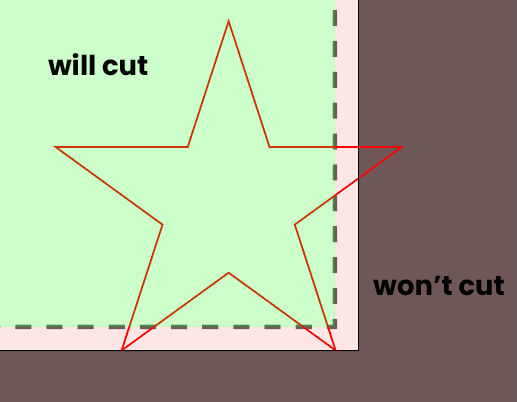
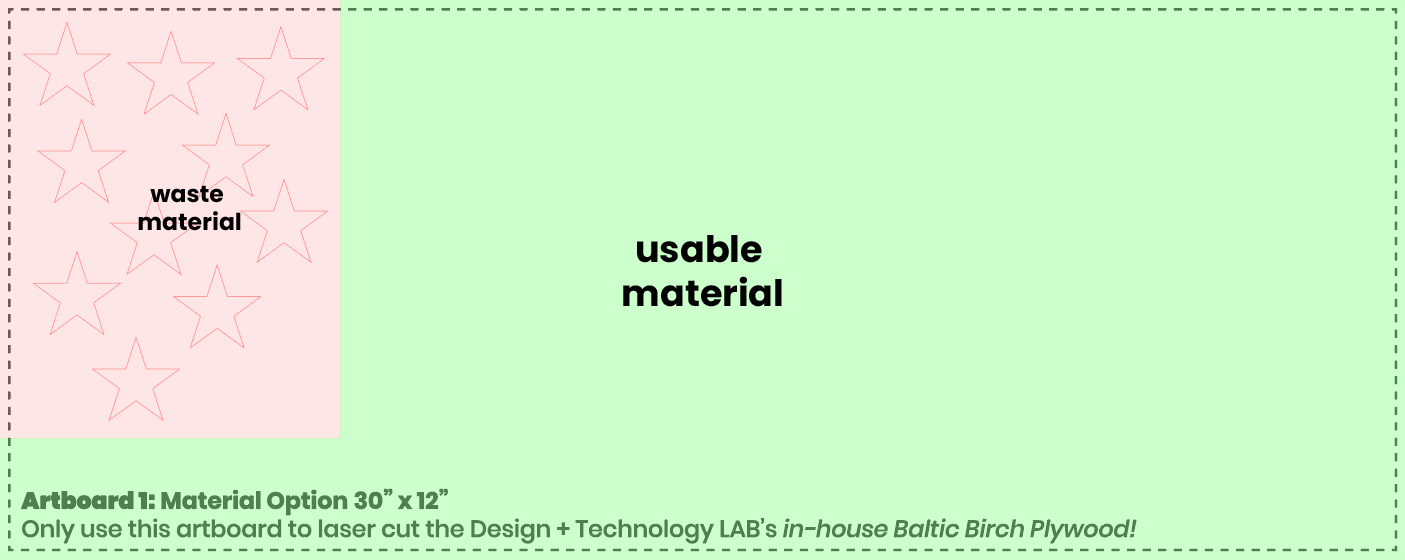
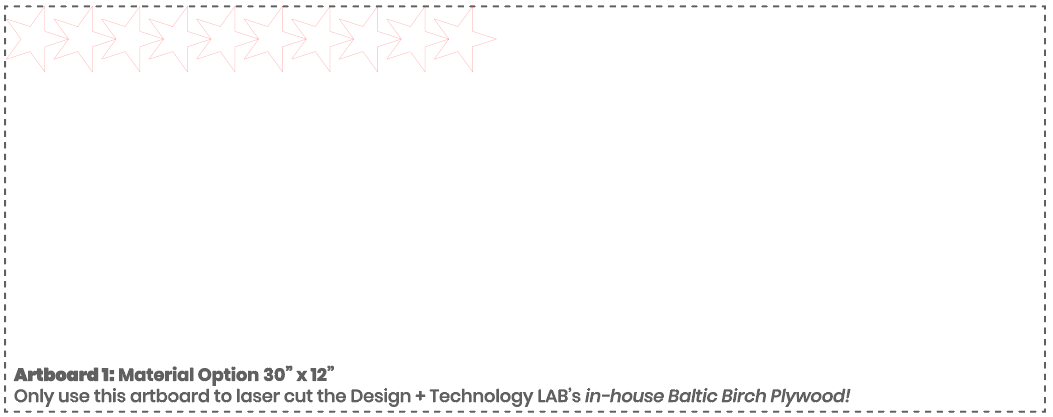
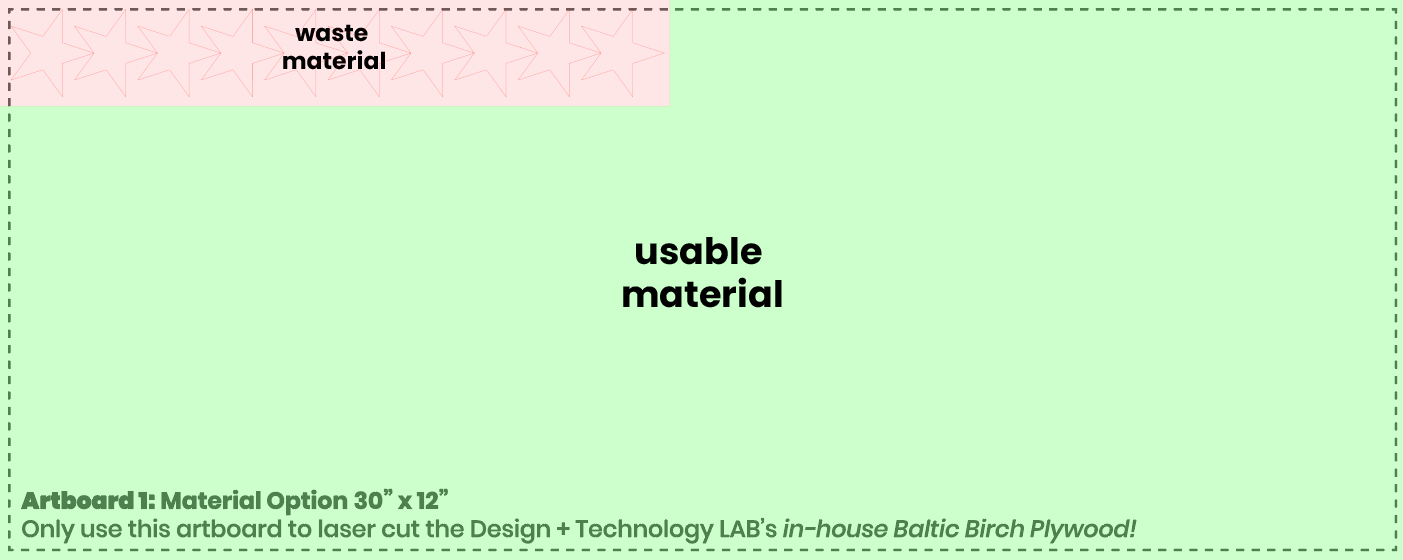
Any design elements too close to or outside the borders of the artboard will not be processed. As well, placing elements too close to the edges of the material can result in inconsistencies or incomplete shapes.
Always provide a 1/4" margin around the perimeter of the artboard (the Lab’s templates include this for you).
Solutions:
- Ensure that the artboard size matches the exact material size
- Use the Lab’s templates when possible
- Scale down the design
- Reorganize element placement to maximize material usage (you can use an online tool such as DeepNest.io (external link) )
- Consider using additional sheets of material
For sustainability and also cost effectiveness, always try to use the material in the most efficient way possible. One sheet can be used for multiple submissions if planned accordingly. As well, the less traveling the laser cutter has to do, the faster the job will finish.
Solutions:
- Add cut lines which trim your material down to rectangles at the end of the job
- Try and efficiently place your designs to use the least amount of material - use software such as Deepnest.io (external link) for help
- Deepnest not only rearranges for most efficient material usage, it also automatically merges duplicated lines to ensure that the same cut line isn’t done twice.

- When nesting shapes, avoid duplicated lines and when possible, have regular shapes share cut lines (e.g. rectangles)
- In Illustrator, use the direct selection tool (keyboard shortcut “A”) to click on one of the paths and delete the duplicate
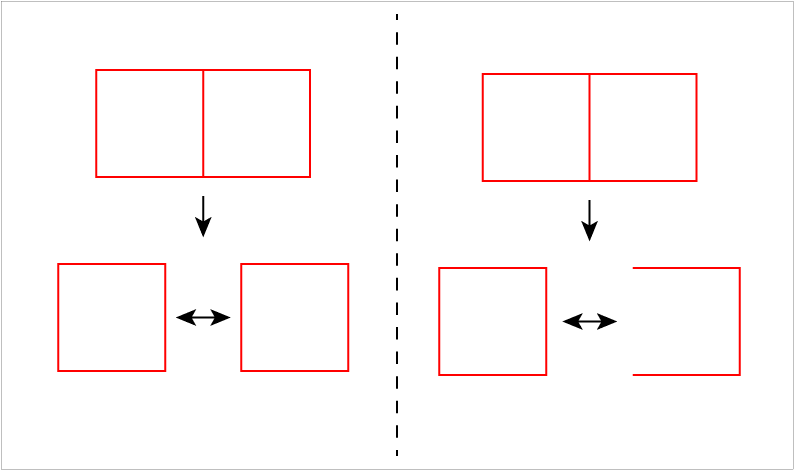
When lines overlap, the laser will run the cut on them twice, resulting in a potentially undesirable finish. This can include singeing, larger cut lines, incorrect final dimensions, and more.
This issue can be difficult to diagnose which is why it’s always important to be mindful when designing and manipulating your artwork.
The top square has a duplicated line on the right side, where the line appears slightly darker. This means that that right edge will be cut out twice.

Solutions:
- Ensure all of your line weights are accurate
- Be mindful when copy-pasting
- In Rhino, type “SelDup” to select all duplicates and then delete them
- In Illustrator, use the direct selection tool (shortcut “A”) to select the specific path/shape & delete it
The direct selection tool can also be used to double check for duplicates. You can and drag on a line you believe to be duplicated to check underneath. Using this technique on the square example, reveals that the right edge did indeed have a double underneath.
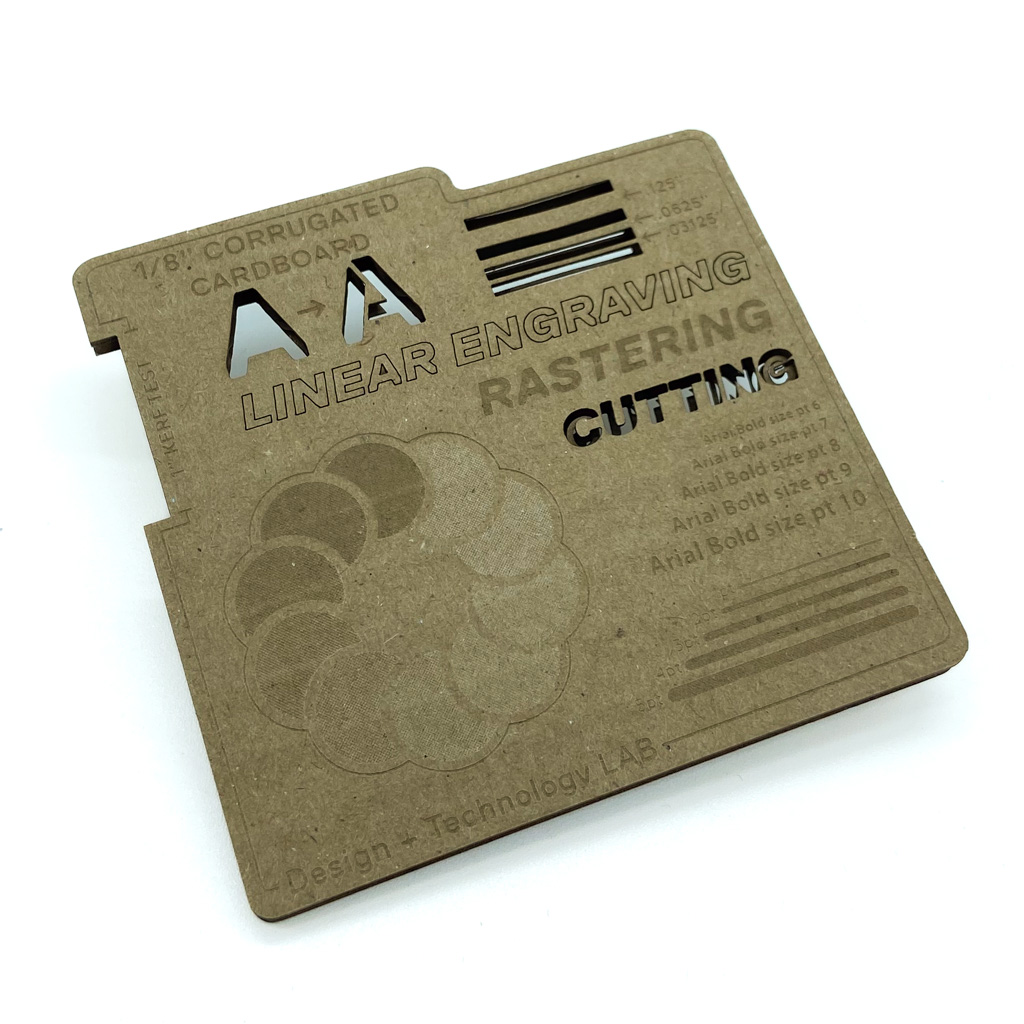
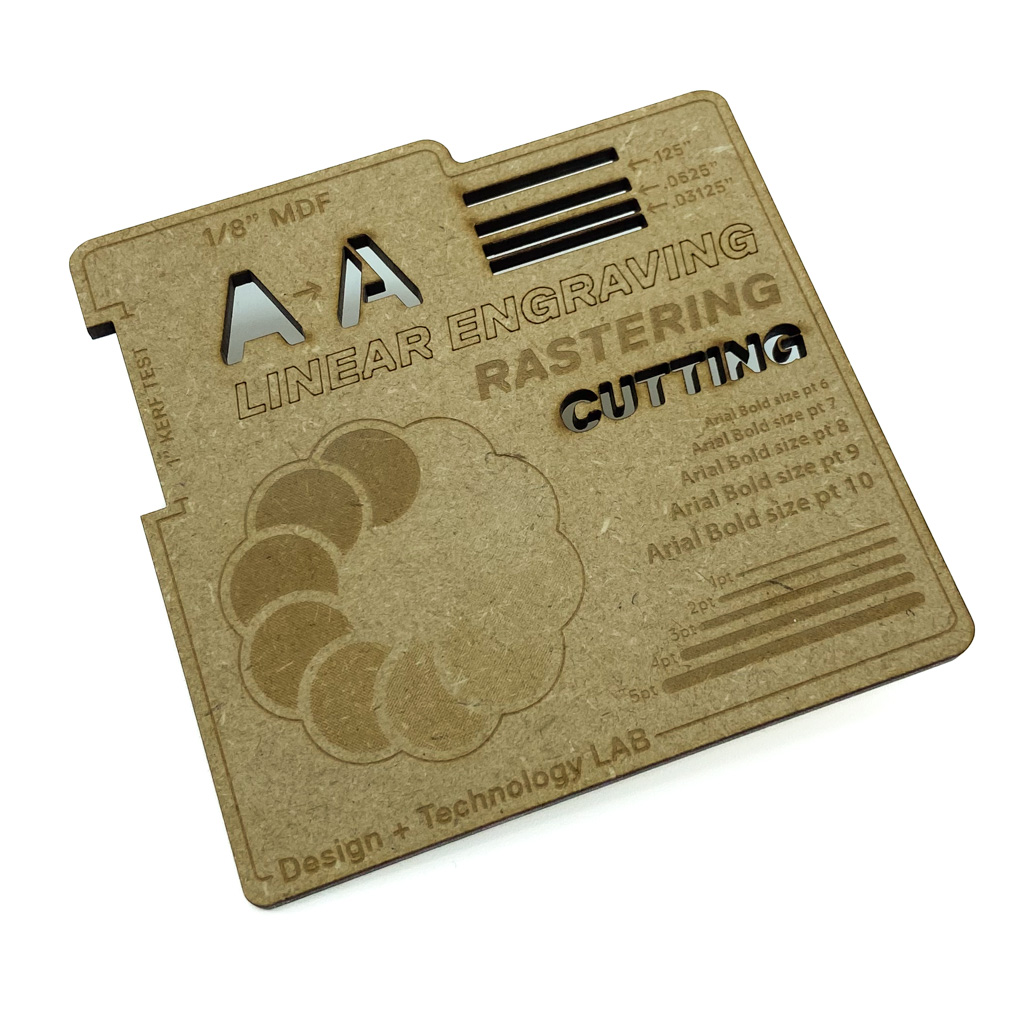
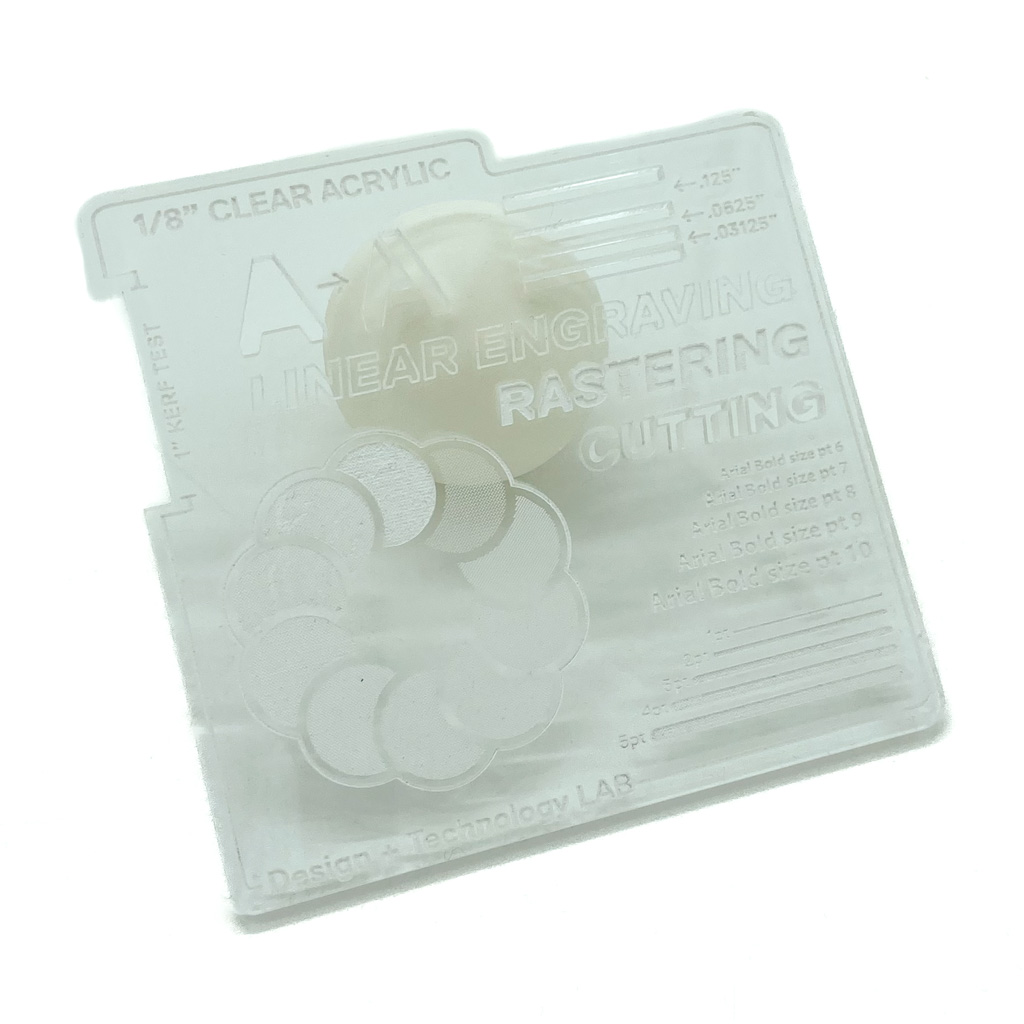
Ensure you’re using the correct line colors/line weights for the desired technique. The exact vocabulary may differ between Illustrator, Rhino, and Autocad, but the theory remains the same.
Solution:
Consult our laser cutting resources page & watch the file setup video (external link) to ensure you’re using the right techniques to achieve the desired results
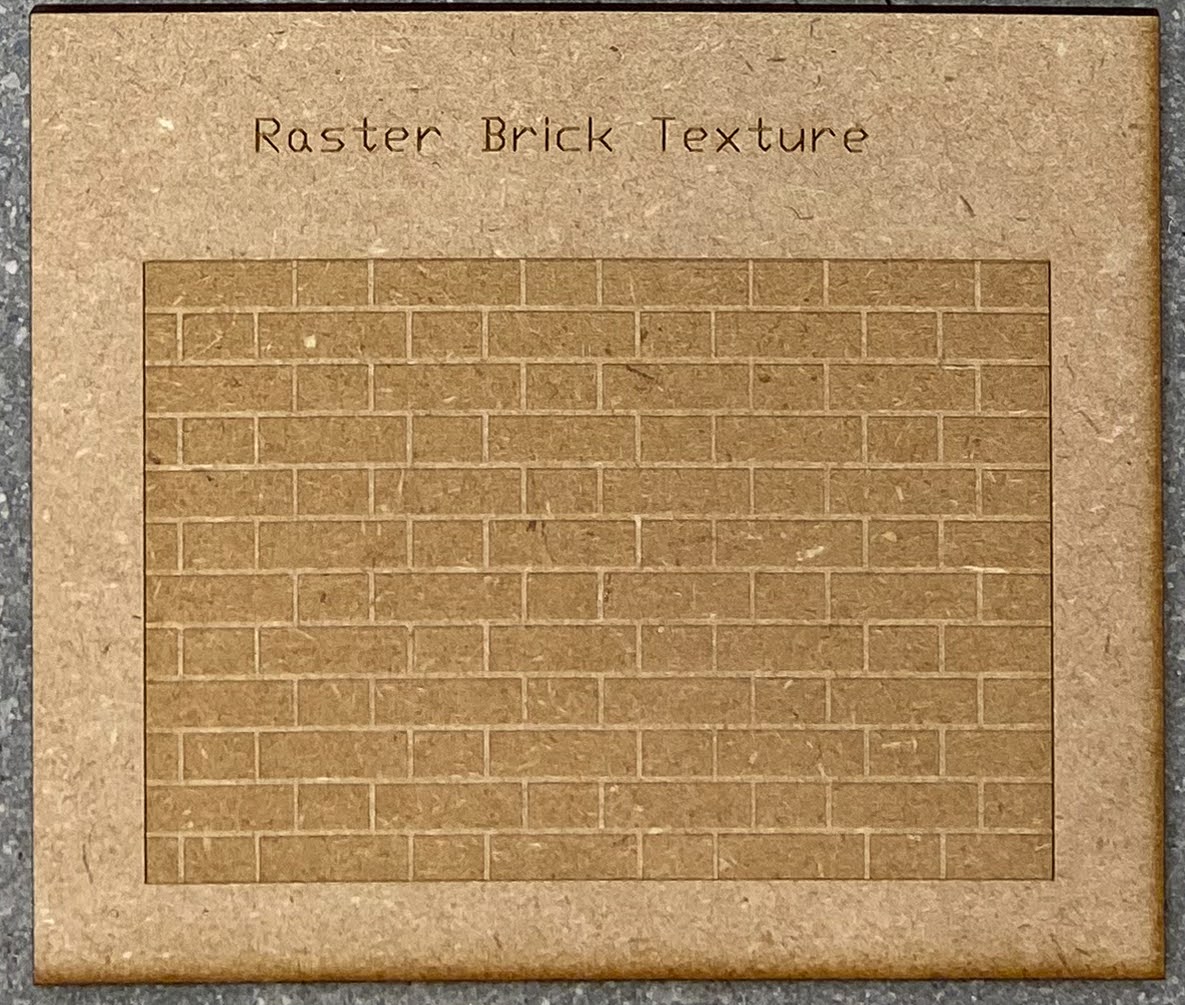
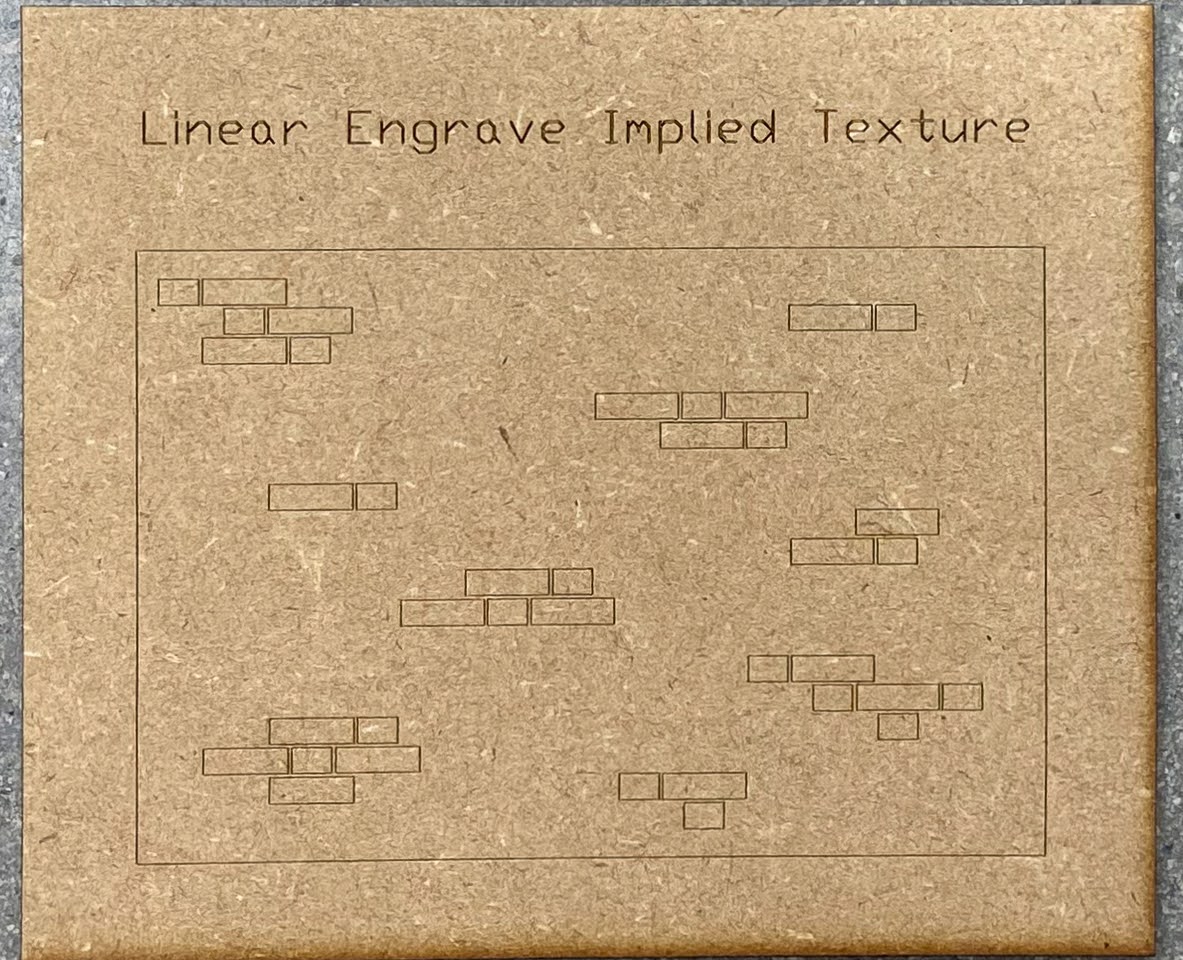
Very detailed designs or designs with large raster areas will take longer to process.
Solutions:
- Consider whether linear engraving may provide a similar/equivalent effect (e.g. implied textures, outlining text, etc.)
- Place all rastering designs in a landscape orientation as the laser engraves faster in this direction
- Place all parts that need to be rastered closer together to reduce laser travel.
Raster Brick Texture (typically cuts slowest):
Linear Engrave Brick Texture (typically cuts faster):

Linear Engrave Implied Texture (usually cuts fastest):
Elements too close together will make them melt/fuse/warp. This is especially important to consider for 1/16” acrylic.
Solutions:
- Alternate line colors for elements that are in close proximity.
- The laser can read certain, specific line colors for completing jobs. It will process all the elements of the same color before moving onto the next. This will ensure that the acrylic has a chance to cool down between close cut lines, reducing any warping & other inconsistencies. Reach out to the lab or come by during Open Lab hours for support in file setup.

Adding more space between the elements
- Illustrator Shortcut:
Step 1: Select all the elements that need spacing.
Step 2: Open up the “Align” tool (click “Window” in the top bar -> “Align”)
Step 3: Click on one of your objects to serve as the Key Object. This object will remain in place while the others get spaced out.
Step 4: Use the Distribute Spacing tools (vertical or horizontal) w/ a specified spacing value. We recommend a min. spacing of 1/16” between elements.
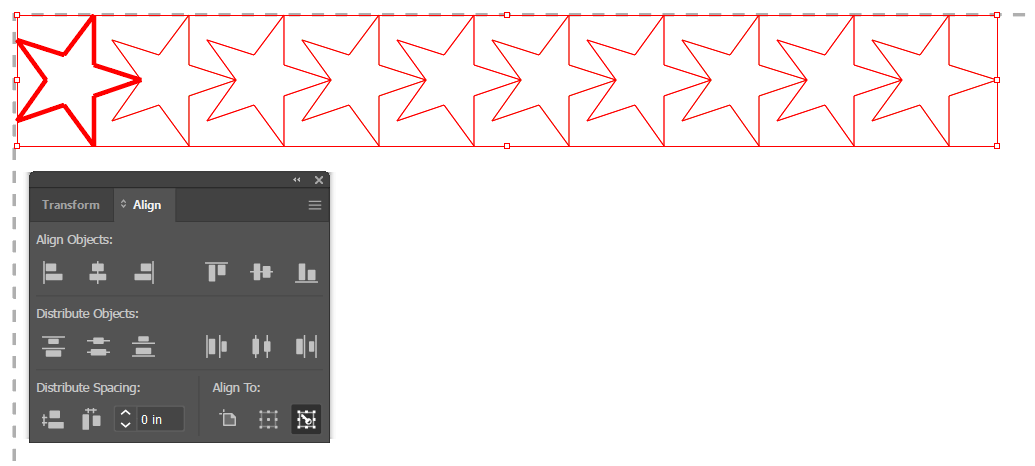
- TIP: You can type fractions (e.g. “1/16 inch”) and Illustrator will convert the fractions and units for you, as necessary.

The Lab’s main laser cutter has a max cutting size of 48" x 27”; your material cannot exceed these dimensions.
Solutions:
- Cut your material down to the appropriate size. Reach out to the Lab or visit us during our Open Lab hours if you require assistance/support with this.
- Be sure to modify your design to match the new material size
The Lab’s main laser cutter has a max cutting size of 48" x 27”; your artboard cannot exceed these dimensions.
Solutions:
- Scale down the artwork to fit within the max. dimensions
- Split the job up into multiple material sheets
- Reach out to the Lab for possible further solutions
- Be sure your file is at a 1:1 scale
- Double check units before sending it off to us to ensure desired results
- The Lab generally operates in inches for laser cutting
- Use the Lab’s templates to ensure proper visualization of the job
- Always make your artboard matches the size of your material
Reach out to the Lab for possible further solutions
