Record lecture components using Zoom
Important information about Cloud Recordings
Please note that Cloud recordings are set to be automatically deleted after 180 days of storage. To ensure the safety of your recordings, we highly recommend downloading them and then re-uploading the files to your TMU Google Drive. This will help preserve your content and prevent any unintentional loss through automatic deletion.
If you have downloaded recordings, you are responsible for the deletion of recordings in accordance with the record retention schedule
Zoom is known as an online meeting platform, but it can also be used to pre-record materials to be shared with your class.
Use this method to:
- Record portions of your lecture, combining presentation slides and narration.
- Record quick tutorials.
- Record messages to your students.
Keep it short and sweet! This is not the place to provide a 3-hour lecture. Short, focused videos of less than 10 minutes each are more effective.
Support
- Zoom's video tutorials (external link)
- Zoom's help center (external link)
- Email the main Help Desk at: help@torontomu.ca using your TMU email address.
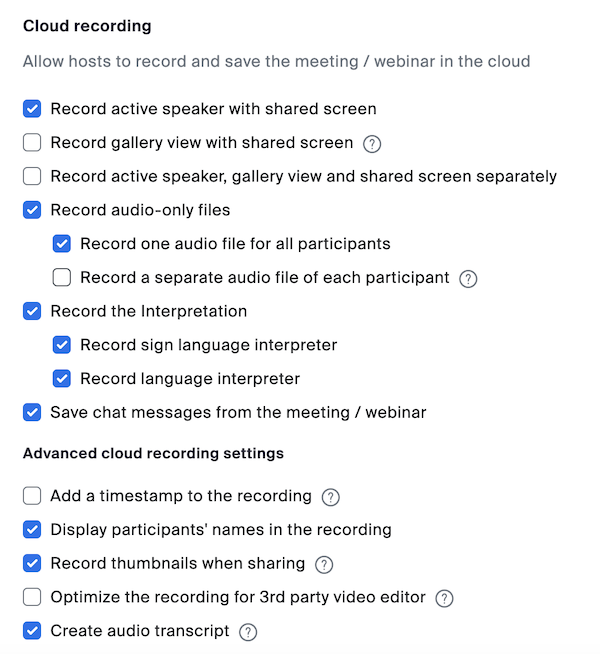
Customize your Cloud Recording settings
- Log in to the Zoom web portal and navigate to the Recordings tab under Settings. (external link)
- Look for the settings under the "Cloud Recording" heading.
Review the options and select the ones that best fit with what you are trying to do. You can see some examples on Zoom's support site. (external link)
Some things to consider
- Do you want to include the speaker video in the recording?
- Do you only want to include the shared screen (which may contain your slide presentation and/or demonstration of computer applications)?
- Do you want separate video files for the active speaker, gallery view and/or shared screen?
- This option is most useful for people who like to edit their videos and want the most control.
- This option is most useful for people who like to edit their videos and want the most control.
- Is this for a pre-recorded lecture component or a recording of a live lecture event? This may impact how much you want to capture in the video!
- Always consider the privacy of your attendees. They may not want to be included in the recorded video.
Some good things to always select
- An audio-only file.
- Save chat messages.
- An audio transcript.
If you only want the presentation in the resulting recording
- Uncheck Record active speaker with shared screen.
- Check Record active speaker, gallery view and shared screen separately.
- New options will appear. Choose Shared screen and any other options you like.
Make sure you save the new settings before moving on.
If you want the speaker video included with the presentation in the resulting recording
Check Record active speaker with shared screen.
Make sure you save the new settings before moving on.
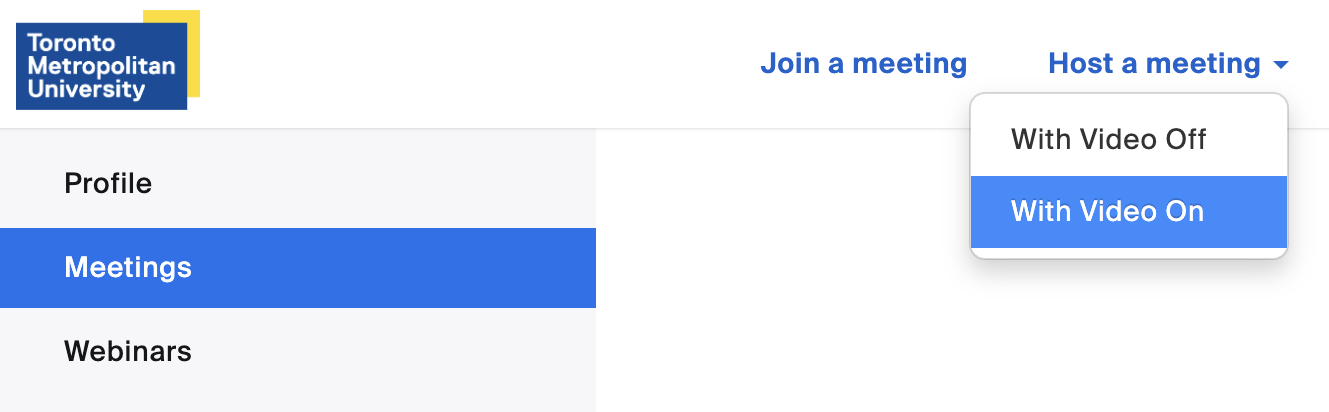
Start a solo meeting
- Select Host a Meeting in the top right corner of the Zoom web portal.
- You can choose whether to start a meeting with your video on or off.
This will start a meeting with yourself as the only participant.
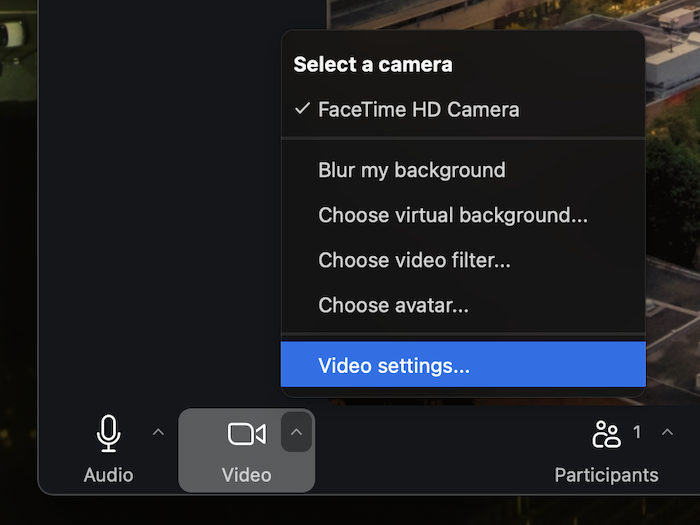
Camera settings
In the meeting, make sure your microphone is not muted and your camera is on.
To ensure you are recording in high definition:
- Select the arrow beside the Video button.
- Select Video settings…
- This will open the Zoom application settings.
- Select the HD checkbox, and any other options that you would like to have enabled.
Sharing your screen
Select the green Share button at the bottom of your screen.
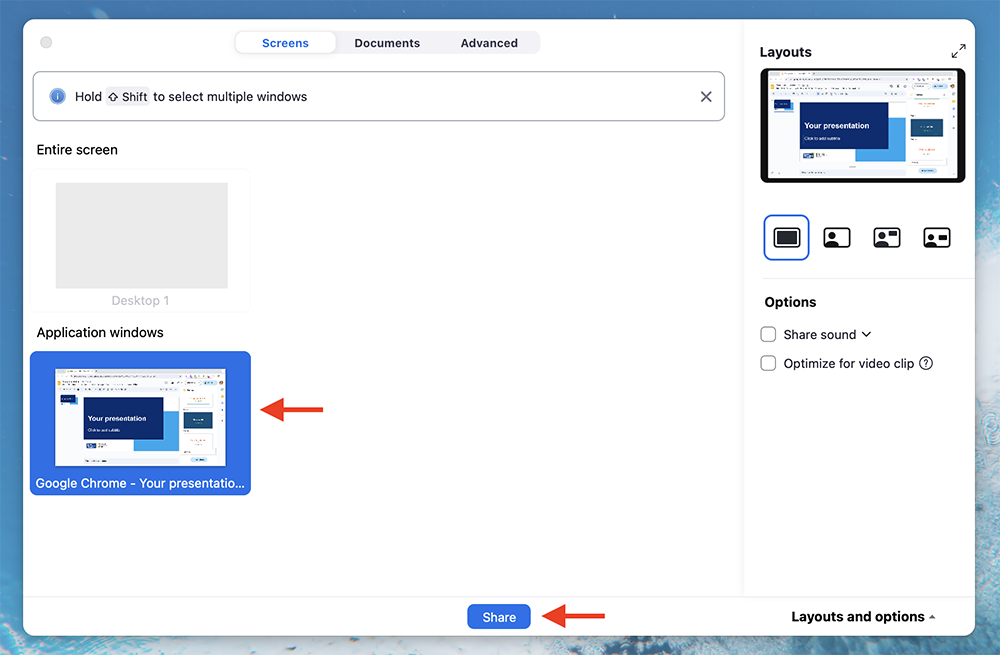
- You will be asked to select which window to share. You can either share your entire desktop or a specific window. Select the window that contains your presentation, and then select Share.
- There are additional layout options on the right side if you are also recording yourself with your webcam.
- If you have videos in your presentation, select the Optimize for video clip checkbox.
- Switch to presentation view within your Google Slides or PowerPoint presentation.
Record to the Cloud
Hover over the top of your screen to reveal the Zoom toolbar. Select the More button, then Record, and then select Record to the cloud.
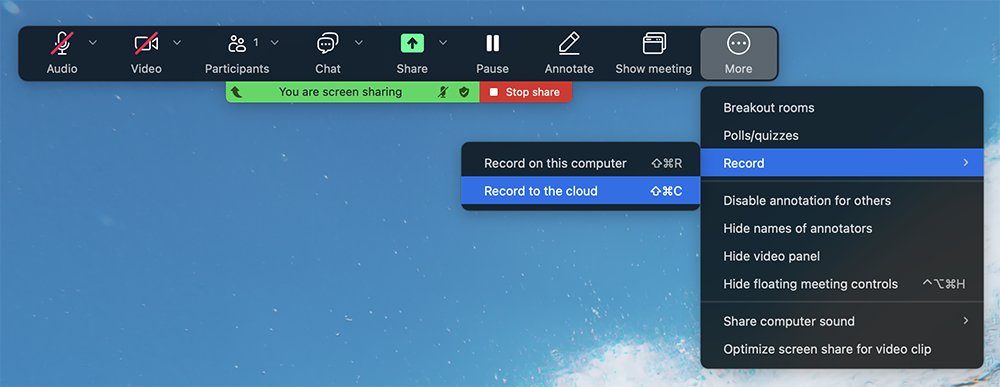
- You will be prompted to start the recording and you may hear a voice tell you that the meeting is being recorded.
- Present your slides. If you are worried about making mistakes or stumbling over your words, please view the speaking tips below.
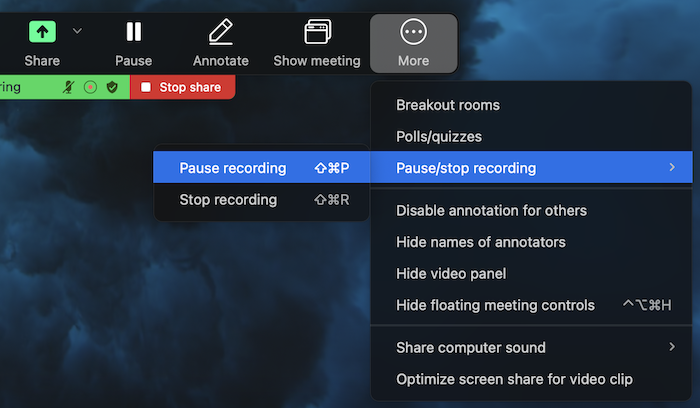
Pause recording
- You can take a break in between slides. Hover over the top of your screen to reveal the Zoom toolbar, select More, and then select Pause recording.
- If you are done recording, you can select Stop recording and Stop share.
Some tips for recording your presentation
Print/write out a script or point-form notes to have beside you as your record. This can also serve as a text-only transcript that you can upload to your course along with the video.
Slow down and take pauses. Not only will it be easier for you to present, it will make it easier for your students to absorb the content.
There's nothing wrong with the occasional stumble. They make your presentation more human. If it’s perfect, you may sound like a robot.
Take a pause in between slides. Hover over the top of your screen to reveal the Zoom toolbar, select More and choose Pause recording. You can then rehearse the next slide(s) before resuming the recording.
If you want to start over, you can hover over the top of your screen to reveal the Zoom toolbar, select the More button and choose Stop recording. Then, Record to the Cloud again. This will create a second (or third, or fourth!) recording without having to set up another meeting, and you can delete the files you don’t need later.
Downloading the recording is important, as the university will not be able to store all cloud recordings indefinitely.
We have been given a limited amount of space - which means that, at some point, recordings must be deleted in order to allow new cloud recordings to be made.
To ensure you retain access to your recording, download it and then delete the cloud recording.
- Wait for the email confirmation from Zoom that your recording is ready. If you selected to have a transcript generated from the audio, this will take a bit longer - a second email will be sent to let you know once this is ready.
- Go back to torontomu.zoom.us (external link) (you may need to sign in again)
- Select Recordings.
- You will likely see that your recording is still processing. This could take several minutes.
- Once it is done, select More, where you can download the files.
- From there, you can edit them (optional) and then delete them from the cloud.
When you download the files, you will also get a “.vtt” file. This is a closed caption file that can be uploaded with the video to either Google Drive or D2L.
Rename your Zoom recording files after downloading! It's worth taking the time to rename the recording file to something clear and concise - so you can easily identify it later.
Google Drive is a great place to host your Zoom recordings, because:
- Google Drive will process your recording so it can be played directly in the web browser.
- You can control who is able to access your recording (and prevent downloading).
- It's easy to embed a Google Drive video in D2L Brightspace.
Create a class shared folder in Google Drive
The next step is to create a folder to contain your videos that is shared with the students.
Did you know that you can request a Google Group (mailing list) with your students as members?
Once you have a class Google Group, you can set up a shared resources folder that makes it really easy to share files with your students. This folder should be set to give the students "read" access -- but you can always create sub-folders inside that allow the students "edit" access, to facilitate collaborative activities.
Upload the video file to the class folder
- Launch Google Drive in your browser. You can find it on the my.torontomu page under “Apps.”
- In Google Drive, open the shared class folder where you would like to save the video. Make sure your students have permission to view the contents of this folder, but not edit it. Some tips for this are included below.
- Open Finder (Mac) or File Explorer (PC) and locate your file.
- Select and drag the video from the folder on your computer to the Google Drive folder.
- After uploading, edit the sharing settings on the video so that it cannot be downloaded or shared.
Some tips for creating a folder to share your recordings
Each course should have its own folder where students can view the video but cannot edit it. This will protect the video from being deleted or replaced.
When naming the folder, consider including a word that will remind you that the contents are shared with the students an being accessed regularly (i.e. "LIVE" or "SHARED")
Remind students they must be logged into their browser with only their TMU Google account. If they are logged in with a personal account, the video won’t play for them. Encourage them to use one browser (Chrome or Firefox) just for schoolwork to avoid confusion.
Captions are critical for people who cannot hear well or at all, but captions can benefit everyone!
When recording to the Zoom Cloud, a transcript will automatically be generated in VTT format. While this isn't a compatible subtitle format for many media players, it can be converted into one that is, or it can be uploaded as an accompanying transcript.
Step 1: Edit the transcript for accuracy
Accurate captioning of at least a 99% accuracy is the only way to ensure that people who are D/deaf or hard of hearing can understand audio content. Automatic captions should never be used as a substitute for captions. However, it is much easier and timely to use an automated transcript as a starting point when creating accurate captions.
Under Cloud Recordings (external link) , find your recording. Select the Play thumbnail to open up the Zoom media player. Navigate to the Audio Transcript panel on the right and select the pencil icon next to the phrase you want to edit. You can adjust the speed of the video if it makes it easier to make corrections.
Step 2: Download recording and corrected audio transcript
If re-uploading your recording to Google Drive, Stream or any video hosting platform, you will need the movie and transcript file. Select Download in the top right corner, or download the files individually from the previous screen. The Zoom recording and transcript will download as a .MP4 and .VTT file.
Step 3: Upload captioning file or text transcript
Closed captioning is preferred for people who rely on captioning to fully comprehend a video. However, you can also include a Google Doc or Microsoft Word attachment of the transcript.
Closed captions
- Double-click on the video in Google Drive to launch it.
- Here, you can add the VTT file to the video for closed captions:
- Select the three-dot icon at the top-right which will show more actions. and select manage caption tracks. This will open a new tab in your browser.
- Select the plus button beside add new captions tracks and add the VTT file.
- Close the browser tab to return to the video preview.
- Select the three-dot icon at the top-right which will show more actions. and select manage caption tracks. This will open a new tab in your browser.
If you receive any captioning error messages, convert the VTT file into SRT format (third party tool) (external link) .
Transcript
Transcripts are great as they can be annotated and are print friendly. Although, when it comes to watching videos, closed captioning is preferred. The transcript file is a VTT file containing timestamps. Use a subtitle to plain text converter (third party tool) (external link) to make the VTT file readable and user friendly. If privacy is a concern, you can also open the VTT file in most modern text editors such as Notepad on a Windows PC or TextEdit on a Mac by right clicking and selecting "Open with". You can then copy and paste the transcript into Google Docs or Microsoft Word and include it as an attachment with your recording.
- In Google Drive, select the Share option for your video. (If you are in the folder, right-click the video and select Share).
- At the bottom of the window that pops up, select Copy link. This will copy the address (URL) of the video, which you can paste into D2L Brightspace.
- You may choose to prevent students from downloading this video. Please do this with caution, however, as some students may greatly benefit from being able to access your materials without being on the internet.
- Select the Settings ()button in the upper-right corner of the pop-up window.
- Here you can uncheck the box labeled Viewers and commenters can see the option to download, print, and copy.
- To post the video to the Content tool in D2L Brightspace:
- Open D2L and navigate to the content module where you wish to add the video.
- Select the Upload/Create button in the module and choose Create a Link. Give the link a title and then paste the URL into the URL field. Select Create.
Zoom general information
Zoom is a live streaming and web conferencing tool for online meetings & seminars in real-time.

