How to set up recurring tutorial sessions for TAs/GAs
This guide explains how to set up recurring tutorial sessions for teaching and graduate assistants (TAs/GAs).
Support
- Zoom's video tutorials (external link)
- Zoom's help center (external link)
- Email the main Help Desk at: help@torontomu.ca using your TMU email address.
There are a few different ways to approach this, but we recommend these two workflows:
In Option 1, the instructor creates all of the Zoom meetings for the tutorials. This can ensure the instructor maintains ownership of the meetings and recordings, but has a few drawbacks.
In Option 2, the TA/GA creates the Zoom meetings for their own tutorials, but transfers the resulting recordings to the instructor through Google Drive.
Why use this method?
- The instructor can ensure all tutorials have the same settings.
- The recordings of all sessions are saved to the instructor's Zoom account.
- The instructor can re-assign a tutorial to a different TA/GA if needed.
Do not use this method...
- If any of your tutorial sessions happen concurrently. Zoom does not permit a user to host multiple meetings at the same time (external link) , and may close all other Zoom meetings created by that host at that time!
- If your TA/GAs need to be able to run polls during the meetings. This can only be done by the person who originally created the meetings.
Considerations
- If you have many tutorial sections, this may be a lot of work for the instructor.
- The TA/GA must enter the room first so that they are given the "host" role.
- Co-hosts (the TA/GAs) will not see these meetings listed when they log into Zoom; they will be relying on the link provided by the instructor.
Schedule a meeting
- Log in at torontomu.zoom.us (external link)
- Select Meetings from the side navigation on the left, then select the Schedule a Meeting button on the right.
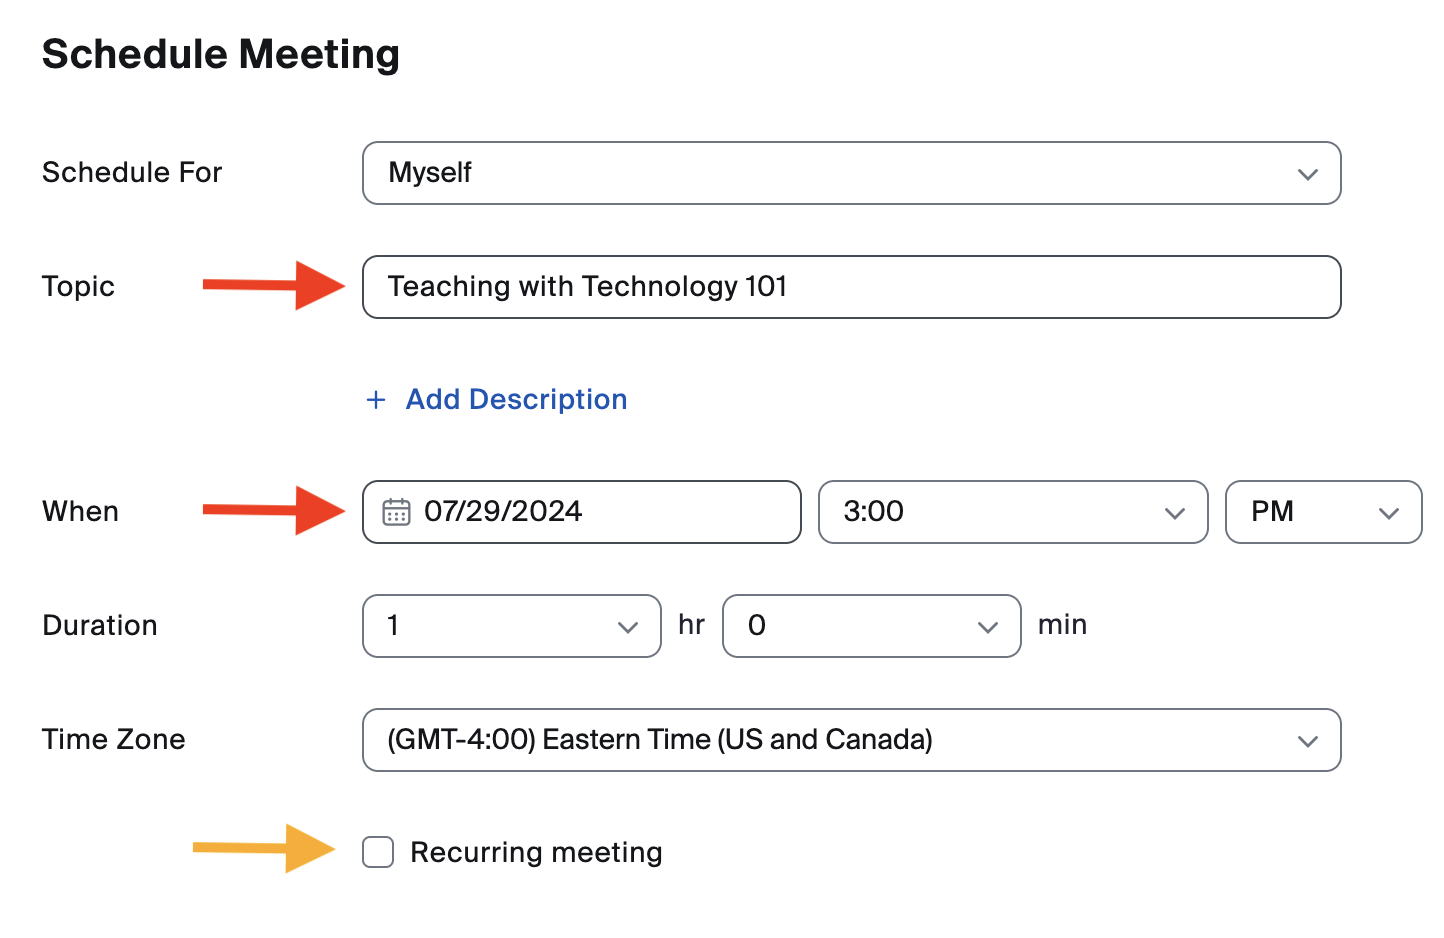
- Under topic, make sure to give the session a clear name so you can distinguish between the tutorials easily.
- Enter the date and time of the first meeting.
- Select the Recurring meeting checkbox.
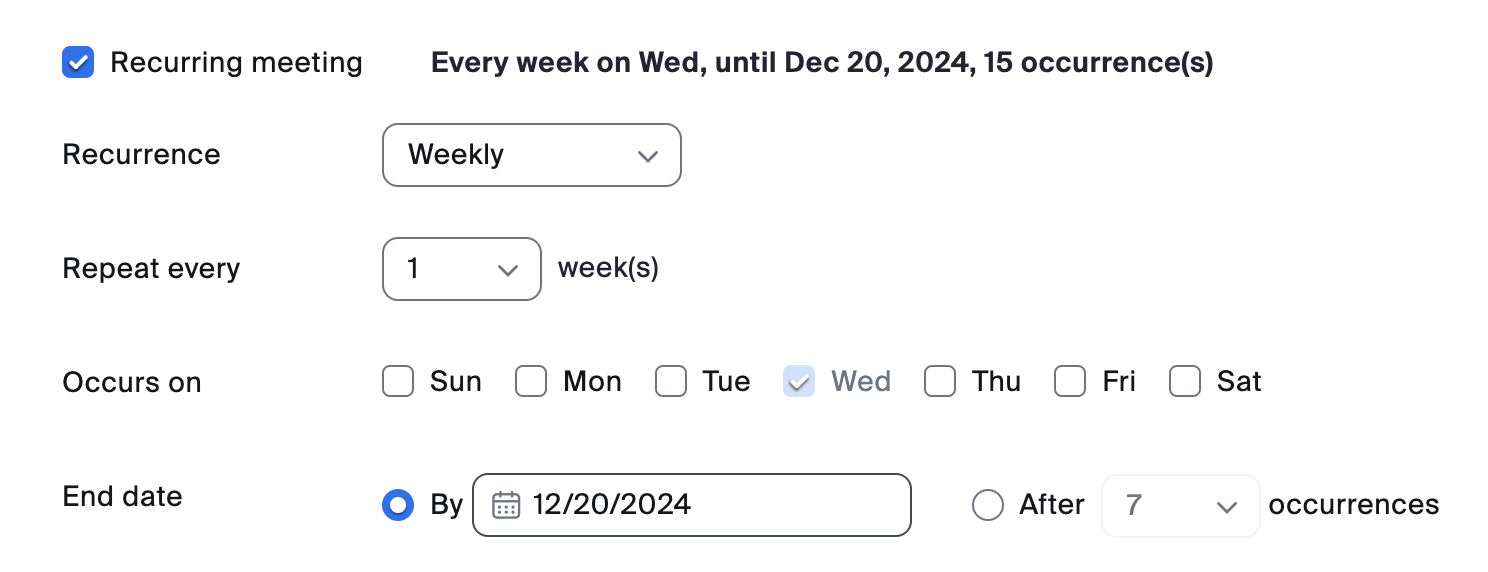
Recurring meeting
- If the tutorial happens once a week, change the Recurrence to Weekly.
- Select the days that the tutorial occurs.
- Select End Date and select the last day of the semester.
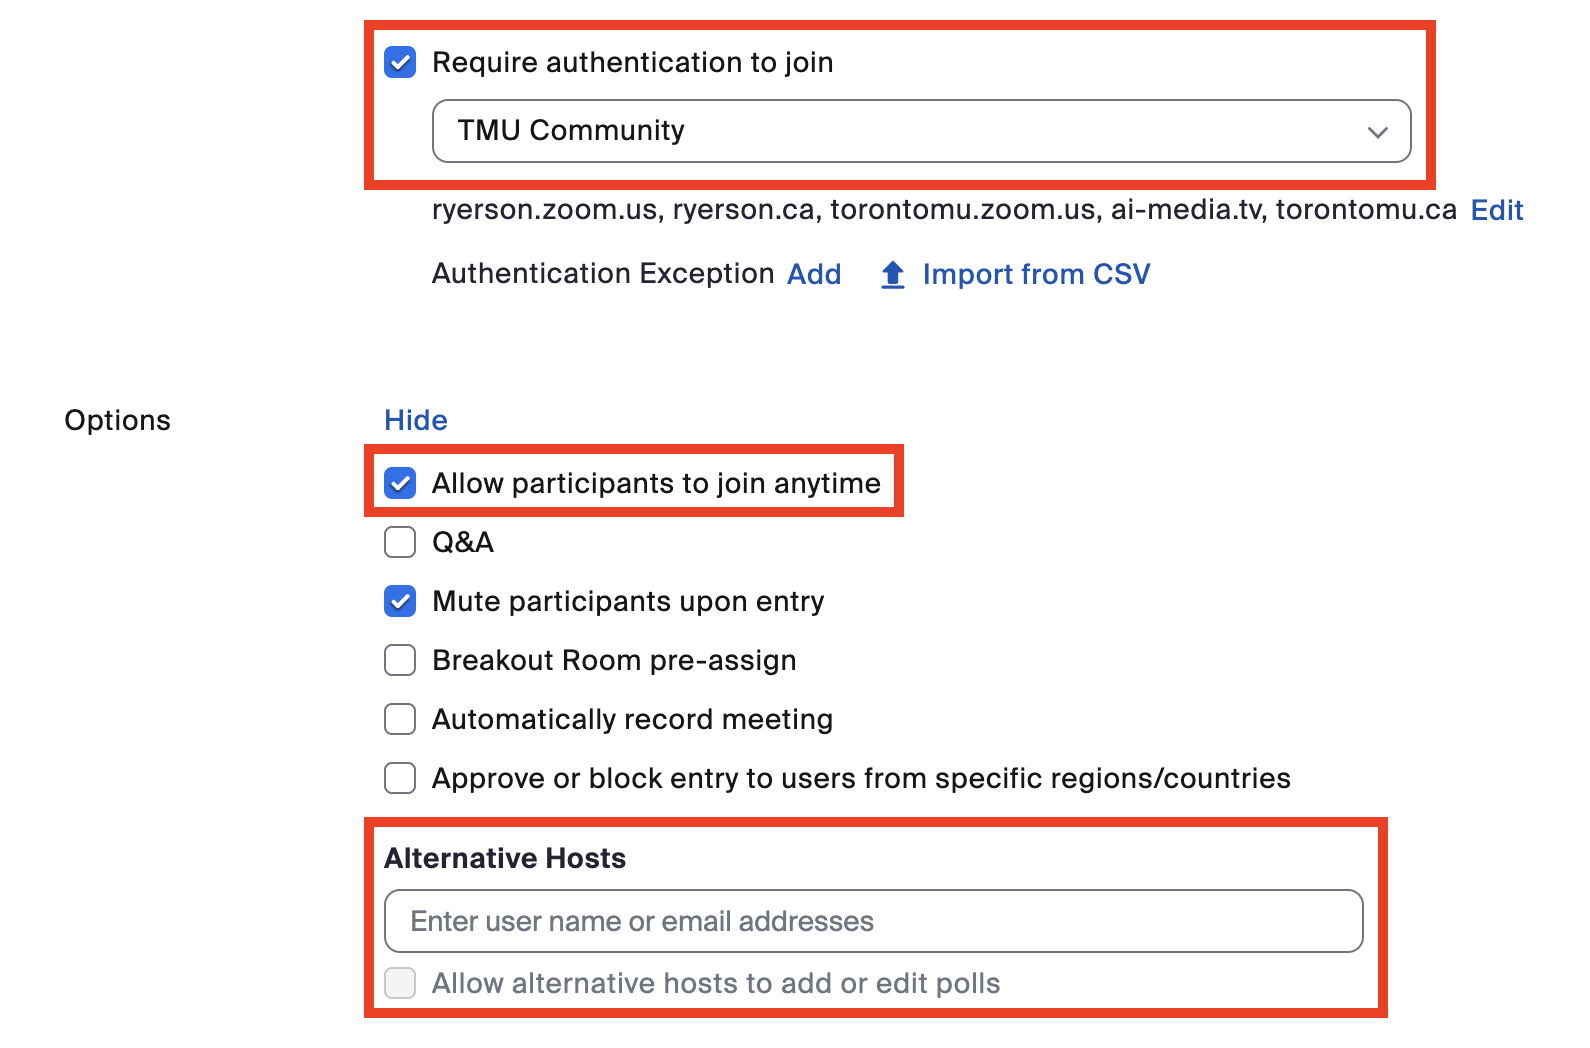
Additional meeting options
- Under meeting options, be sure to check Allow participants to join anytime and Require authentication to join.
- Check Mute participants upon entry, to prevent background noise.
- You can add teaching assistants to the Alternative Hosts field which will give them some administrative controls over the meeting.
- If you don’t have the names of your TAs/GAs yet, you can add them later by editing the meetings.
Important note about the "Require authentication to join" option
This option will require participants to sign-in to Zoom with their TMU credentials, minimizing the risk of unwanted guests joining the room. Before joining a meeting, your participants must sign in to the Zoom desktop or mobile app using Single Sign On (SSO).
External attendees
For external attendees, you can pre-select an authentication exception option. Invited guests will then be able to join your session without needing to authenticate their Zoom account with the "TMU Community" authentication profile.
View instructions on how to add authentication exceptions, (external link) or select the Add button beside “Authentication Exception” to enter any non-TMU guests’ names and email addresses as referenced in the screenshot above.
- Log in at torontomu.zoom.us (external link)
- Launch the meeting using the meeting link provided by the professor/instructor.
- In the toolbar at the bottom of the screen, select Participants to see the list. Beside your name you should see “(host).”
- If the professor/instructor has set up the waiting room, you will see students arrive at the top-right of your screen. You will need to admit the students into the meeting.
- You may have been asked to record the sessions. This may happen automatically. If so, a warning will pop up when you start the session and the same warning will appear for the students as they join the call. If not, you will need to select Record in the toolbar and select Continue in the window that pops up.
- At the end of the session, select End and choose End meeting for all. This will end the session and the recording.
Why use this method?
- If there are many tutorial sessions, this is less overhead work for the instructor.
- Since the TA/GA is the creator and host of the meeting, there is no worry that the instructor will accidentally close all simultaneous tutorials.
- The TA/GA will be able to run polls during the meetings.
- As long as the TA/GA adds the instructor as an alternative host for the session, they can still join the tutorials (just be sure to allow the TA/GA to enter first).
Considerations
- The TA/GA's Zoom account will be the owner of any resulting recordings.
- TA/GAs would be required to provide the instructor with a copy of all recordings, then destroy any recordings in their own accounts.
- Instructors should be sure to provide the TA/GA with a list of settings, to ensure all tutorials are set up in the same way.
- The instructor would not have the ability to re-assign a tutorial meeting to another TA/GA if required.
Schedule a meeting
- Log in at torontomu.zoom.us (external link)
- Select Meetings from the side navigation on the left, then select the Schedule a Meeting button on the right.
- Under topic, make sure to give the session a clear name so you can distinguish between the tutorials easily.
- Enter the date and time of the first meeting.
- Select the Recurring meeting checkbox.
Recurring meeting
- If the tutorial happens once a week, change the Recurrence to Weekly.
- Select the days that the tutorial occurs.
- Select End Date and select the last day of the semester.
Additional meeting options
- Under meeting options, be sure to check Allow participants to join anytime and Require authentication to join.
- Check Mute participants upon entry, to prevent background noise.
- Under Alternative hosts, enter the instructor's email address.
Important note about the "Require authentication to join" option
This option will require participants to sign-in to Zoom with their TMU credentials, minimizing the risk of unwanted guests joining the room. Before joining a meeting, your participants must sign in to the Zoom desktop or mobile app using Single Sign On (SSO).
External attendees
For external attendees, you can pre-select an authentication exception option. Invited guests will then be able to join your session without needing to authenticate their Zoom account with the "TMU Community" authentication profile.
View instructions on how to add authentication exceptions, (external link) or select the Add button beside “Authentication Exception” to enter any non-TMU guests’ names and email addresses as referenced in the screenshot above.
- Log in at torontomu.zoom.us (external link) or via the desktop app with SSO. Since you created the meeting, it will be listed in your upcoming meetings.
- In the toolbar at the bottom of the screen, select Participants to see the list. Beside your name you should see “(host).”
- If you have set up the waiting room, you will see students arrive at the top-right of your screen. You will need to admit the students into the meeting.
- You may have been asked to record the sessions. If you set up the meeting to automatically record, a warning will pop up when you start the session and the same warning will appear for the students as they join the call. If not, you will need to select Record in the toolbar and then select Continue in the window that pops up.
- At the end of the session, select the End button and choose End meeting for all. This will end the session and the recording.
Download all of the meeting files from Zoom
- Wait for the email confirmation from Zoom that your recording is ready. If you selected to have a transcript generated from the audio, this will take a bit longer - a second email will be sent to let you know once this is ready.
- Go back to torontomu.zoom.us (external link) (you may need to sign in again)
- Select Recordings.
- You will likely see that your recording is still processing. This could take several minutes.
- Once it is done, select More, where you can download the files.
- From there, you can edit them (optional) and then delete them from the cloud.
When you download the files, you will also get a “.vtt” file. This is a closed caption file that can be uploaded with the video to either Google Drive or D2L.
Rename your Zoom recording files after downloading! It's worth taking the time to rename the recording file to reference the course code and tutorial, as well as the date or week.
Upload the meeting files to the shared Google Drive
Once you have all of the files from Zoom, upload them into the folder you created. Since each session may result in a number of files, you may want to create a sub-folder inside the main folder for each session.
Zoom does not support concurrent meetings
Zoom does not allow a user to host multiple meetings at the same time. If the host attempts to have concurrent meetings by scheduling two or more meetings at the same time, you and any alternative hosts may experience various issues or warnings. These issues will occur even if you designate an alternative host or enable the "join before host" option.
Zoom general information
Zoom is a live streaming and web conferencing tool for online meetings & seminars in real-time.
- Accessibility in ZoomPage Description:Discover and customize Zoom's accessibility settings to meet your specific needs.
- Additional features for hostsPage Description:Learn about additional Zoom features to help you manage your meeting room or make it more interactive.
- Changing your name in a Zoom meetingPage Description:If you need to change how your name appears in Zoom, follow these steps in the Zoom interface.
- How to create polls in ZoomPage Description:The polling feature in Zoom allows you to create single choice or multiple choice polling questions during your meeting.
- How to host a meetingPage Description:How to host a virtual meeting or classroom in Zoom.
- How to set up recurring tutorial sessions for TAs/GAsPage Description:How to set up recurring tutorial sessions for teaching and graduate assistants in Zoom.
- How to sign in to Zoom with Single Sign On (SSO)Page Description:For your safety, some meetings require you to authenticate with your TMU credentials. Before joining a meeting, we recommend you sign in to the Zoom desktop or mobile app using Single Sign On (SSO).
- Record lecture components using ZoomPage Description:Zoom is known as an online meeting platform, but it can also be used to pre-record materials to be shared with your class.
- SecurityPage Description:Zoom has several security features to keep your meetings safe.
- Zoom Breakout RoomsPage Description:Breakout Rooms allow you to split your Zoom meeting into small groups automatically or manually. Breakout rooms mimic in-person small group discussions, separate from the main meeting.
- Zoom for Google Workspace add-onPage Description:With the Zoom for Google Workspace add-on, you can use Zoom to easily schedule, join, manage, and customize meetings from GMail and Google Calendar.
- Zoom WhiteboardPage Description:Zoom Whiteboard is a digital collaboration tool that replicates the experience of using a physical whiteboard in a classroom.
