Using iClicker and Zoom

iClicker (external link) is the institutionally supported classroom response system.
In remote courses, you may need to use iClicker and Zoom together.
Disclaimer: there is a student fee associated with using iClicker. Some departments may decide to purchase licenses for their students. Please check with your department.
Support
Instructors
- Instructor guide
- For instructor support, please email dmp@torontomu.ca.
Students
- Student guide
- For student support, please email clickerhelp@torontomu.ca.
Ready your Presentation
The iClicker Cloud system integrates with your powerpoint presentations. Have your presentations prepared and ready to be presented to your students.
Signing In and Starting a Class
- Open the iClicker Cloud application that you have previously downloaded on your device.
- Sign in to your iClicker Cloud account.
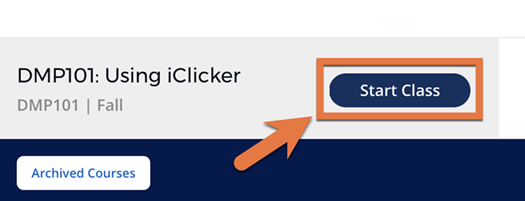
- Select the course that you would like to start a session with and click 'Start Class' in the upper right corner.
You will notice that the iClicker Cloud application will launch the iClicker navigational polling bar on your screen.
Launch Zoom
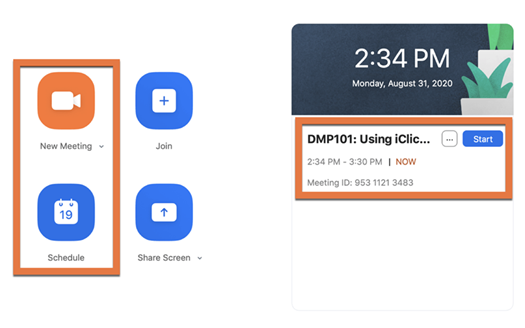
Once your iClicker Cloud software has been set up, launch the Zoom application located on your desktop.
From here, you can access a scheduled meeting that you have created for your class or create a new meeting.
Share your Screen
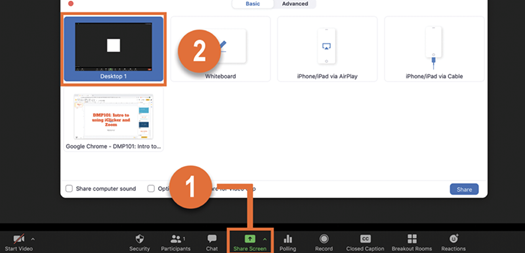
- When you are ready to present your powerpoint presentation, click 'Share Screen' located on the bottom bar of the Zoom application.
- Select the option that says 'Desktop 1,' this will allow students to see all windows on your device including Zoom, Powerpoint and the iClicker Cloud software.
Important: Please close any private or confidential windows you have open on your device.

Presenting your Powerpoint Presentation
After sharing your screen, present your powerpoint. Note: this will enter you into fullscreen mode.
Zoom has a built in navigational bar as iClicker does, and so you are still able to control your Zoom meeting using this bar.
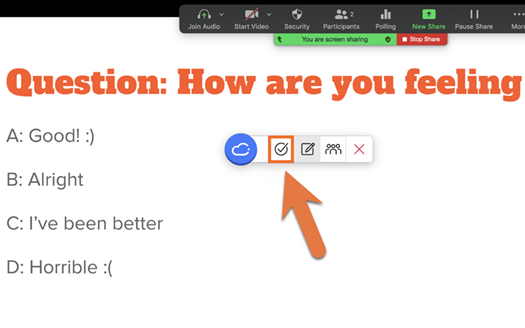
Using the iClicker Polling Tool
Once your presentation requires the iClicker polling system, click the circle with the checkmark icon in order to begin a polling session.
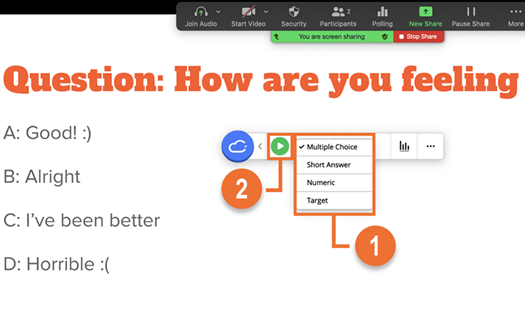
Selecting a Polling Type and Starting the Poll
- Select a polling type from the drop down menu.
- Once you are ready, click the play button located to the left of the drop down menu.
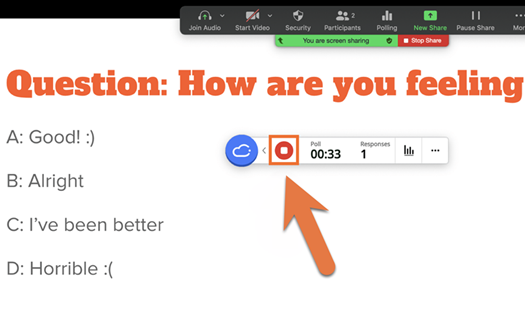
Ending a Poll
Give your students time to answer the questions. Once you are ready to end the poll, click the stop button located on the iClicker navigational polling bar.
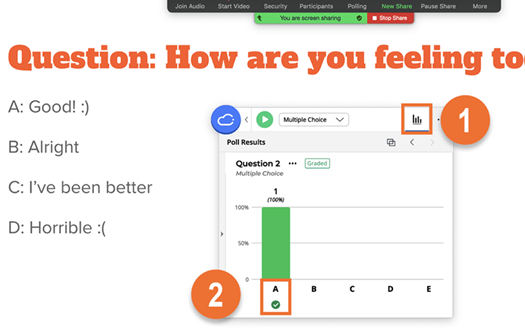
Viewing Results, Sharing Results & Grading
- You have the ability to view and share the results of the poll. Click the graph icon located on the iClicker navigational polling bar to do so.
- The polling tool by default has no grade or mark component active. This allows you to poll your class' opinions without them worrying about having a correct answer. However, in a situation where you would like to appoint marks to questions, select the answer that is correct by clicking on the letter that corresponds to the correct answer. In this example, 'A' is correct and so you will click 'A' to designate it as correct.
Note: You are not obligated in any capacity to select the correct answer during the lecture. If you would like to perform this action after the lecture, you can access this function by clicking 'Class History' in your iClicker Cloud (external link, opens in new window) account.
Ending your Presentation and Class
When you are ready to end your presentation:
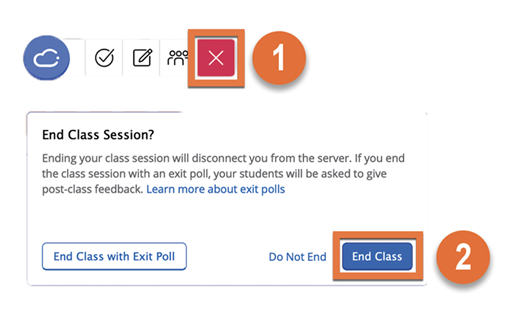
- Click on the X icon located on the iClicker navigational polling bar.
- A pop-up will display, click 'End Class.'
iClicker Exit Polls
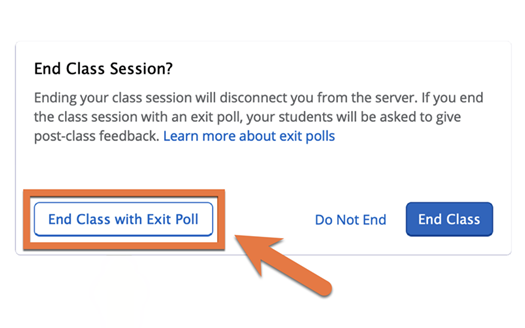
You will notice that when you click on the X icon, a pop-up will appear asking you if you would like to conduct an Exit Poll. This allows you to poll your students in the same fashion as previously and allows you to gain insight on how they felt about the lecture.
To do this, click 'End Class with Exit Poll.'
However, if you would like to end your class without an Exit Poll, click 'End Class' located on the right hand side of the window.
Stop Sharing your Screen
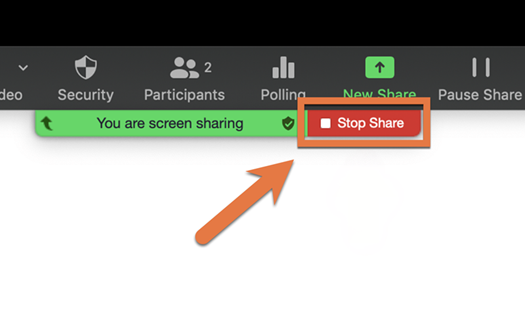
Once your iClicker session has ended, you may stop sharing your screen on Zoom. To do this, click on the 'Stop Share' button located on the Zoom navigational bar.
iClicker general information
Learn about iClicker, the TMU-supported classroom response system, which enables instructors to engage students in the learning environment through real-time multiple-choice questions.
