Use Intelligent Agents to send targeted email
The Intelligent Agents tool allows Instructors to set up automatic notifications to be sent to themselves, advisors, and students when specified course performance criteria are met.
It can be used to both recognize student achievement (e.g., a high score on a quiz) and warn of potential problems (e.g., lack of online activity or poor performance on an exam).
An Intelligent Agent will send an email for each user that matches the criteria you have outlined. If 50 students match, this will result in 50 separate emails.
If Intelligent Agents are copied from one shell to another, they are automatically disabled to prevent unwanted emails from being sent.
Unless you have specified the time, scheduled intelligent agents run at approximately 4:00 PM (Canada - Toronto), and will only run if the shell is active, and the agent is enabled.
Find the Intelligent Agents in the Course Admin section of your shell.
Before you begin, you will need to consider what criteria you will need to create your recipient list.
- Who do you want to email?
- What is the purpose of the email?
If it is based on their achievement in a grade, make sure you have a grade item that is appropriate for that purpose, and decide what the threshold will be for a student to receive the email (for example, send an email if a student receives 80% or higher on the Midterm Exam).
Since Intelligent Agents can make use of Release Conditions, your list of possible criteria is fairly broad.
Here are a few examples of when you might want to run an Intelligent Agent:
- When a student has been added to your shell, send them a "Welcome" email that spells out expectations, how to get started, etc.
- If you have concerns about students not submitting an assignment on time, you could set an intelligent agent that checks several days before the due date, and sends a reminder email to any students who have not submitted yet.
- You could set an intelligent agent that sends you, the instructor, an email when students have earned an award, achieved a particular grade or viewed (or not viewed) a particular piece of content.

You will find the Intelligent Agents tool by going to the Course Admin of your course shell, in the "Communication" section of the page.
- Start a new Intelligent Agent by clicking the New Agent button at the top of the page.
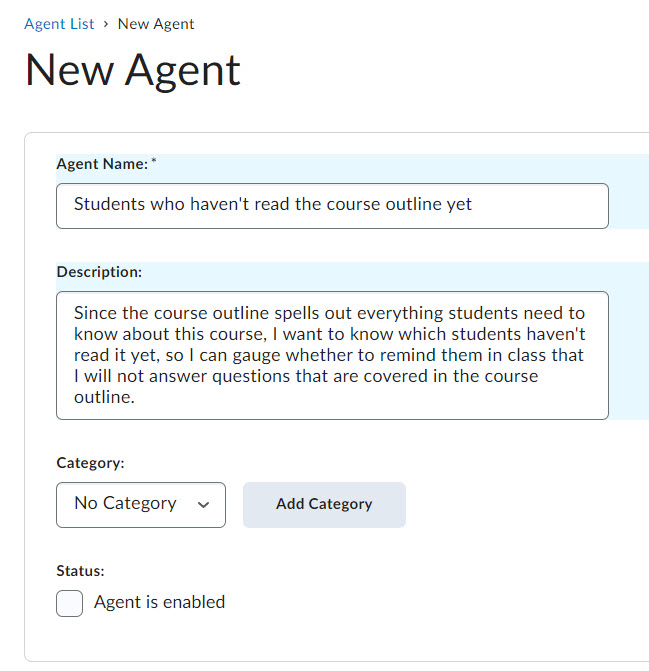
Give the new agent a name. Only the teaching team (instructors, TAs, etc.) see the name of an Intelligent Agent - so make sure it's meaningful to you.
Similarly, add a description that tells you what the agent does.
If you will create a lot of Intelligent Agents, you may want to keep them organized by adding the new agent to an existing or new category. If you will only have a few agents (<10), you don’t need to use categories.
For now, do not check the box to enable the agent yet. This will be done after everything has been set up and tested.
Proceed to set the frequency that emails for this agent will be sent out.
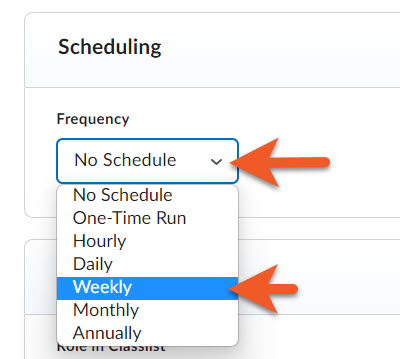
Scheduling
Intelligent Agents can be run manually, or they can be scheduled to run automatically.
If you want the Intelligent Agent to run automatically, you will need to set a schedule.
- Click on the Frequency dropdown
- Select an option:
- No Schedule - You will edit the Intelligent Agent later to request a one-time run, or to set a different frequency.
- One-Time Run
- Hourly
- Daily
- Weekly
- Monthly
- Annually - Note: Most courses are only 1 term, so this will not be relevant. This might be useful for an organization.
- Once you select the type of repeat, you will be offered additional setting options
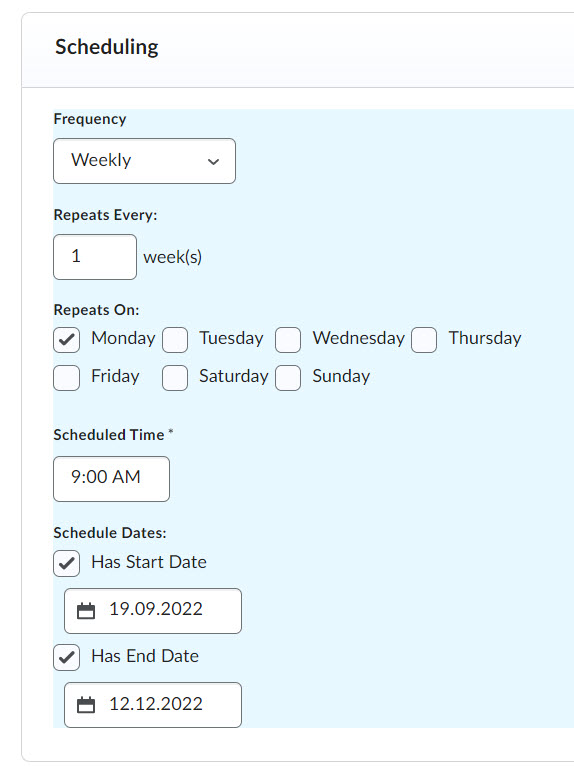
Depending on the frequency you choose, you will see different options.
In this example, you can see the settings for a weekly agent that runs every Monday at 9am, from September 19th until December 12th.
Schedule dates: The schedule will only run between these days, allowing you to focus the Intelligent Agent on certain times of year (i.e. if it should run weekly, starting in the 2nd week of classes, until the final week of classes)
NOTE: Intelligent Agents will only run on schedule if the shell is active AND the agent has been enabled.
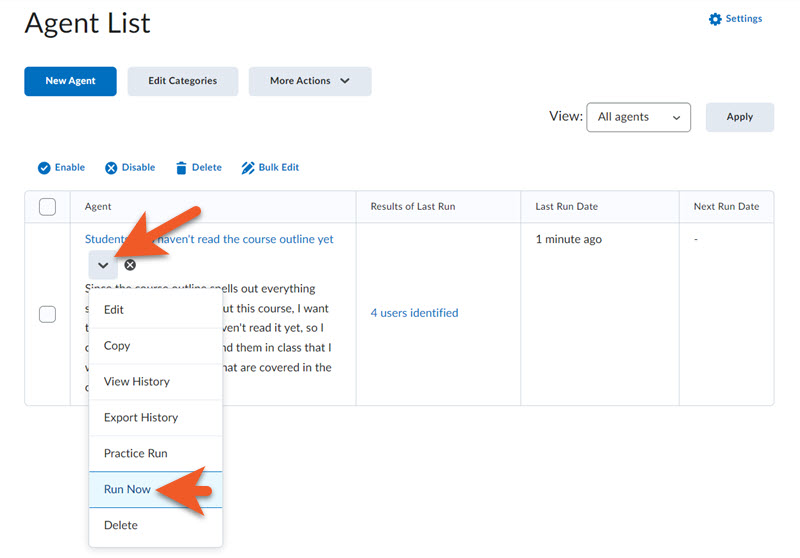
Run an Intelligent Agent manually
This is a great option if you don't want the agent to run automatically, and you just want to run it as needed.
- Click the arrow icon to the right of the name of the agent you want to run.
- From the dropdown menu, select "Run Now" and follow the on-screen prompts to complete the process.
You will receive a confirmation email once the agent has run, letting you know that the agent has completed.
If you are the recipient of the resulting emails, you will receive an email for each user that matches the criteria.
Next, you will need to set the criteria that is used to determine whether an email is sent out.
There are three types of criteria that can be applied, either individually, or in combination:
- User roles
- User activity
- Release conditions
Each of these criteria serve to narrow the list of people whose activity will trigger the Intelligent Agent email.
NOTE: While it is possible to save your new Intelligent Agent without selecting any criteria, please keep in mind that without any criteria, your IA will likely not behave the way you expect.
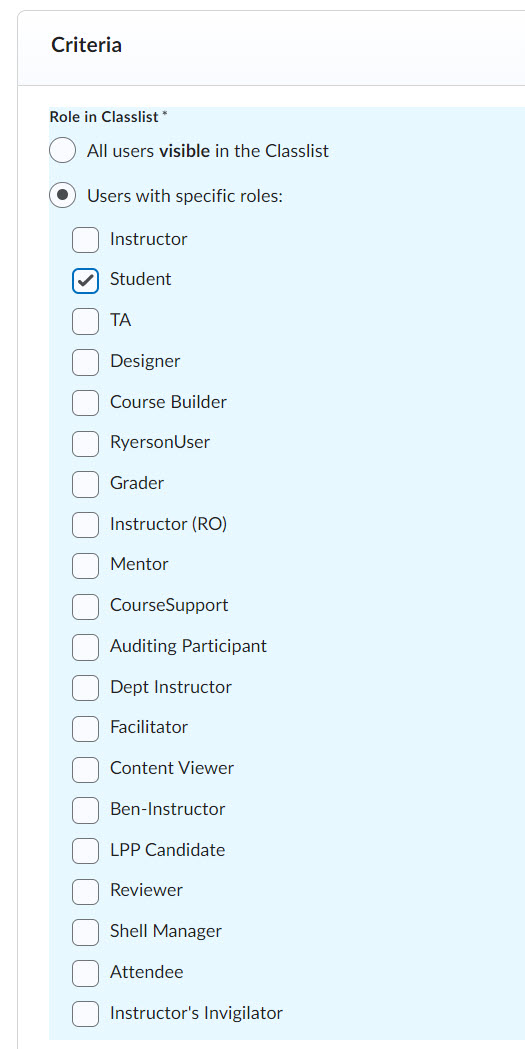
Roles
Determine which users (by role) will need to match the criteria - in most cases, this will be your learners ("Student" and "Auditing Participant" in official courses, possibly "Attendee" in certain types of professional development courses).
If you aren't sure which roles apply to the people in your course, check your Classlist!
Any further criteria set will only apply to those with the role(s) you have selected here.
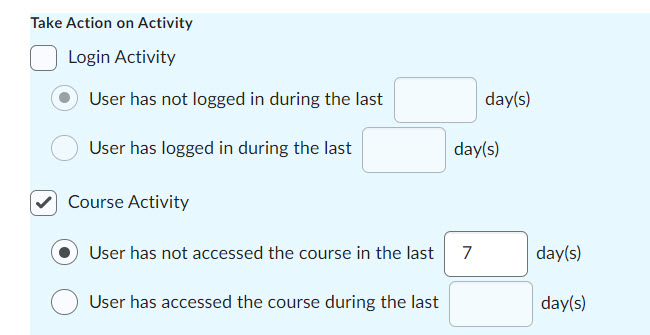
User Activity
If you want your Intelligent Agent to identify people who have or have not been interacting with Brightspace or with your course (in general), select one of these options.
- Login activity - refers to general access to Brightspace (but not necessarily your course shell).
- Course activity - refers specifically to access of this course shell
You can identify users who have or have not interacted within the last x number of days.
*Be sure to check the box for the type of activity to apply to this Intelligent Agent, then enter the number of days into the appropriate field.
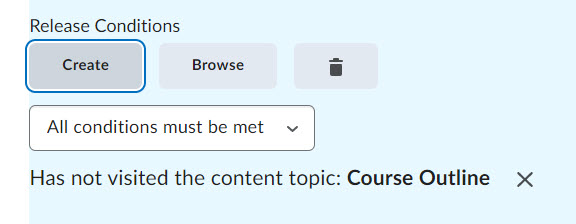
Release Conditions
This is where things can get very interesting, but a little bit more complicated.
Release conditions are criteria based on specific areas of your Brightspace shell, including:
- membership in a section or group
- grades in the gradebook
- submissions to quizzes and assignments
- viewed content
- completion of checklists
... and much more!
Be mindful of whether your agent requires users to have met ANY or ALL conditions that you have set in the Criteria section, as the results can be quite different.
In this example, the instructor wants to receive an email for each student who has not yet viewed the course outline. (If you have a large class, you might want to wait a few weeks and remind students a few times before running an agent like this one, or you might receive a lot of agent emails!)
For example, you can send an email to students who achieved over 80% on the midterm grade, or to students who have not yet submitted their final assignment.
Click "Save", at the bottom of the page, to save your changes as you go!

Repetition
Do you want to trigger an email every time someone matches the criteria - or only the first time?
Keep in mind that this doesn't relate to how often a student completes a task listed in the criteria, but how often they will match the criteria.
Here are some tips to ensure you don't spam your students (or yourself) with emails...
Opt to take action "only the first time" for criteria that will not change over time:
- students who are enrolled in this shell
- students who are members of section 011
- students who got over 80% on their midterm
- students who contributed to a specific class discussion
- students who achieved a specific award
Think of these emails as a one-time recognition of the completion of a task or achievement of a grade or award. As these things will continue to match each time, you don't want to spam your class with emails every time the agent runs.
Opt to take action "every time" for criteria that may change as the person engages with the course shell:
- students who haven't been in the course shell in over 2 weeks
- students who haven't submitted to an assignment
- students who haven't contributed to a discussion
- students who haven't viewed a vital piece of content yet
Think of these emails as reminders and resources that are provided until those tasks are completed.
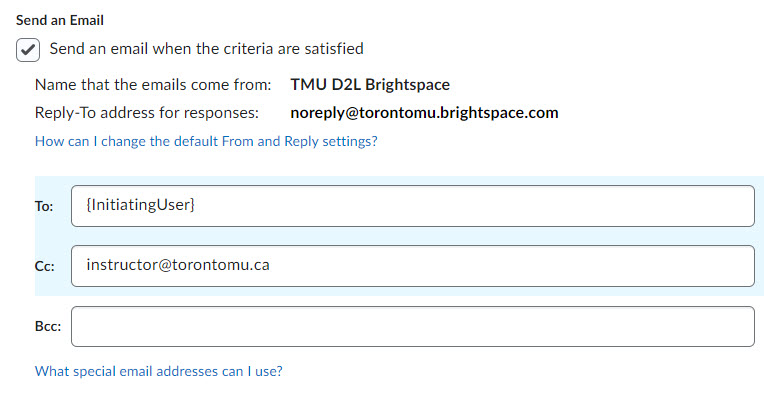
Who will receive this email?
How do I email the students who match the criteria?
There is a special variable that you can include as a recipient that will email the specific user who matched the criteria (usually the student).
Add {InitiatingUser} to the TO, CC or BCC field.
To vs Cc or Bcc
Use the TO field to include the address of the main recipient of the email. If the email content is directed to the student, use the TO field for their email address. If you will also include yourself (the instructor) or your teaching team, you can add these email addresses into the BCC field.
If the email content is directed to you or the teaching team, feel free to put these addresses into the TO field.
We do not recommend using Intelligent Agents to send emails to those outside of the teaching team.
Bcc is used to send the email to someone without having their email address visible to the other recipients.
Who is the "sender" of the email?
By default, the sender of the emails is "email@torontomu.brightspace.com" - and the display name of the sender is TMU D2L Brightspace.
You (the instructor) can change the display name of the sender as well as the reply-to address (see the "Settings" area of the Intelligent Agents tool for options).
Note that you cannot change the actual email address that the email comes from.
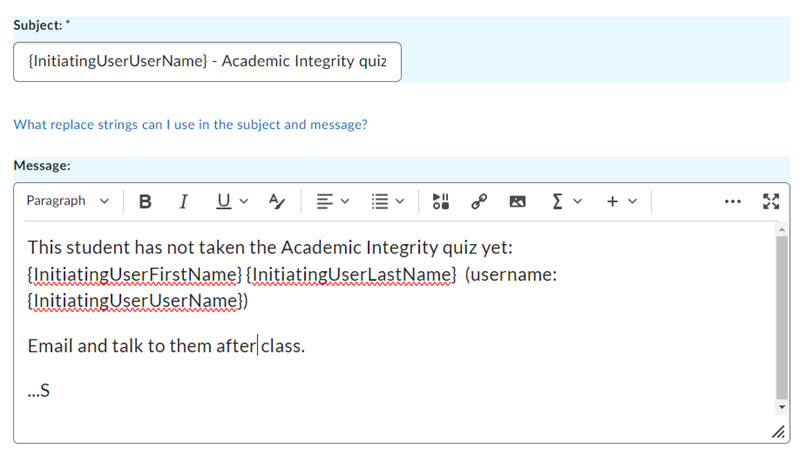
Crafting the email
Like in a regular email, the subject and message body need to be clear and concise.
What needs to be in the subject to ensure the recipient understands what it is for, and opens it?
What do you want to communicate in the message body, relating to the criteria that triggered this email in the first place? Are you providing some resources, some encouragement and acknowledgement?
Are you asking the user to perform a task?
"Replacement strings" to add dynamic content
As you craft the subject and body of the email, there are a few useful variables that you can include to dynamically include certain information.
- {InitiatingUserFirstName} - The first name of the initiating user. (i.e. a student who has met the criteria you outline in the agent)
- {InitiatingUserLastName} - The last name of the initiating user. (i.e. a student who has met the criteria you outline in the agent)
- {OrgUnitCode} - The code for the course shell (i.e. abc123_f21_01).
- {OrgUnitName} - The name of the course shell. (i.e. ABC123 - Intro to Bending Objects with your Mind - Fall 2021)
- {LastCourseAccessDate} - The date the initiating user last accessed the course
- {LastLoginDate} - The date the initiating user last logged in.
Tips for using the replacement strings
- Use {InitiatingUserFirstName} to address the email - it makes the email feel more personal and friendly.
- Start the subject line with "{OrgUnitCode}: " - this matches the way Brightspace sends emails from your course shell, and will work with any email filters you (or your class) have set up.
- Use {OrgUnitName} in the email instead of typing the name of the course - that way, you can copy this agent to different shells and you won't have to edit the course name for each course!
- If you are sending an email when someone hasn't visited the course in a certain number of days, you can include {LastCourseAccessDate} in the message body to indicate the actual date they last accessed the course shell.

Attachments
You can attach files to emails sent by Intelligent Agents.
- "Upload" to select a file from your computer
- "Choose Existing" to select a file from your shell's "Course Offering Files".
- "Record" to record a video or audio clip to be included in the email.
Click "Save", at the bottom of the page, to save your changes as you go!
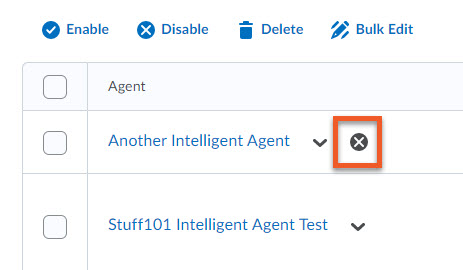
It's relatively easy to set up an Intelligent Agent, and forget to enable it, so there's an easy way to see if an Intelligent Agent has or has not been enabled.
In your course shell, go to Course Admin > Intelligent Agents.
In the list of Intelligent Agents, if you see an "X" icon to the right of the name, that Intelligent Agent has NOT been enabled yet.
If you do not see an icon, the Intelligent Agent has been enabled, but if you are unsure whether it's running, edit it, and check the scheduling details.
Please note that if you have copied or imported a One-Time Run agent, it will, by default, be set as "not enabled". You will need to enable the agent for it to run. If you copied or imported a One-Time Run agent that had a scheduled date that is in the past, the date will not be copied, but if the agent had a scheduled date that is in the future, the date will be copied (but still needs to be enabled, or it will not run at the scheduled time).
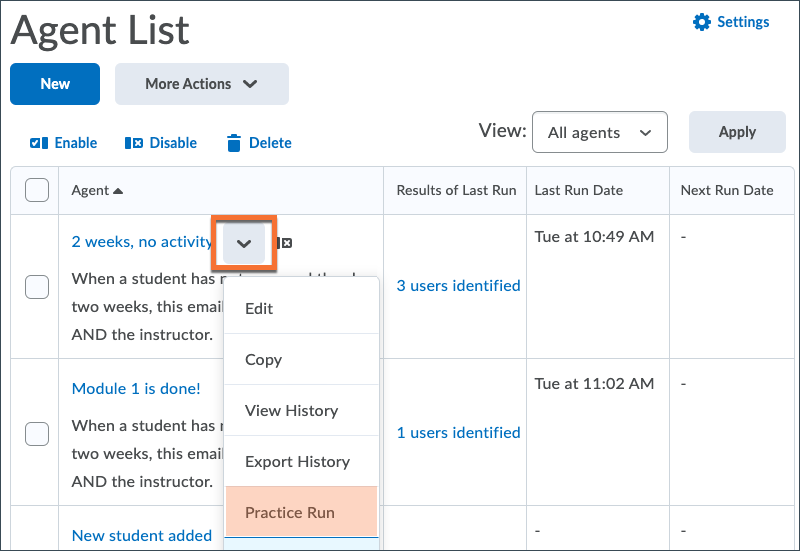
Do a "practice run" to test your results!
Before you enable the agent, and start sending real emails, you should complete a practice run so you can see a list of the users that match the criteria.
- Click the arrow icon to the right of the name of the agent you want to run.
- From the dropdown menu, select "Practice Run" and follow the on-screen prompts to complete the process.
You will receive a confirmation email once the agent has run, letting you know that the agent has completed.
Once it has completed, come back to the agent list and click on the link in the "Results of last run" column. This will show you a list of the users that matched the criteria at the time of the last run.
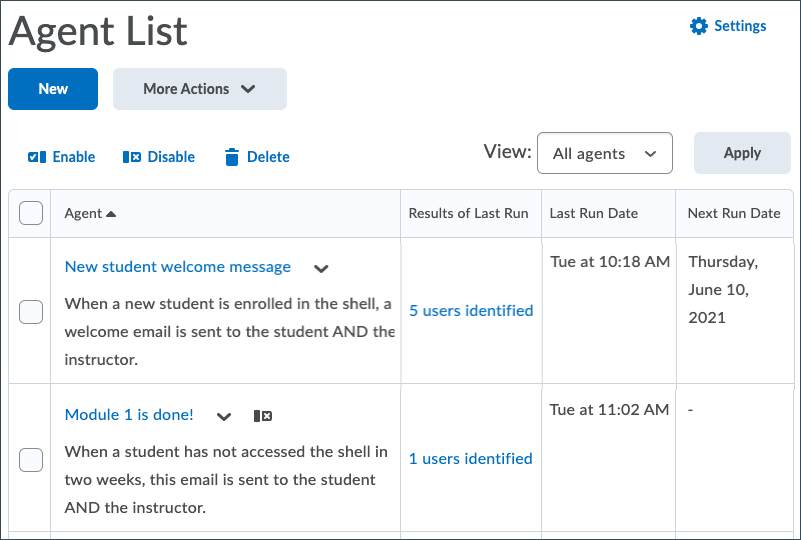
Enable the agent when ready
Now that you've completed a practice run, you can enable the agent if you are ready to have it run on the schedule you set.
- Click the arrow icon to the right of the name of the agent you want to run.
- From the dropdown menu, select "Edit".
- On the edit screen, check the "Agent is enabled" box
- Click "Save and Close" at the bottom of the screen.
Once enabled, you will see the scheduled "Next Run Date" in the agent list.
Note that Intelligent Agents will not run on schedule unless your course shell is "Active" and the agent is "enabled".
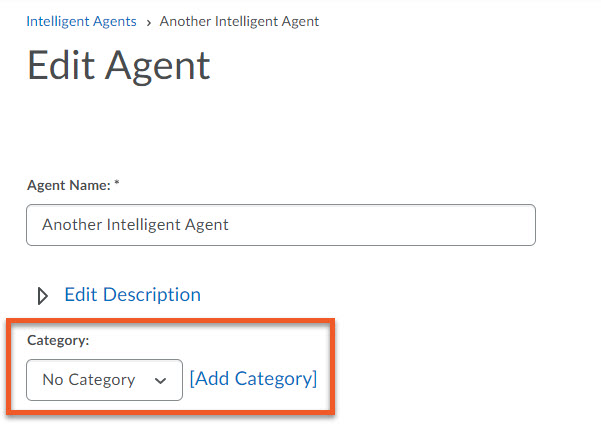
If you have a lot of Intelligent Agents, you may find it helpful to organize them into categories. See below for a few ways to use the Intelligent Agents Category tool.
Select or add a category while editing an Intelligent Agent
While you are creating or editing an Intelligent Agent, you can simply click on the Category dropdown to select an existing category.
OR, if you need a new category, just click on Add Category, then in the popup window, type the name, then click OK.
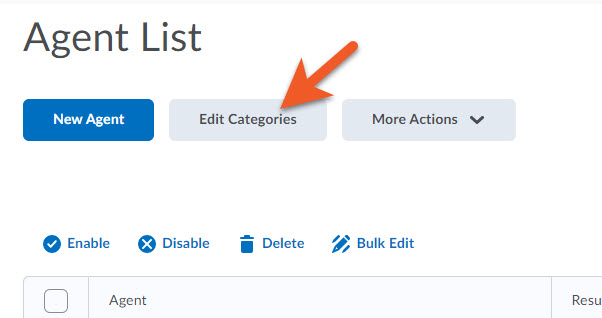
Add or Edit Categories
To add or edit categories, click on the Edit Categories button.
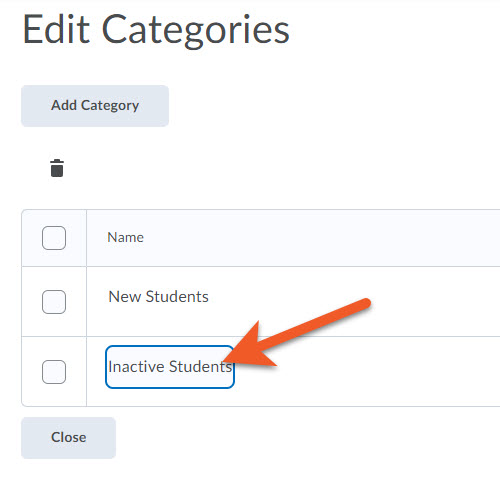
To edit an existing category, click on the name, and make the necessary edits.
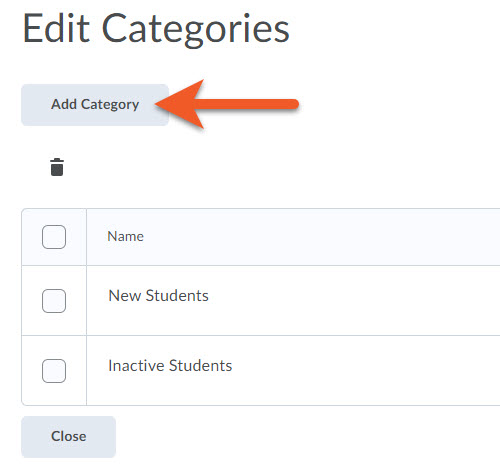
To create a new category, click on the Add Category button.
In the popup window, type the name of the new category, then click OK.
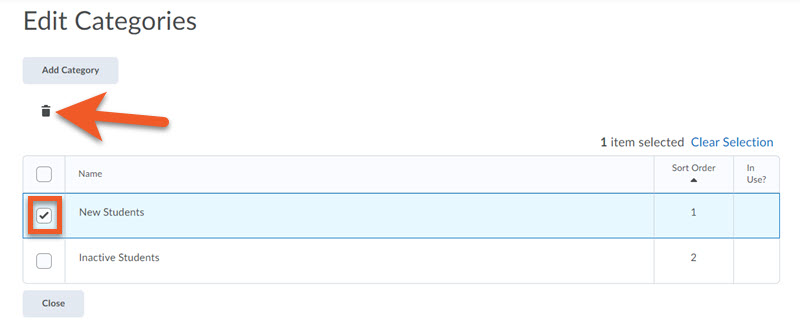
To remove an existing category, select the checkbox in front of the category, then click on the trash can.
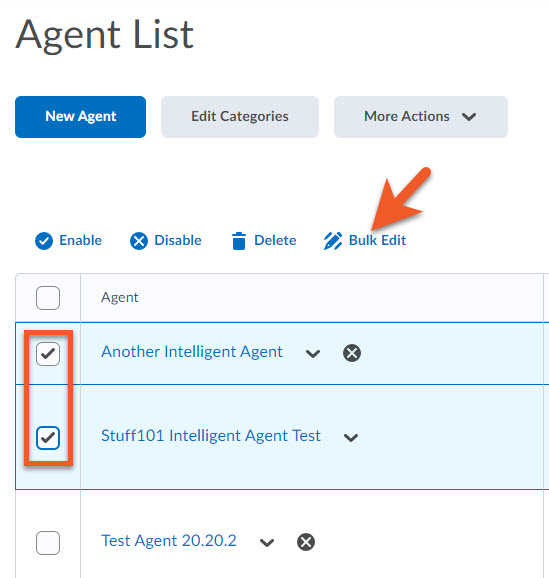
If you want to make changes to the names or categories, or enable/disable multiple Intelligent Agents at the same time, you can use D2L's Bulk Edit functionality.
Go to Course Admin > Intelligent Agents.
Select the Intelligent Agents you wish to change.
Click on Bulk Edit.
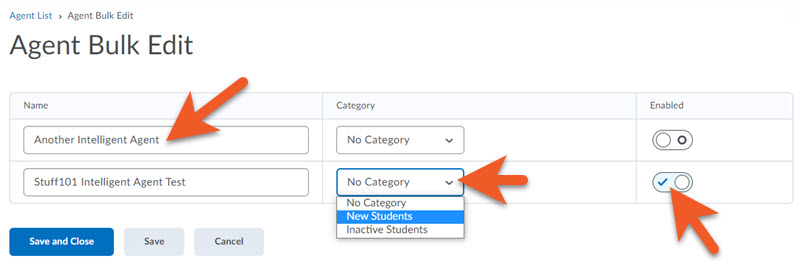
To change the name of an Intelligent Agent, just click on the name, and edit it.
To change the category, click on the dropdown, and select the category you want.
To enable/disable an Intelligent Agent, click on the visibility icon to turn it on or off.
Related Links:
Announcements and notifications
