Evaluate discussion participation
Now that you have completed some discussion activities in the class, it's time to review the students' participation.
There are a couple of features in the Brightspace Discussions tool that can help you to complete an evaluation:
- Enable 'assessment' on a discussion topic - this provides the ability to collect posts for assessment, as well as provide a grade.
- Review the history of a post
- Review the statistics for a discussion
By using this functionality, you will be able to grade your students' work through the Discussions tool, which is the preferred workflow, to ensure the grading team and students see the grades and feedback in a consistent way.
Find Discussions in the top menu, under Communication. If it isn't there, review how to enable course tools.

If participation in this discussion topic will count toward the final grade in the course, we highly recommend that you first go to Grades, and create a grade item for this discussion topic, then return here to follow the rest of the instructions.
Click in the Grade Out Of box, and type in the number of points this topic will be marked out of.
You will notice an “In Grade Book” item appears to the right of the Grade Out Of box..
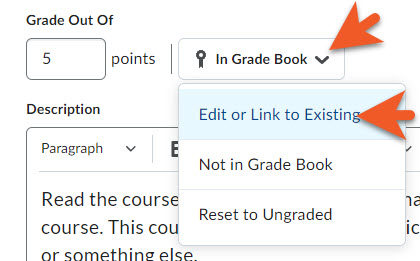
Now you need to connect this assessed discussion topic with the gradebook.
Click on In Grade Book (or the down arrow to the right of it), and select Edit or Link to Existing.
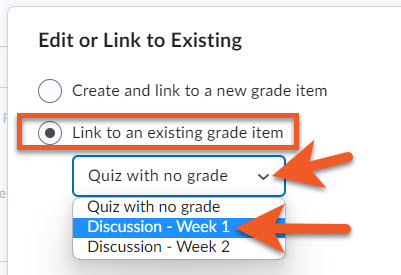
In the popup window that appears, click on the second option, Link to an existing grade item.
Then, in the dropdown, select the desired grade item from the gradebook.
NOTE: If you did not previously create this grade item in the gradebook, you can choose “Create and link to a new grade item” instead but you will not have access to all of the settings. A grade item will be created with incorrect settings, and you will need to go to Grades afterward, and fix it.
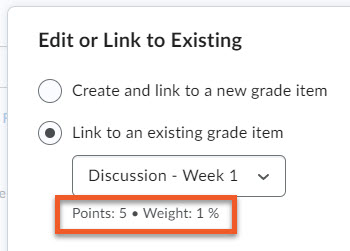
Below the grade item dropdown, you will now notice the points and weight values that were set up in Grades. If these are incorrect, you will need to go to Grades later (before you start grading this item!) to correct those values. If these are incorrect when you start grading, your students’ final grade in the course will be calculated incorrectly.

Click on OK to save this setting.
If you need to go create a grade item, click on Cancel, fix it, then return (and repeat the steps above).
You can evaluate users' individual posts and have Brightspace automatically calculate a topic score for each user, or you can assign a topic score directly to each user. If you choose to assess individual posts, first you need to enable this setting by clicking on the Evaluation & Feedback panel to expand it, then select the checkbox for “Allow evaluation of individual posts”.
Then, below that, you will see options so you can specify how you want the system to calculate each user’s overall topic score.
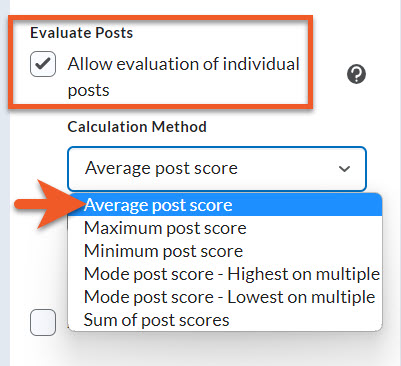
Calculation methods
There are five possible calculation methods that you can select when configuring a topic for assessment.
- Average post score: This calculation method averages all of the post scores included per user.
- Maximum post score: This calculation method identifies the highest score of all the post scores included per user.
- Minimum post score: This calculation method identifies the lowest score of all the post scores included per user.
- Mode post score - Highest on multiple: This calculation method looks at the frequency of scores on posts, then selects the highest occurrence of a score per user. Once it picks the frequency, the system looks to see if multiple scores occur at that frequency. If not, it assigns that score to the user. If there are multiple scores with the same frequency, it will choose the highest of those scores. For example, if a score of 7 occurs 2 times, a score of 8 occurs 3 times, and a score of 9 occurs 3 times, the system will choose the frequency 3 and the score of 9.
- Mode post score - Lowest on multiple: This calculation method looks at the frequency of scores on posts, then selects the highest occurrence of a score per user. Once it picks the frequency, the system looks to see if multiple scores occur at that frequency. If not, it assigns that score to the user. If there are multiple scores with the same frequency, it will choose the lowest of those scores. For example, if a score of 7 occurs 2 times, a score of 8 occurs 3 times, and a score of 9 occurs 3 times, the system will choose the frequency 3 and the score of 8.
- Sum of post scores: This calculation method totals all scores for posts in the topic, and assigns that score to the user.
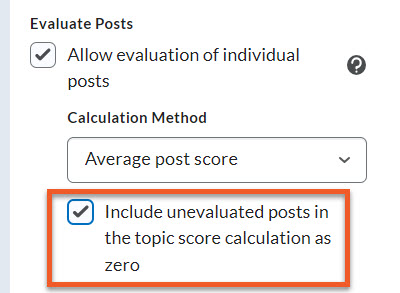
If you wish, you can also choose to select Include unevaluated posts in the topic score calculation as zero.
You might choose this option to save time assigning a score of zero to posts that do not meet your expectations.
If you want to disregard any posts you haven’t evaluated, make sure to uncheck this box.
And, of course, remember to Save your changes.
Assess within discussions: individual posts
You can assess users from inside a discussion topic while reading posts or from the Assess Topic page. Assessing users from within the topic lets you read users’ posts in context and evaluate them as you perform other reading-related tasks (approving posts, marking posts as read, replying, etc.). When assessing users from the Assess Topic page, you can see topic scores for all users and view all of a user’s posts together on one screen. Assessable topics display an Includes assessment icon below the topic name in the Discussions List.
To assess individual posts, you must select the Allow evaluation of individual posts check box in the Evaluation & Feedback panel of the Edit Topic page.
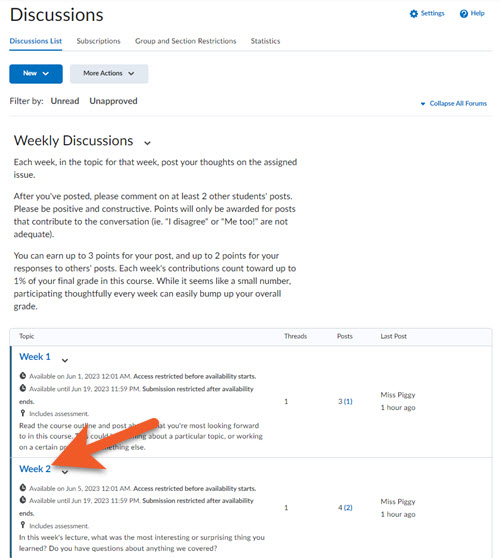
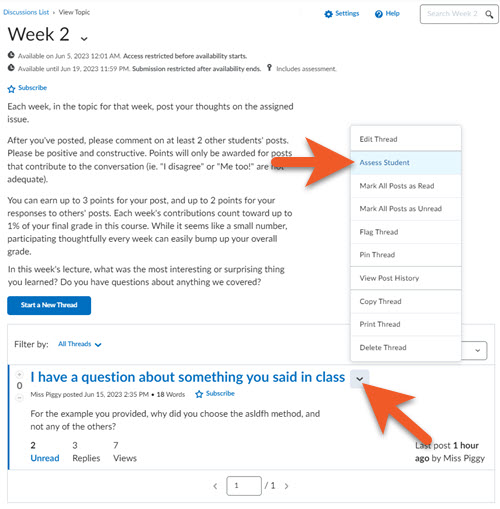
Click Assess Student from the thread title's context menu.
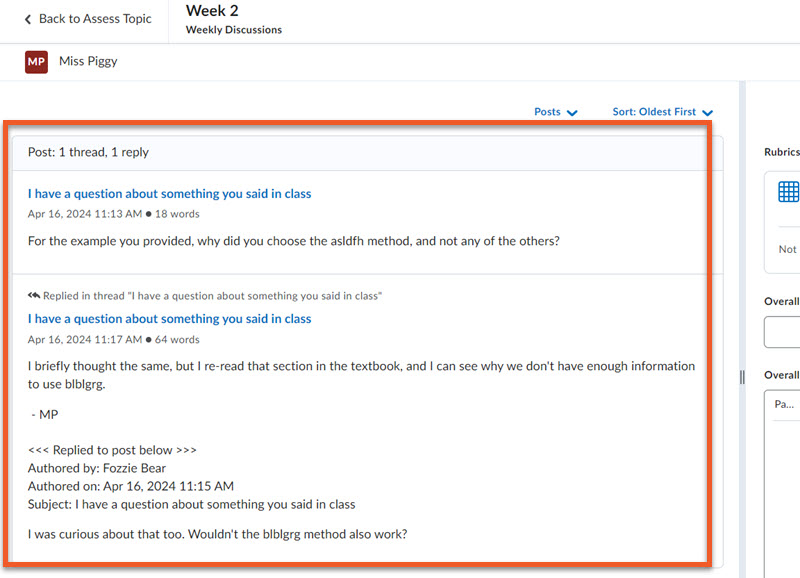
On the left, review the student’s posts.
To view a post within the context of the discussion thread, click on the title of the post. You will need to follow the instructions above to make your way back to the evaluation screen again.
If you set up the topic to assess each post, you will see a score box beside each post. Enter a score for each post, and the overall score will be calculated according to the method you previously selected. If you did not select that option, you will only see one score field, in the right-hand evaluation panel. See below for additional details about the evaluation panel.
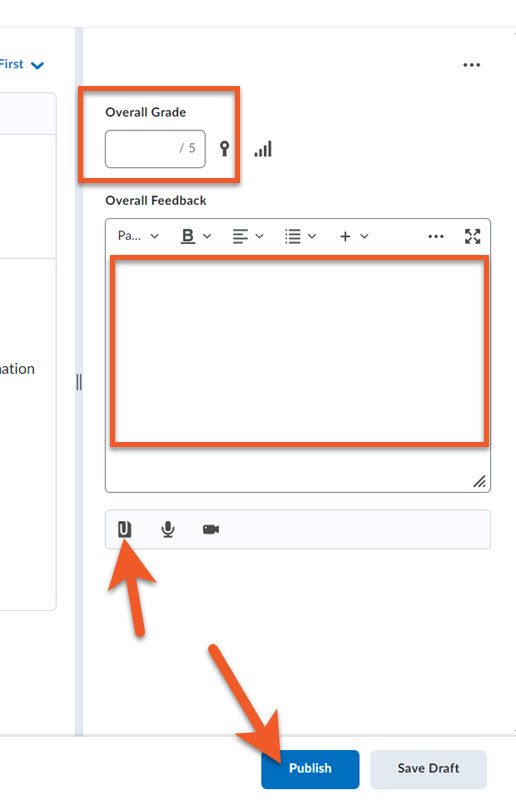
In the Overall Grade box, enter the score.
Add Overall Feedback, if desired.
Or, you can click on the Attach icon to attach a feedback file, if you wish.
Click Publish to push grade and feedback to Grades, or Save Draft to just save for now. You will need to publish later.
Note that when you Save Draft or Publish, the student's score will be updated in the area above the feedback box.
Assess within discussions using a rubric : individual posts
You can assess users from inside a discussion topic while reading posts or from the Assess Topic page. Assessing users from within the topic lets you read users’ posts in context and evaluate them as you perform other reading-related tasks (approving posts, marking posts as read, replying, etc.). When assessing users from the Assess Topic page, you can see topic scores for all users and view all of a user’s posts together on one screen. Assessable topics display an Includes assessment icon below the topic name in the Discussions List.
To use a rubric to assess a student, you must clear the Allow evaluation of individual posts check box in the Evaluation & Feedback panel of the Edit Topic page.
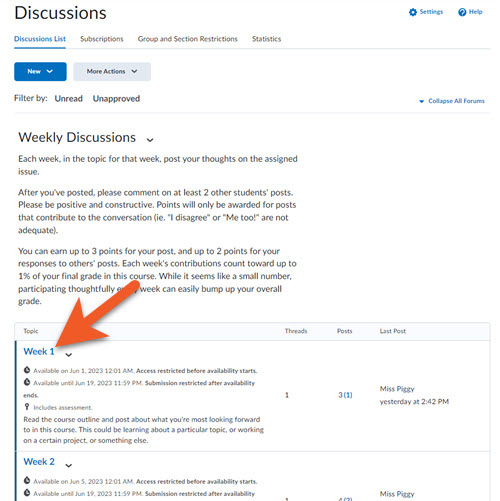
On the Discussions List page, click on the specific topic you want to assess.
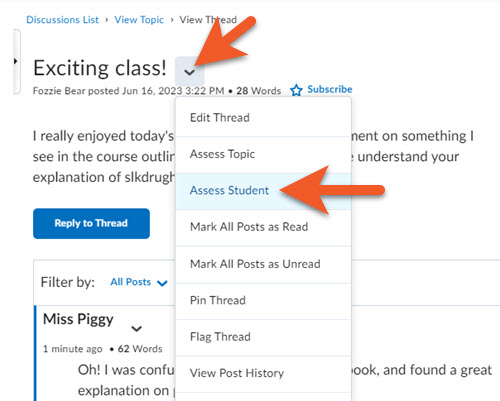
Click on the thread title to open it.
Then select Assess Student from the thread title's context menu.
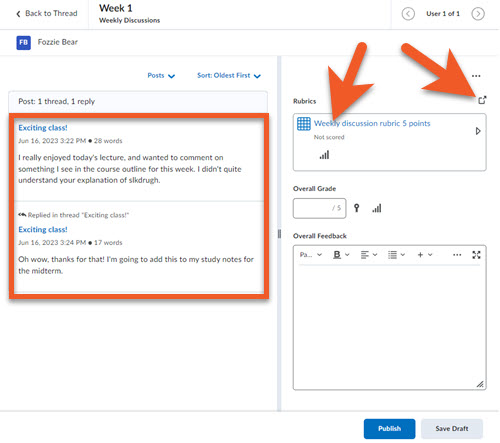
On the left, review the student’s posts.
To view a post within the context of the discussion thread, click on the title of the post. The post should open in a new tab/window, but if it doesn’t, you will need to follow the instructions above to make your way back to the evaluation screen again.
If you are using a rubric:
If your rubric is very simple, just click on the name of the rubric to expand it within the right-hand column.
If your rubric is complex, or large, you will find it easier to grade if you click on the “Expand” icon just to the upper-right of the rubric name.
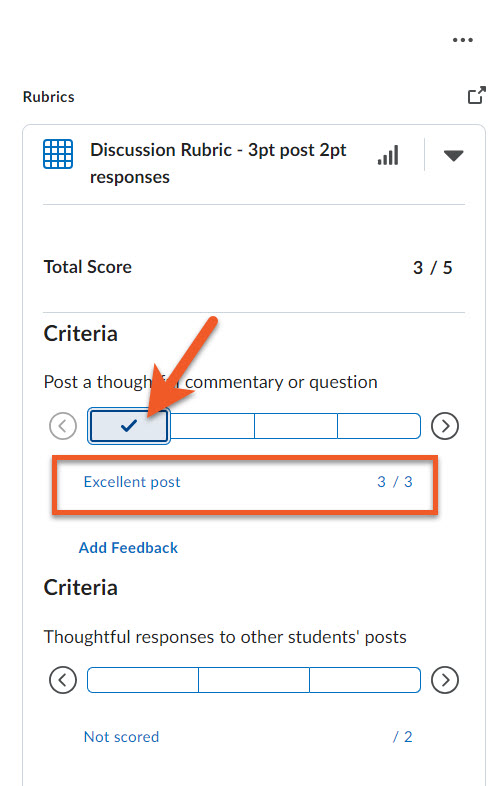
If you have clicked on the name of the rubric to grade a very simple rubric, you can scroll down, and click on the level you wish to score for each criteria. When you successfully click on a level, you will notice a checkmark appear on the bar, and a score will appear just below that bar.
If you wish, you can click on Add Feedback, to provide written feedback specific to a criteria item. However, we strongly recommend that you use the Overall Feedback box, located below the rubric, as it will be easier for students to see the feedback there.
Make sure that you select a score for every criteria. If you miss any criteria, you may experience problems publishing the grade.
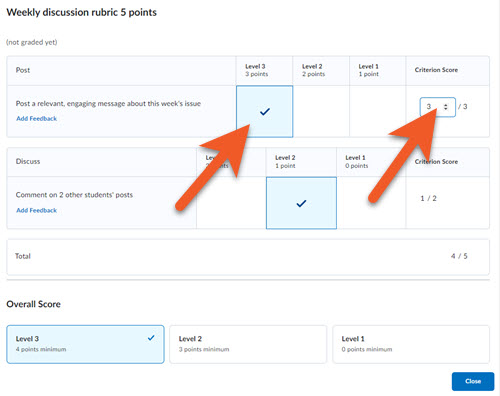
If your rubric is larger, more complex, or you simply prefer to see the full rubric while grading, you can click on the “expand” icon to view and grade the rubric in a popup window. Click on a square to select that score for a criteria.
If you wish to give a grade other than the default for a given level (see the ranges below the level name), select the level, then on the far right, click on the score to edit.
Make sure that you select a score for every criteria.
When you are finished grading using the rubric, click on Close to close the popup window (if using the fully expanded rubric), or scroll down, if you are using the in-page version.
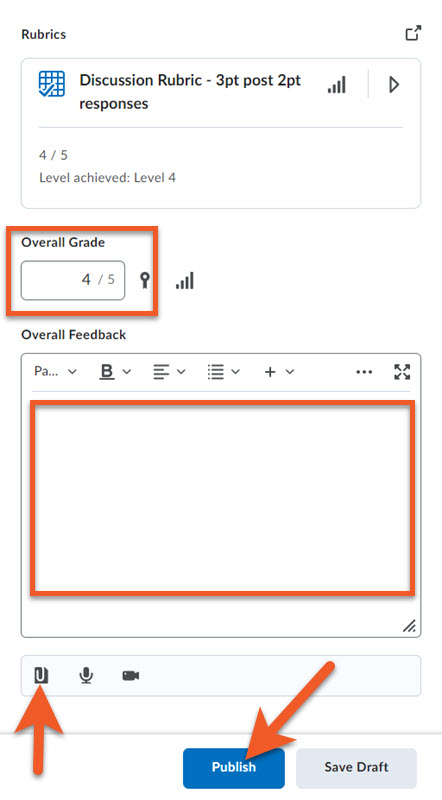
You will notice that by grading using the rubric, the Overall Grade field has been populated with the score from the rubric. If you wish to override that grade (ie. deducting marks for late submission), you can do so in this field. If you do this, it's best to provide an explanation in the written feedback field, to provide clarity for the student (ie. marks deducted for late submission).
Add written feedback, if desired.
Attach a feedback file, if you wish.
Click Publish to push grade and feedback to Grades, or Save Draft to just save for now. You will need to publish later.
Note that when you Save Draft or Publish, the student's score will be updated in the upper-right of this screen.
Assess within discussions: entire topics
To assess an entire topic, you must clear the Allow evaluation of individual posts check box in the Assessment tab of the Edit Topic page.
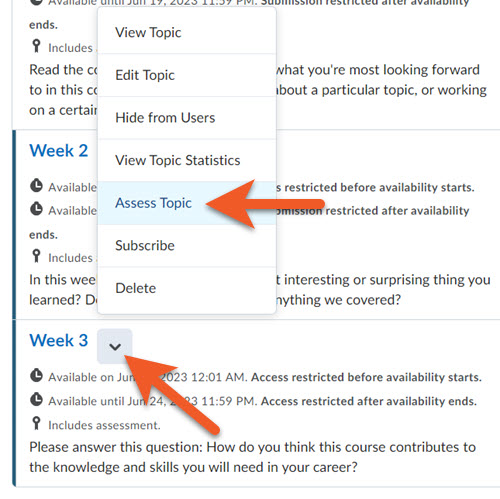
On the Discussions List page, select Assess Topic from the topic title's context menu.
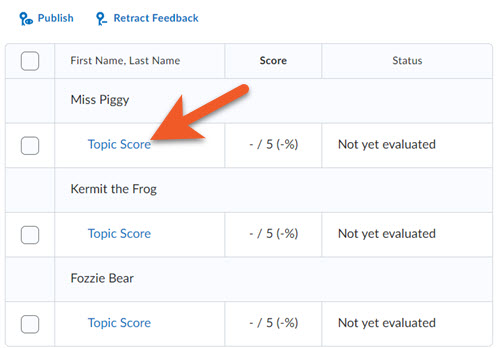
One at a time, click Topic Score beside each student you want to assess.

On the next screen, enter a grade score and comments (if necessary). (Or, if you have attached a rubric, score the rubric, as described earlier on this page.)
You can also attach a separate feedback file, if desired.
Click Publish to push grade and feedback to Grades, or Save Draft to just save for now. You will need to publish later.
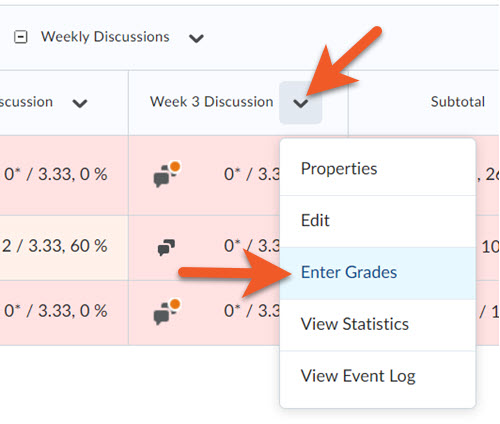
Once you have a discussion tied to a grade item, it is possible to assess a student's contributions through the gradebook.
However, please avoid entering a grade directly in the gradebook, if possible. For consistency, it's better to enter grades in the discussion evaluation screen, using one of the methods described above.
In your course shell, go to Grades > Enter Grades.
Click on the downward-facing arrow beside the column header for the grade item you wish to grade.
Select Enter Grades.
If a student has discussion posts, you will see a speech bubble icon in the Assessment column.
Click on the icon to grade this student's discussion submissions. Please note that this may open the discussion evaluation screen in a new browser tab (or window, depending on your browser settings), so you may need to rearrange your browser windows to see everything you need to review.
For additional instructions for assessing the student’s submissions on the discussion evaluation screen, see the appropriate sections above on this page:
- Assess individual posts (no rubric) OR
- Assess a student’s posts (using a rubric).
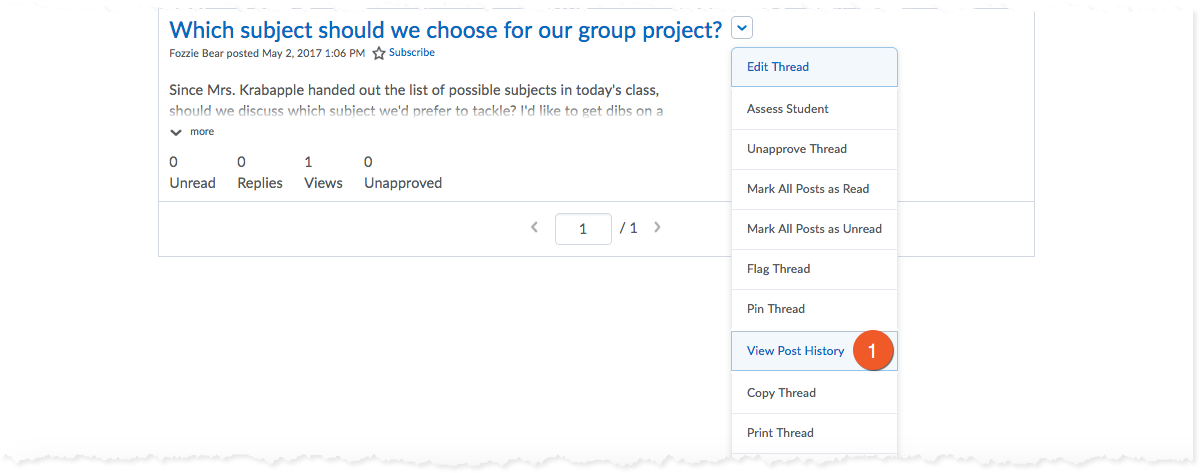
Click View Post History from the context menu of the post.

Statistics give you an overview of user activity in your discussion topics and forums. You can use this information to determine which topics stimulate conversation and which do not, or which students post frequently and which hang back.
As the semester unfolds, you can use statistics to pinpoint topics in need of conversation-starters and to follow the participation levels of different users. You can send email reminders to users who have not been participating or ask overly vocal users to slow down and give others a chance to contribute.
When the semester ends, statistics help you identify the topics that were most effective and the ones you might want to omit or modify for the next course.
Three levels of discussion statistics:
There are three levels of discussion statistics. Choose the one that meets your needs to get the statistics on all discussions, discussions in a specific forum or discussions in a specific topic.
Please note that the results you get may differ, depending on the type of statistics you are viewing. For example, the topic-level statistics include values for star and up/down ratings.
All Discussion Statistics
You can get statistics for the entire Discussions tool by clicking the 'Statistics' button in the top bar.
Unique to this view:
- Click on the student's name to "drill down" to statistics for the various forums and topics.

Forum-Level Statistics
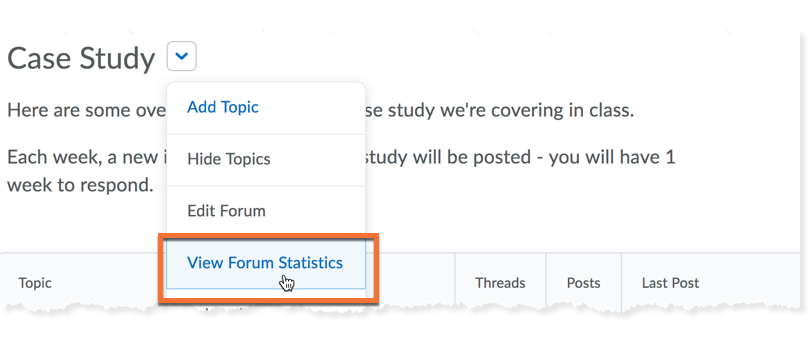
You can get statistics for a specific discussion forum by clicking the arrow icon to the right of the forum name, and clicking View Forum Statistics.
Topic-Level Statistics
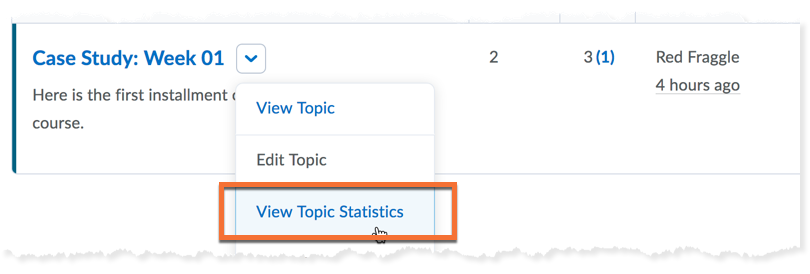
You can get statistics for a specific discussion topic by clicking the arrow icon to the right of the topic name, and clicking View Topic Statistics.
Unique to this view:
- View the star and up/down ratings if they were enabled on the topic.

Statistic Results
These are quantitative statistics, only providing you with the number of threads and replies a user posted, number of posts they read, etc.

Notes
- Post counts do not include unapproved and deleted posts.
- Only users who appear in the classlist appear when viewing statistics by user; however, totals include posts by all users, including instructors.
- You can sort statistics by clicking on any column heading.

- Generate the discussion statistics as per the instructions above.
- Click Export to CSV File. Once the file has finished processing, click the file name to download the file.
Troubleshooting
We ask that you take great care when deleting anything from your shell. It is risky to remove some items, as it may impact final grades for your students, and/or may not follow the university’s student data retention policies.
If you are unsure of how to proceed with solving a problem, before you delete anything, please consult with our support team, at courses@torontomu.ca. If you provide a detailed explanation of the situation, we may be able to suggest solutions that are less risky.
If you have already deleted groups, this may impact where you find submissions for some of your students, and how their grades are calculated, so please refer to the following advice:
If you have only deleted a group
If you have deleted a group (under Communication > Groups) that contained students, and members of that group previously posted in a group discussion under Communication > Discussions, keep in mind that content will still be visible to you (the instructor), and will be labelled as “Deleted”, but will no longer be visible to those students.
Also, keep in mind that if the deleted group had students enrolled in it, and they are still enrolled in the class, Brightspace will automatically distribute those students into other remaining groups, and they will now have access to any group discussion (or group assignments) that their new group has participated in. In any group evaluations that you complete after this point, these students will receive the same grade as their new group.
Please see “Remove a group from an existing group category” to learn more about this.
If you have deleted, then restored a group
If you have deleted, then restored a group (under Communication > Groups) that contained students, and members of that group previously posted in a group discussion under Communication > Discussions, keep in mind that between the time that you deleted and restored the group, Brightspace redistributed those students into other remaining groups. Once their original group has been restored, they are now enrolled in two groups: their original group AND their “temporary” groups.
If you have any assessed discussions:
To avoid giving a student an incorrect grade, it’s vital that you check whether any students from the restored group(s) submitted any work while in their “temporary” group (in the time between when you deleted and when you restored their original group).
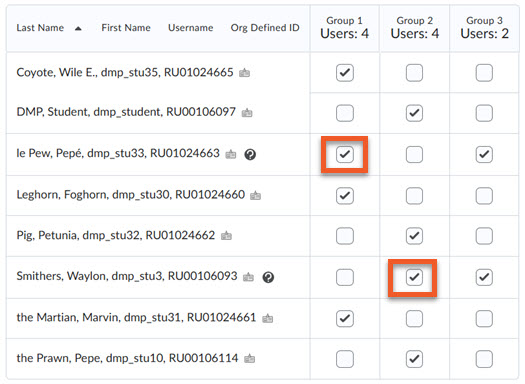
If they didn’t submit any work, you can go to Communication > Groups and use "Enroll users" to unenroll the students from their temporary groups. It's absolutely vital that you do this BEFORE grading any group work, or the student may end up with an incorrect grade.
In the example on the left, "Group 3" was deleted, and then restored. Therefore, you can delete these students from the group that is not "Group 3".
If the student did submit work during their temporary enrollment in a different group, you’ll need to take care when grading the group work, and may need to take notes, and manually update the individual students’ grades after you grade the group submissions, to ensure they do not receive a group grade for the incorrect group.
Please see “Remove a group from an existing group category” to learn more about this.
Related topics
Announcements and notifications