Email and notifications
There are a variety of ways to reach your students using email.
- Email the entire class using the Classlist tool.
- Email individual students or select groups of individuals from various tools, including the Classlist and the Grades tool.
- Automatically notify students of updates in the class using Notifications.
- Sent automated emails based on criteria that you set.
Find the Classlist in the top menu. If it isn't there, review how to enable course tools.
Point your students to our Student guide to Brightspace email.
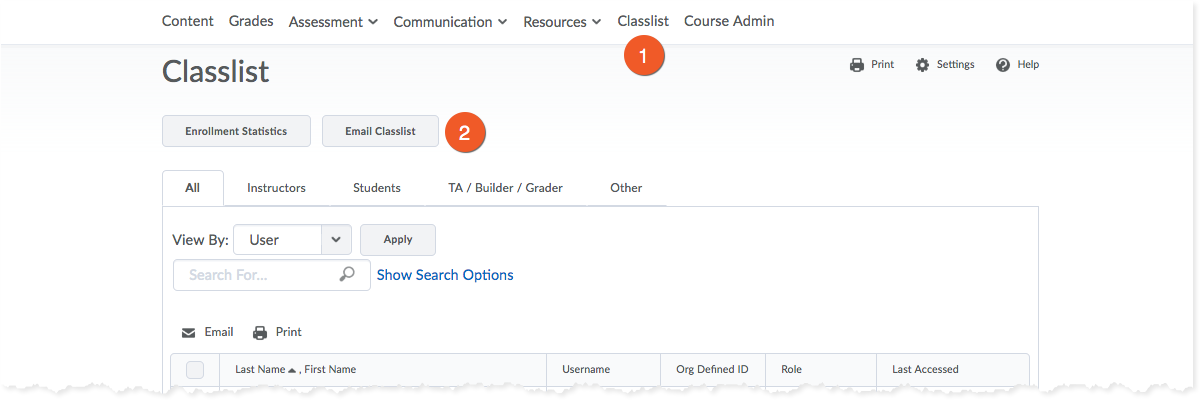
- Click on the appropriate course from the landing page and select the Classlist tool.
- Click the Email Classlist button.
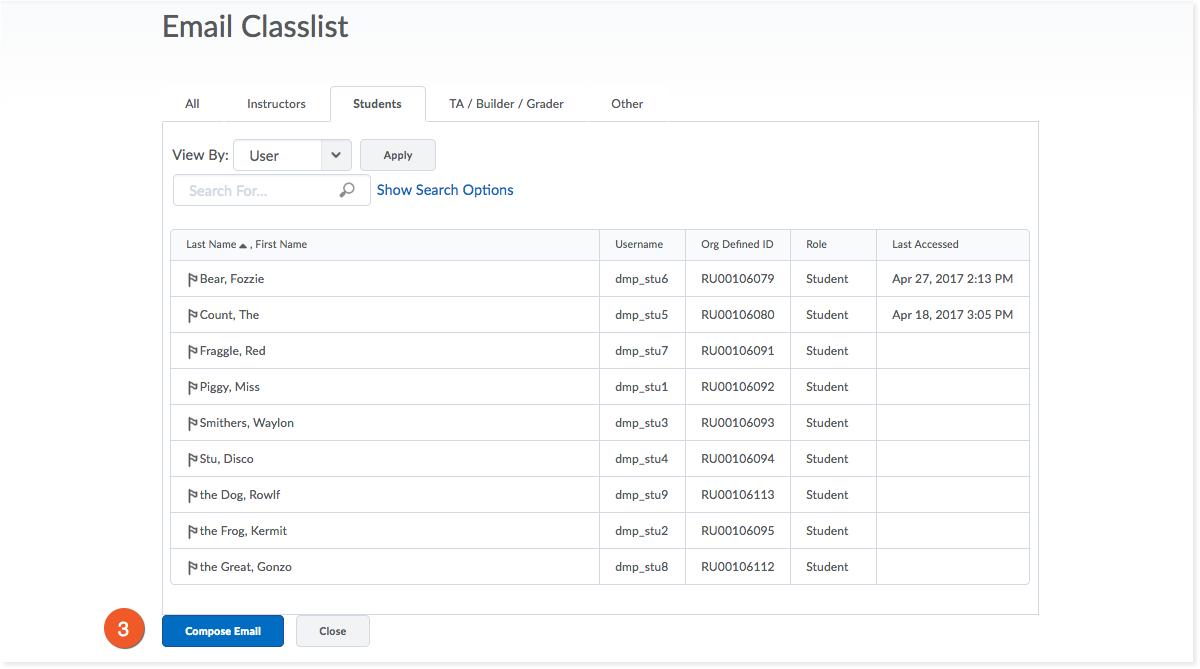
3. If you want to simply send to all of the users in your class, click the Compose Email button at the bottom of the list of users. Otherwise, you can choose to email users with a specific role (like Instructor or Student) by clicking the appropriate tab first.
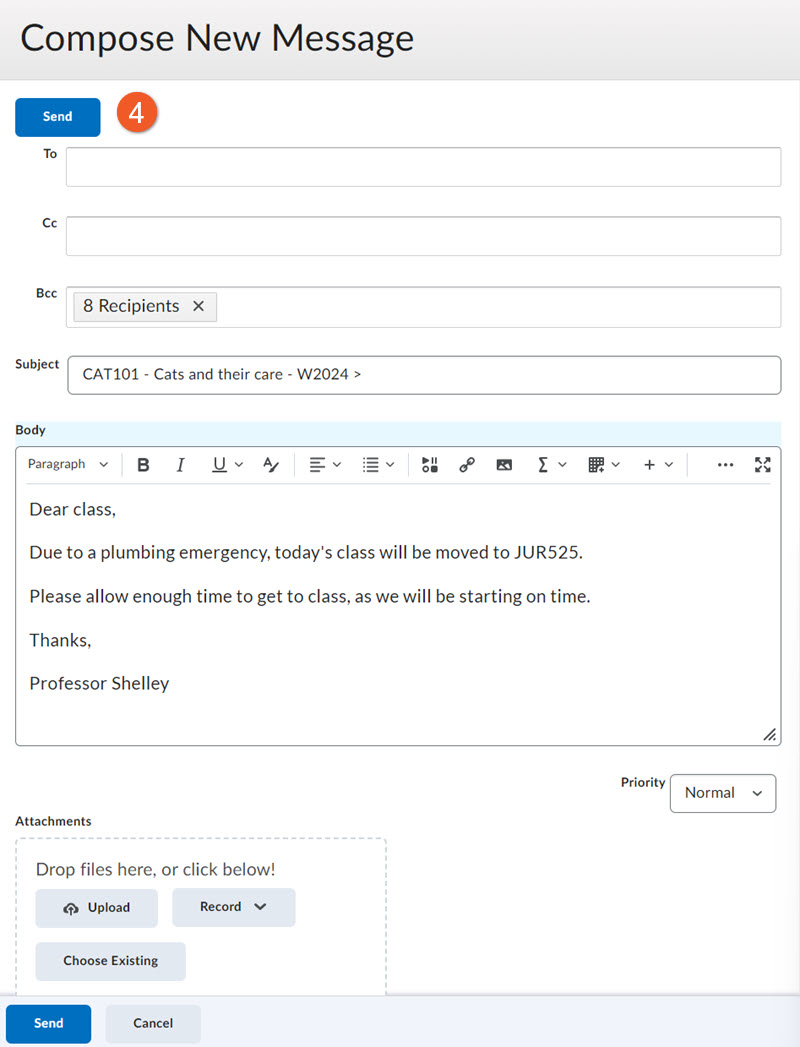
4. Email recipients will fill the Bcc field. Author your email, as usual, then click the Send button at the top of the page to send the email. The email will appear in the users' Toronto Metropolitan University email inbox or their default email inbox if they don't have a university account.
In the body of the message, you can use the text editor to do some basic formatting (font size, colour, bold, indent, bullet lists, tables, etc), and you can even insert an image into the body of the message, if necessary.
If you are emailing a large number of students (ie. more than 100), after you click on the Send button, you may see a message that your message is queued to be sent as a background task. This is to help manage performance on the server. It should only take a few minutes for all of the emails to be sent.
Note: As an instructor, you will not be able to email your students while your course is inactive (see: Making your Course Shell Available). You can still view your classlist during this period.
Note: Students are unable to send instructors an email through the Brightspace by D2L system. For this reason, we recommend informing students how to contact you, the instructor, in the News & Announcements, or the Overview.
Known Issue: The “Sent Mail” button that appears after sending an email doesn’t have a function. No sent emails are kept in D2L Brightspace.
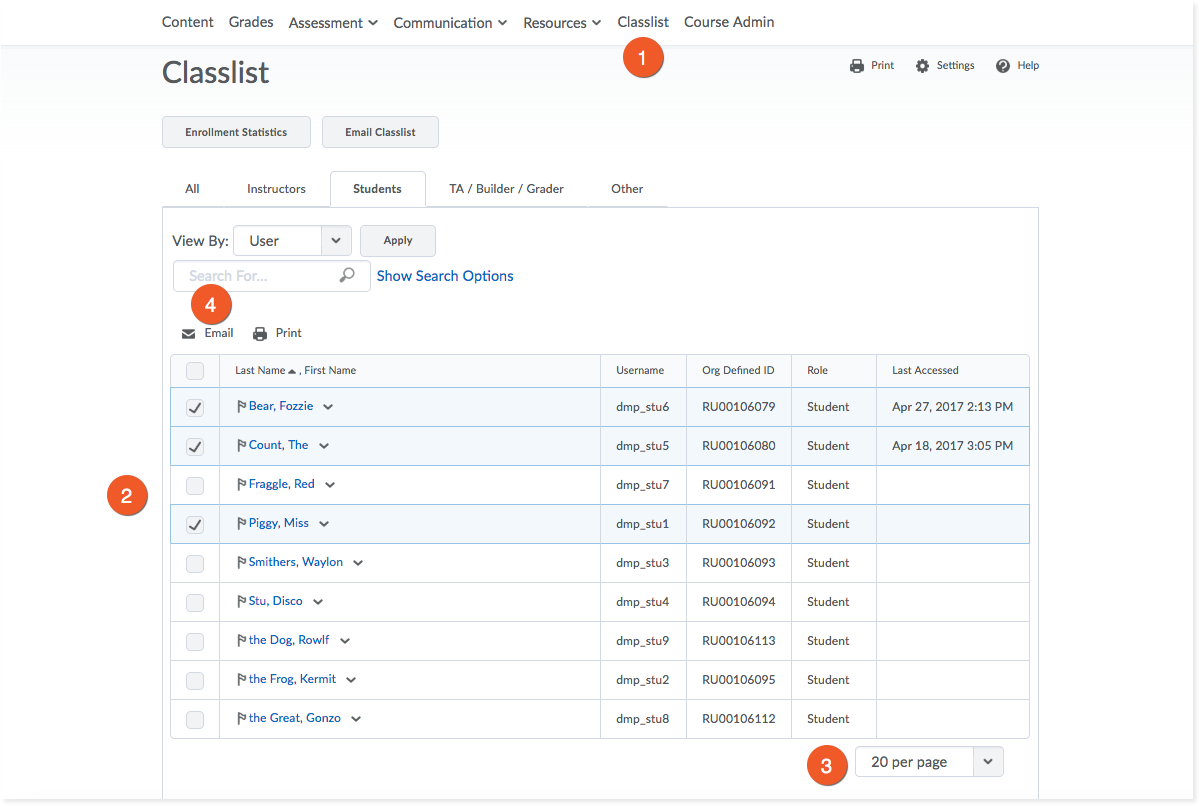
- Click on the appropriate course from the landing page and select the Classlist tool.
- Check the box next to the student(s) you want to email.
- You'll only be able to select from students that appear on the page. At the bottom of the page, you can adjust the number of students that appear per page. We recommend setting this to a high number, so that, if possible, you can always see all students on one page.

4. Click on the Email link at the top of the list of students to open Compose New Message popup window. Please note that you must have popups enabled for this website or you will not see the message window.
Email recipients will fill the Bcc field. Author your email, as usual, then click the Send button at the top of the page to send the email. The email will appear in the users' Toronto Metropolitan University email inbox or their default email inbox if they don't have a university account.
If you are emailing a large number of students (ie. more than 100), after you click on the Send button, you may see a message that your message is queued to be sent as a background task. This is to help manage performance on the server. It should only take a few minutes for all of the emails to be sent.
Note: As an instructor, you will not be able to email your students while your course is inactive (see: Making your Course Shell Available). You can still view your classlist during this period.
Note: Students are unable to send instructors an email through the Brightspace by D2L system. For this reason, we recommend informing students how to contact you, the instructor, in the News & Announcements, or the Overview.

1. Click the context menu that appears with your username in the top navigational minibar. Select Account Settings from the menu.
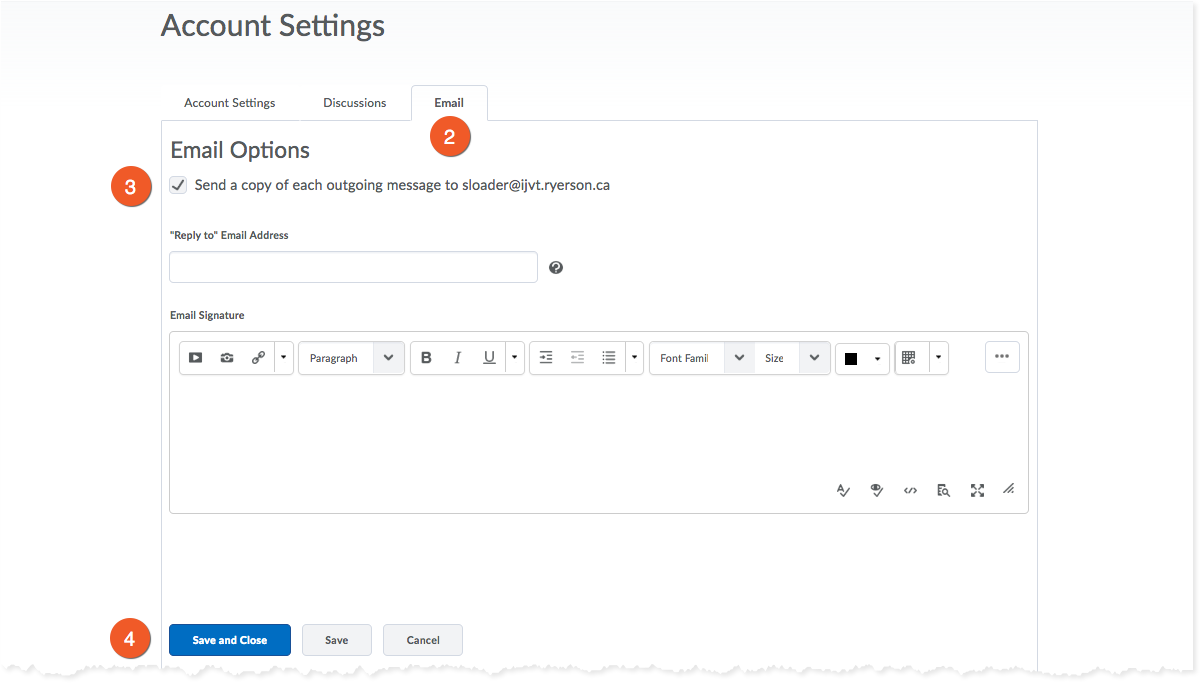
2. Click the Email tab at the top of the Account Settings page.
3. Check “Send a copy of each outgoing message to…” to have any email you send automatically sent to your email address.
4. Click Save and Close.
IMPORTANT: If you forward your copy of the email receipt
If you are set up to receive a copy of your outgoing email, you will receive a special version of the email if you have a role like Instructor or TA in the shell from which the email is sent.
This email will contain a "receipt" - a list of the email addresses for everyone you sent to, as a sort of confirmation. This is private information that should not be shared with others, so you must take special care if you plan to forward this email elsewhere.
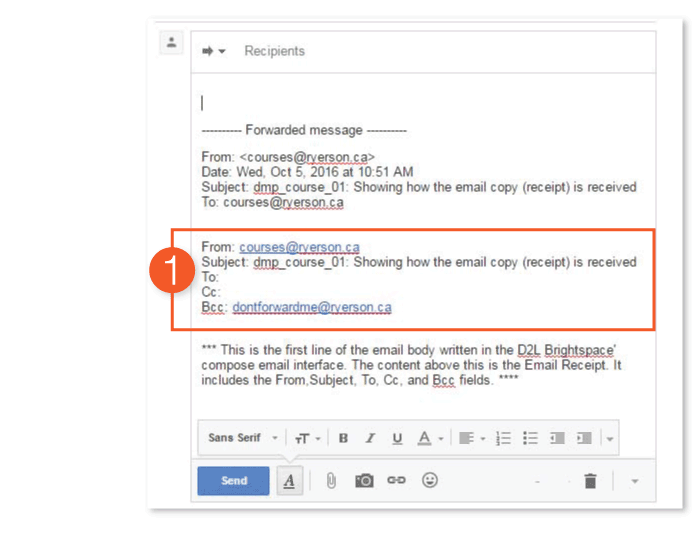
If you choose to forward this email, please do the following:
- Note the location of the confidential email addresses, in the body of the email you have received.
- Make sure you delete this portion of the email, to avoid a privacy breach.
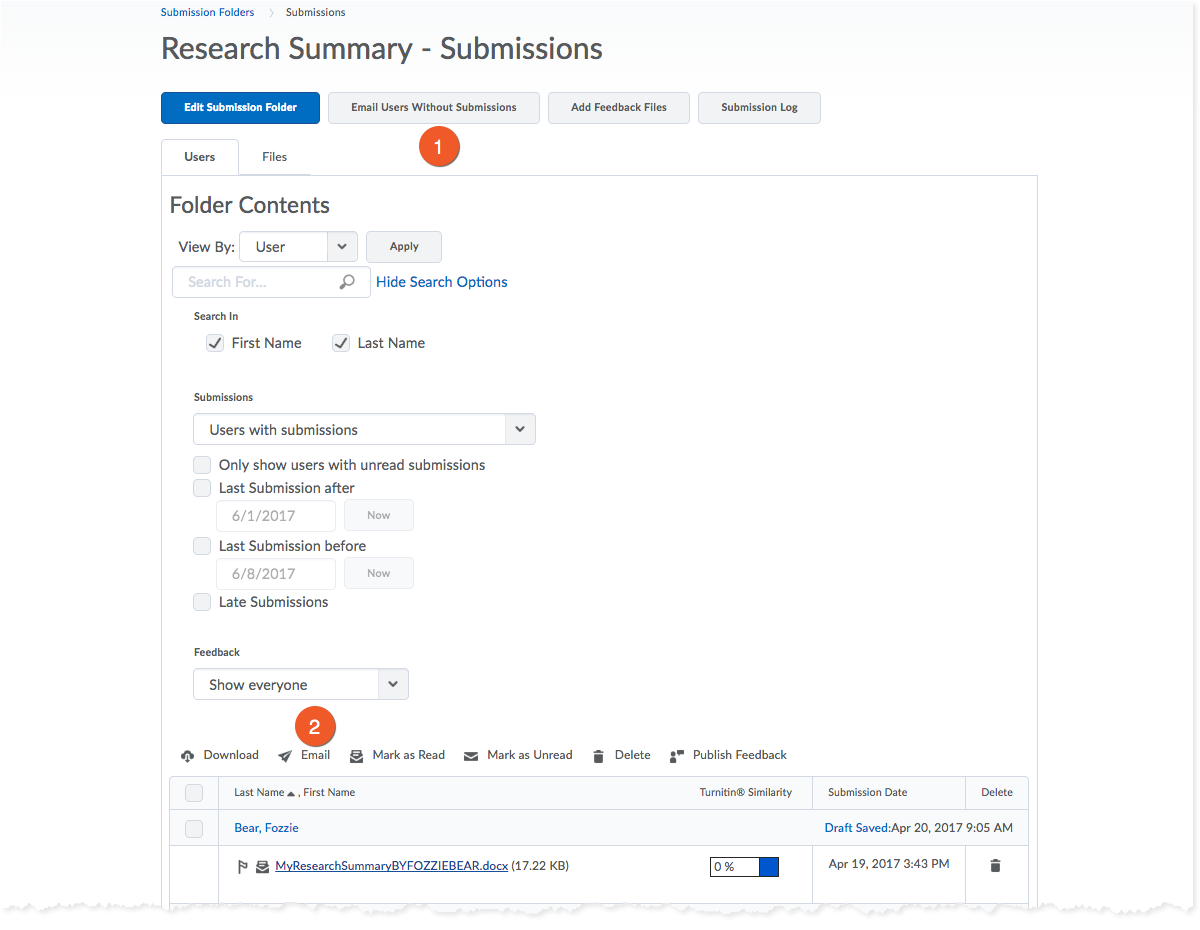
From a particular assignment, you have a couple of email options. You can:
- Email students who have not submitted their assignment yet.
- Select and email a particular student about their assignment submission
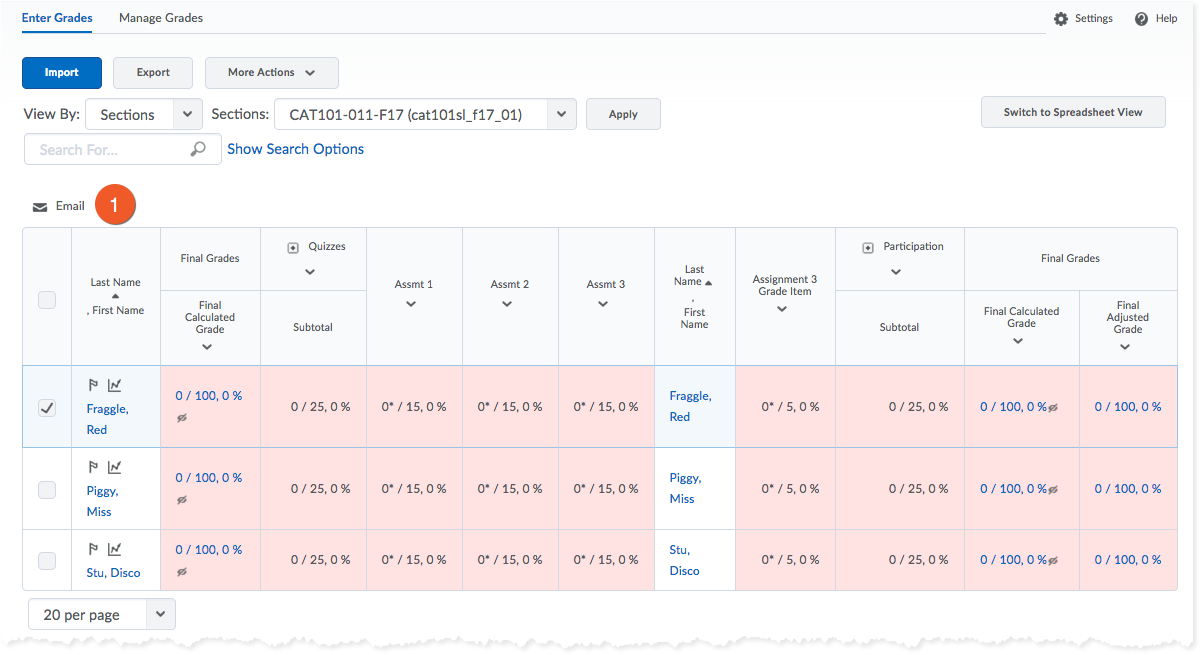
- In Grades > Enter Grades, you can select one or more students, using the checkbox to the left of their name, and then click on the Email link above the student list to send them an email.
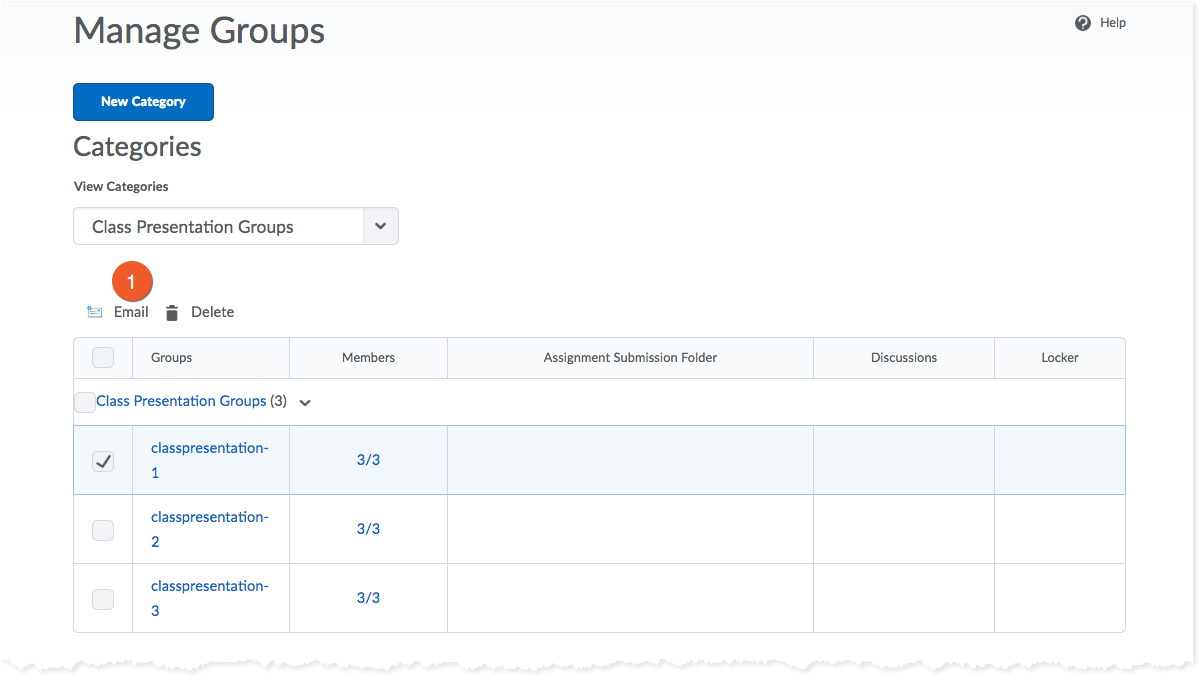
- In the Groups tool, you can select one or more groups, using the checkbox to the left of the group name, and then click on the Email link above the student list to send the members of the group(s) an email.
The Intelligent Agents tool allows Instructors to set up automatic notifications to be sent to themselves, advisors, and students when specified course performance criteria are met.
It can be used to both recognize student achievement (e.g., a high score on a quiz) and warn of potential problems (e.g., lack of online activity or poor performance on an exam).
Find out more about creating Intelligent Agents.
Notifications is a tool that allows every user (students and instructors) to receive an email alert when there are new items or certain kinds of changes in their course.
You can set up a notification to alert you about new content items, news/announcements, and even posted grades!
Each person must enable their own notifications
Each user is responsible for setting up email notifications for their courses - it is not something Instructors will be able to do for them.
This is why it's important for instructors to encourage their students to set up their notifications at the start of the term.
Students will still be able to receive emails sent from instructors regardless of their notification settings.
Please note: While SMS messaging was previously available, as of July 2024, SMS (text message) notifications are no longer available.
Read more about this change.
Related topics
Announcements and notifications