Crowdmark Instructor Guide
What is Crowdmark?
Crowdmark is an online collaborative grading and analytics platform that helps educators, working alone or in teams, to effectively evaluate student work. The platform allows for easy distribution and collection of student work, offers tools for the assembly and management of grading teams, and provides an online workflow that streamlines grading and the delivery of rich feedback to students.
What are the benefits of using Crowdmark in your course?
- Integrated with D2L Brightspace.
- Ease of collaboration; comments and results are visible among graders.
- Digital implementation of marking reduces the need to carry physical papers.
- Efficiency gains in exam administration, grading, data recording, and analysis.
Support
- Instructor Guide
- Crowdmark Help Centre (external link)
- Email support@crowdmark.com
- If you require assistance with Crowdmark's integration with D2L Brightspace, email us at courses@torontomu.ca
Crowdmark is an online collaborative marking tool for written exams and assignments.
Administered (in-person) assessments allow you to upload existing test booklets to automatically assign them QR codes, allowing for easy printing, scanning, and uploading of assignments to Crowdmark’s online collaborative marking system.
Assigned (online) assessments allow you to create new assessments in Crowdmark and email them out to students. Completed assignments are submitted by students directly to the same online collaborative marking system.
Crowdmark’s collaborative marking system offers a set of intuitive grading tools for your teaching team to mark students' work simultaneously. The system keeps the student's identity anonymous during the grading process which enables unbiased grading. Crowdmark enables you to directly upload your grades to D2L Brightspace. Academic integrity is improved by archiving a digital copy of student work that cannot be altered.
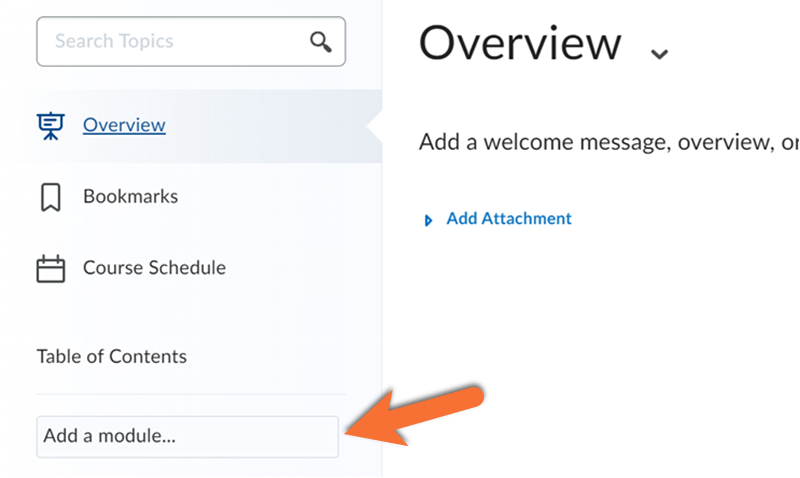
Access the Content tab in your D2L Brightspace course shell. Click the Add a module textbox and name it Crowdmark. A new module will be added to the left navigation bar.
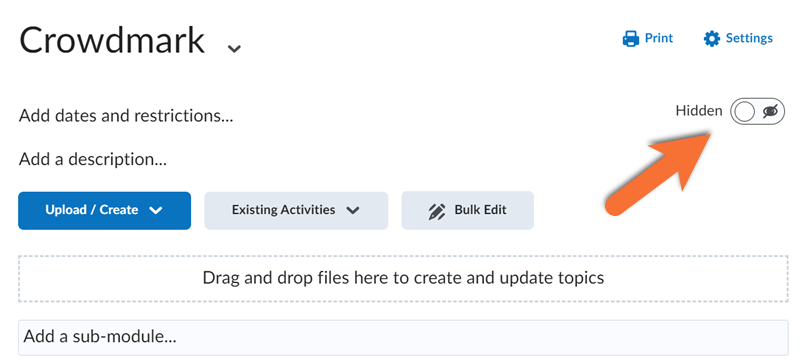
Click the Visible icon in your Crowdmark module and change it to Hidden. This will ensure students do not access the Crowdmark module.
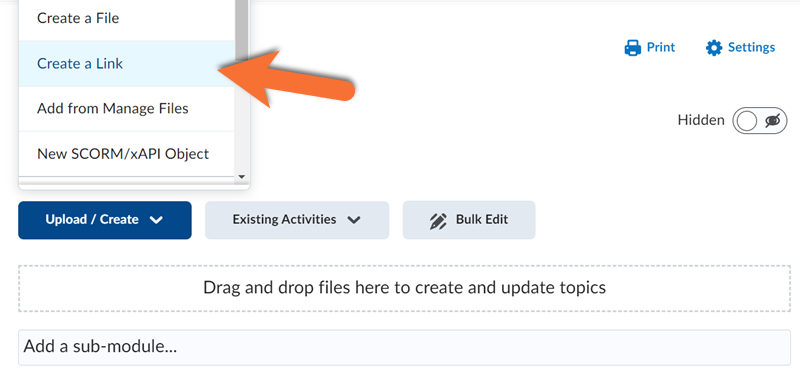
Click the Upload/Create button in your Crowdmark module and select Create a Link.
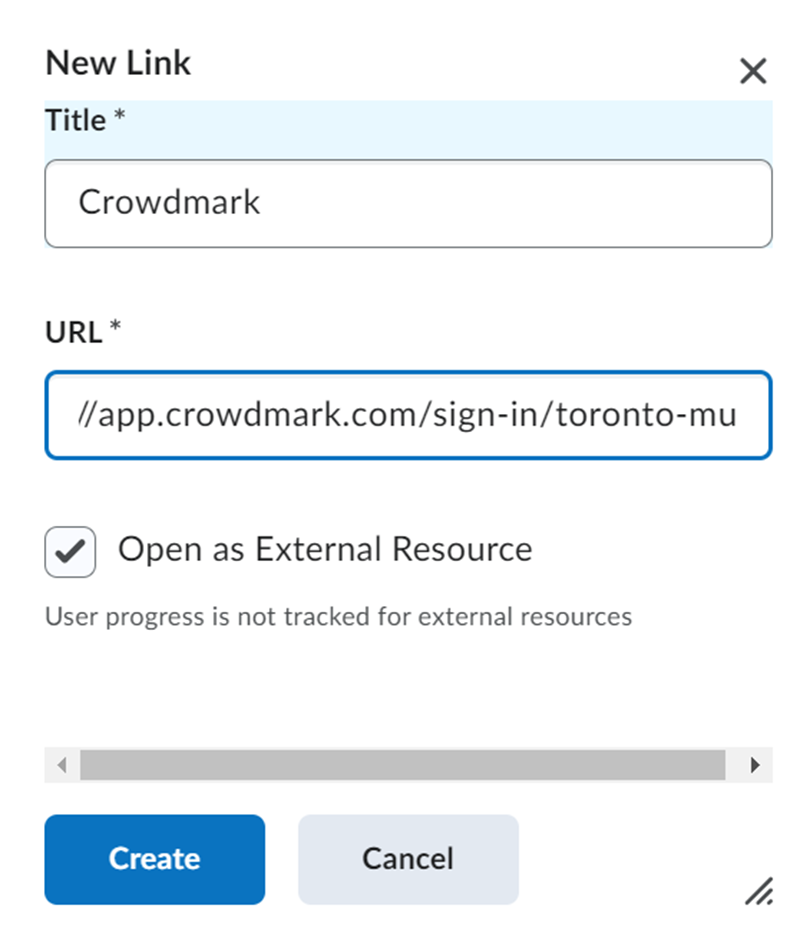
Title the link "Crowdmark" and paste this url: https://app.crowdmark.com/sign-in/toronto-mu
Select Open as External Resource and click Create.
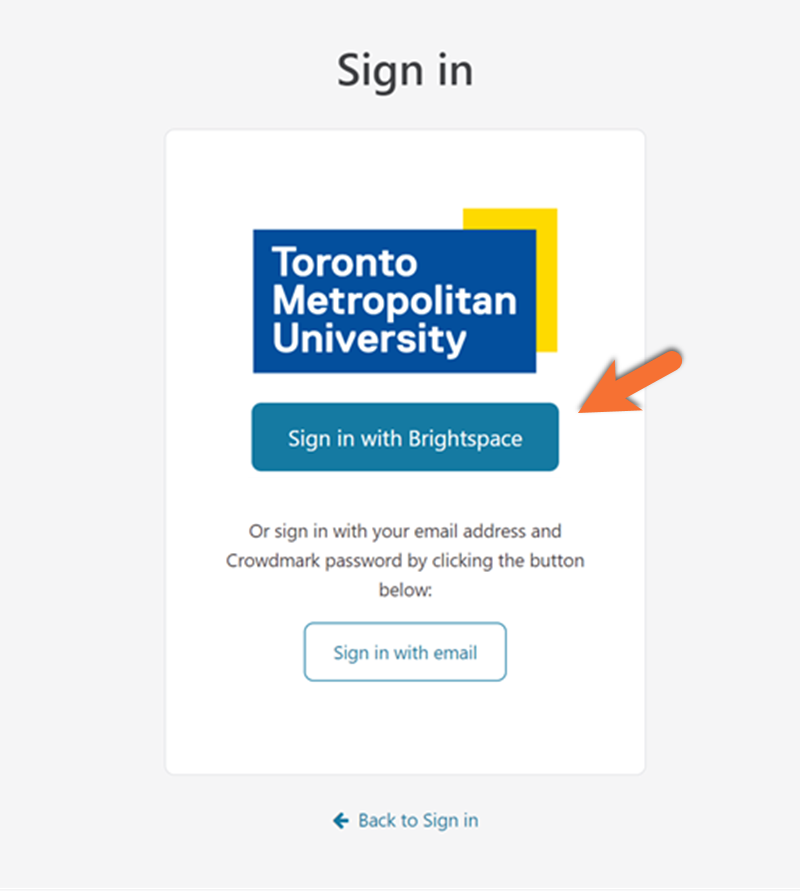
Click on the link in your Crowdmark module.
Select Sign in with Brightspace.
Enter your TMU email address and click Next.
Go to your email and click on the link sent to you to verify your account.
Once you have verified your account, click Go to my courses.
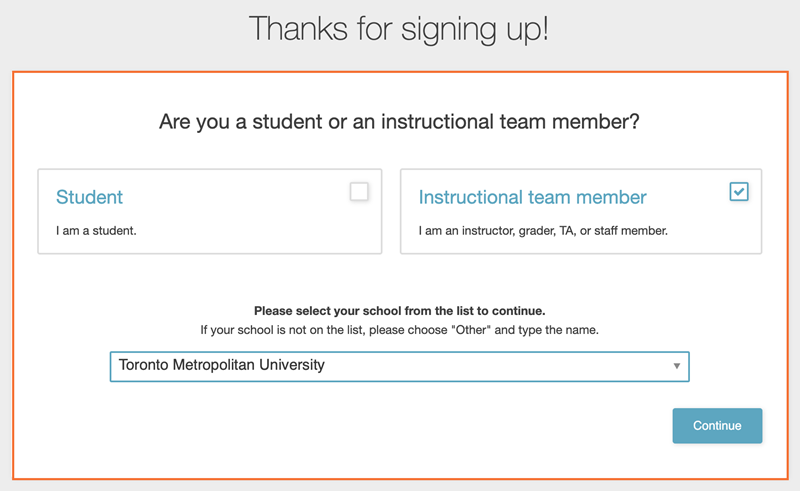
When asked whether you are a Student or an Instructional team member, click Instructional team member and select Toronto Metropolitan University.
Click Continue.
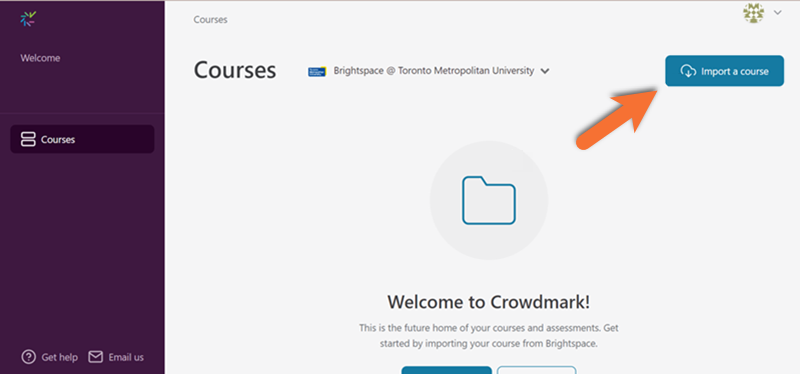
Click on Import a course, select your course, and click Import Course.
The course will appear in the Courses section of your Crowdmark homepage.
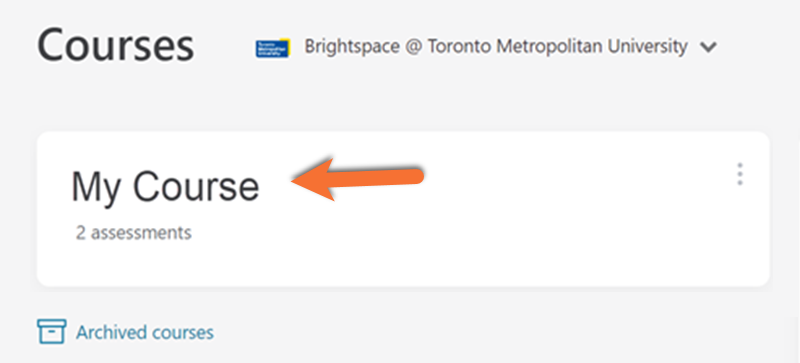
Click on the course you would like to create an assessment for.
Before you can create an assessment, you will need to Import Students to your course.
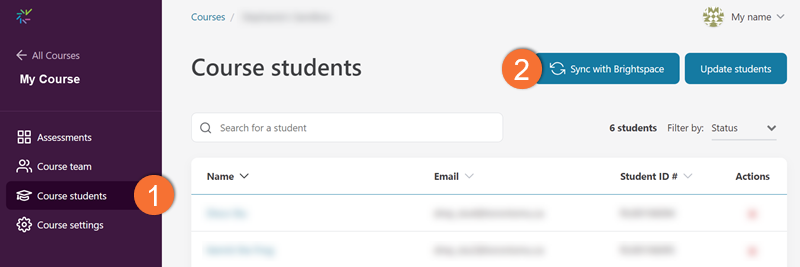
1. Click on Course students in the left sidebar of your course shell.
2. Click Sync with Brightspace.
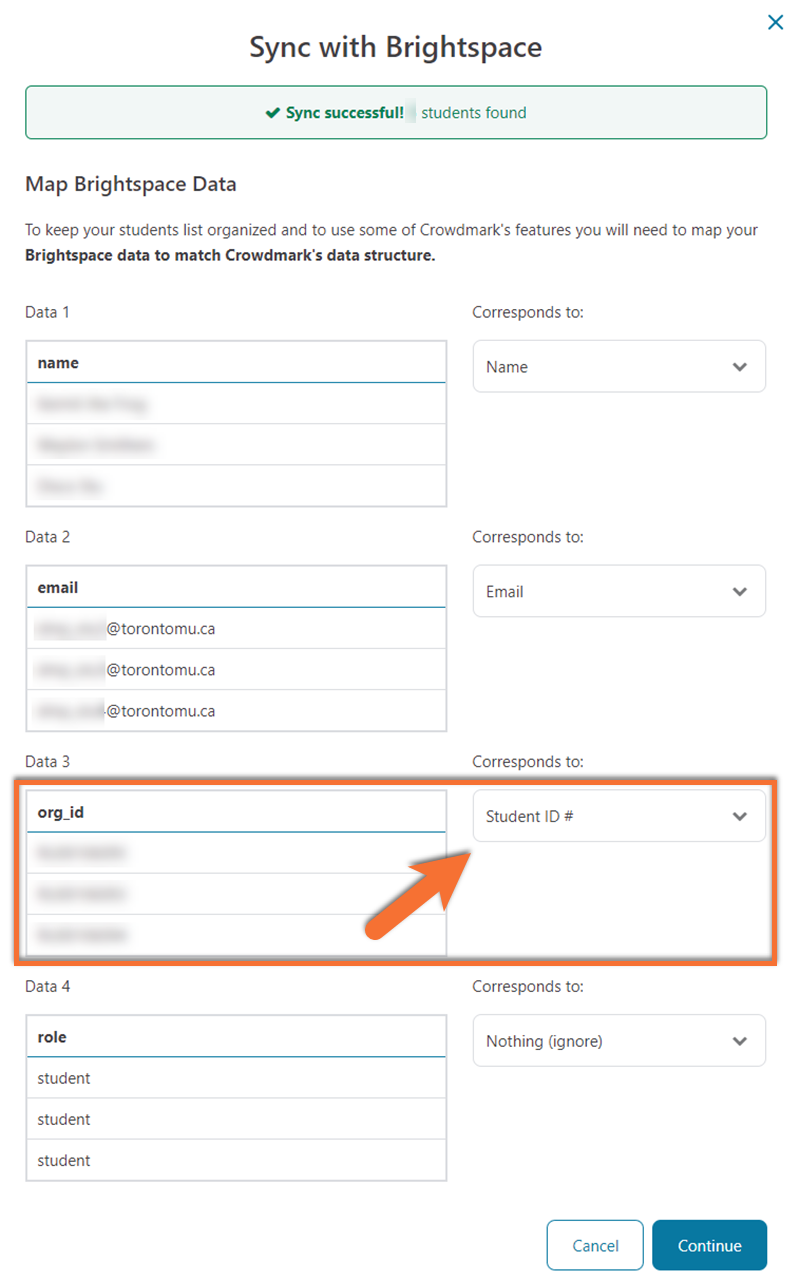
You will be prompted to Map Brightspace Data to ensure that it is matched with Crowdmark's data structure.
Verify that Data 1 name and Data 2 email match their corresponding dropdown lists.
Select Student ID # from the drop-down list next to Data 3 (org_id).
You may leave Data 4 role as Nothing (ignore).
Click Continue when you are done.
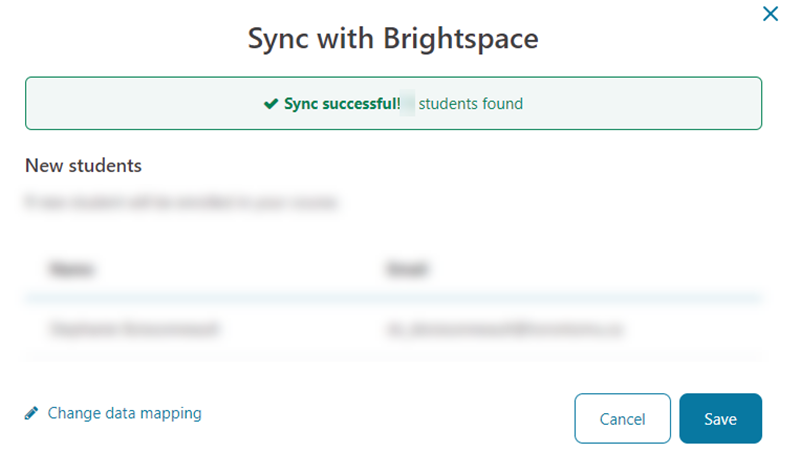
Click Save to confirm students' enrollment.
The Course Students page will now be populated with student information synced from Brightspace.
Administered assignments are on-paper exams, facilitated in person.
Assignments are created by uploading an assessment template to Crowdmark, where a unique QR code is added to each page. Crowdmark then generates a PDF file with a response booklet for each student. This file is then printed and booklets are distributed at the time of assessment. Upon completion, the filled response booklets are collected, scanned, and uploaded to Crowdmark for grading.
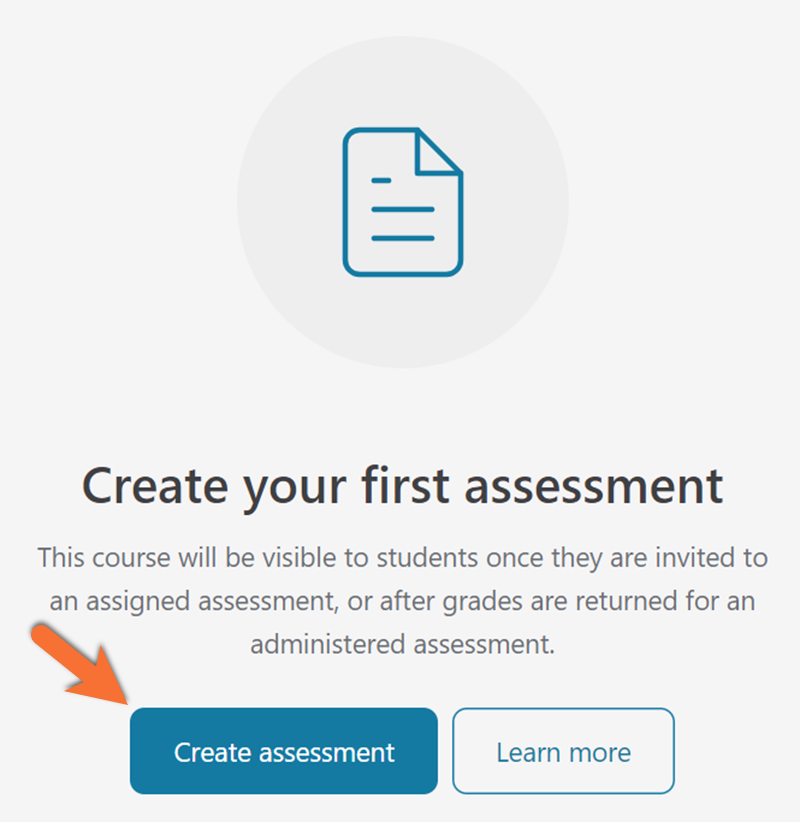
Go to your Assessments dashboard by clicking on Courses in the left sidebar, and then on your course name.
Click on Create assessment.
On the next page, title your assessment and click Next.
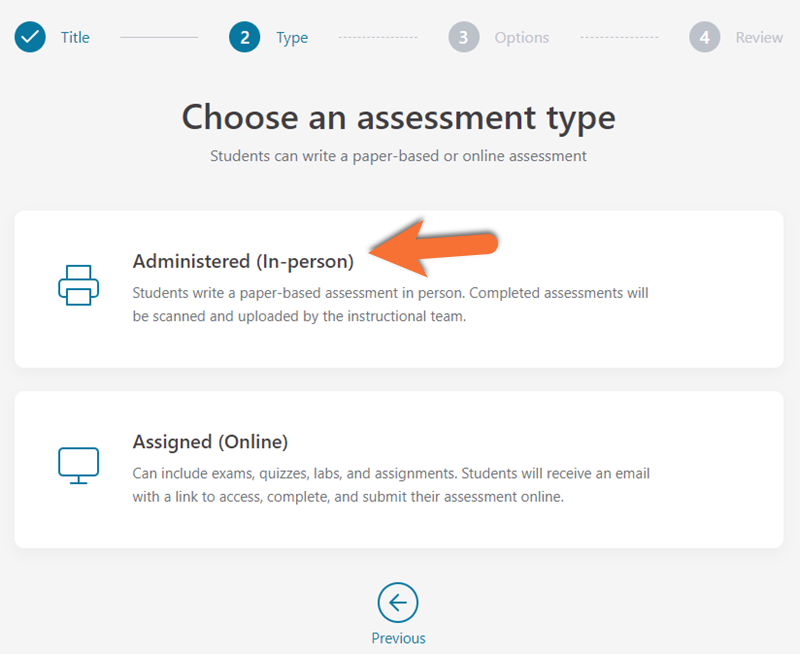
Select Administered (In-person).
On the next page, select Upcoming assessment.
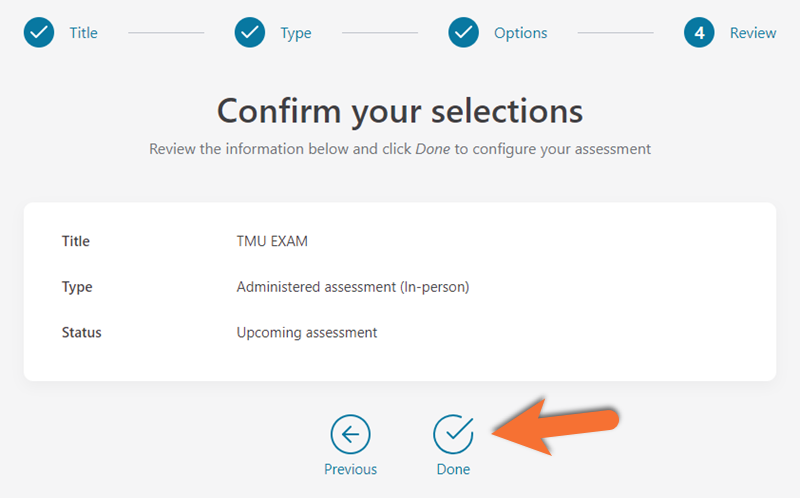
Click Done to confirm your selection.
The assessment will be added to your Assessments dashboard and the Assessment setup page will appear.
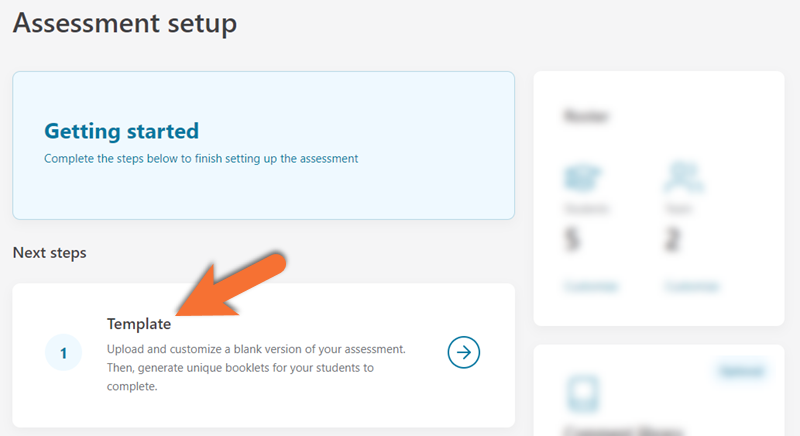
Click Template to upload an assessment template.
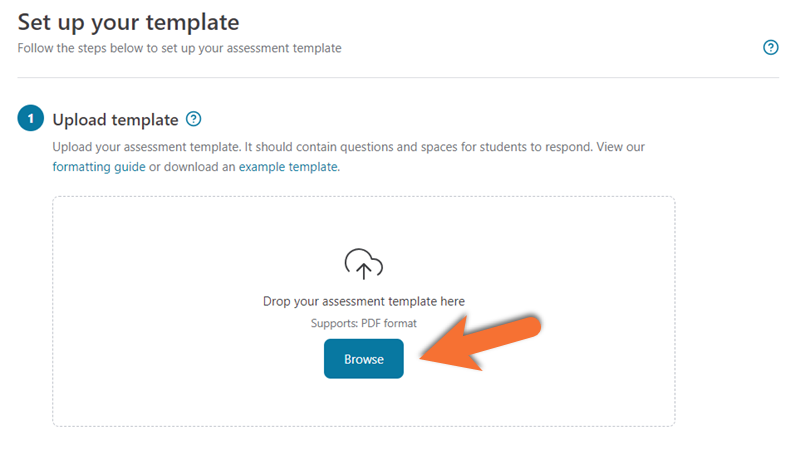
To upload your PDF assessment template, click Browse and select a file.
Note: Before uploading your assessment template, verify that it follows Crowdmark’s assessment template specifications (external link) .
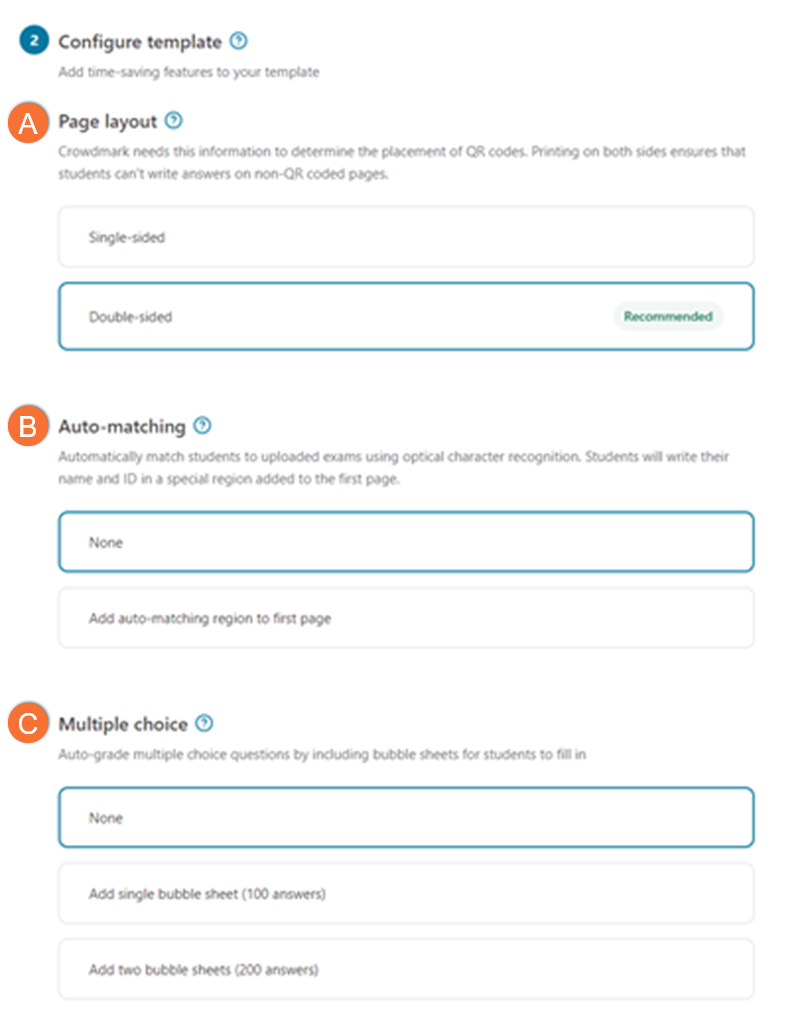
A. Select a page layout to help Crowdmark determine QR code placement.
Note: Double-sided is recommended to ensure students can’t write answers on non-QR-coded pages.
B. Choose to enable Crowdmark’s Automated-matching feature; this links students to their uploaded exam by collecting students’ names and IDs on the assessment template’s cover page.
Note: If enabled, assessment templates must follow Crowdmark’s template specifications for using automated-matching (external link) .
C. Select the option of including bubble sheets for students to fill in; this enables the auto-grading of multiple-choice questions.
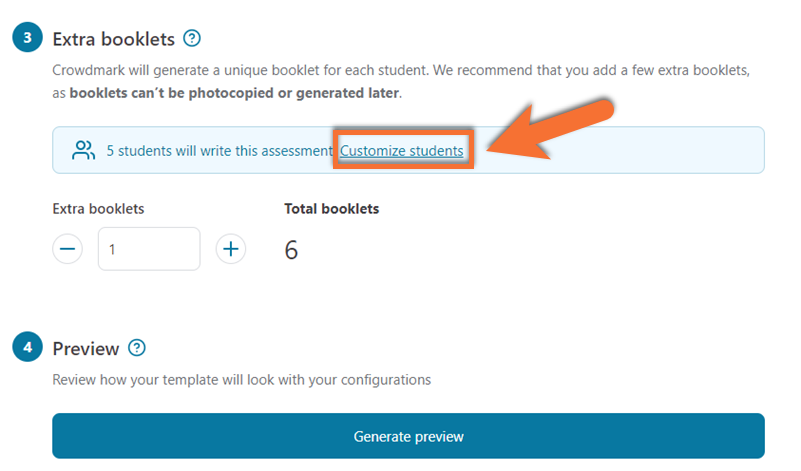
Select Customize students to add or exclude students from your assessment.
Set the number of extra booklets you would like to print. Extra booklets can’t be photocopied or generated later.
Click Generate preview to review the assessment templates with QR codes.
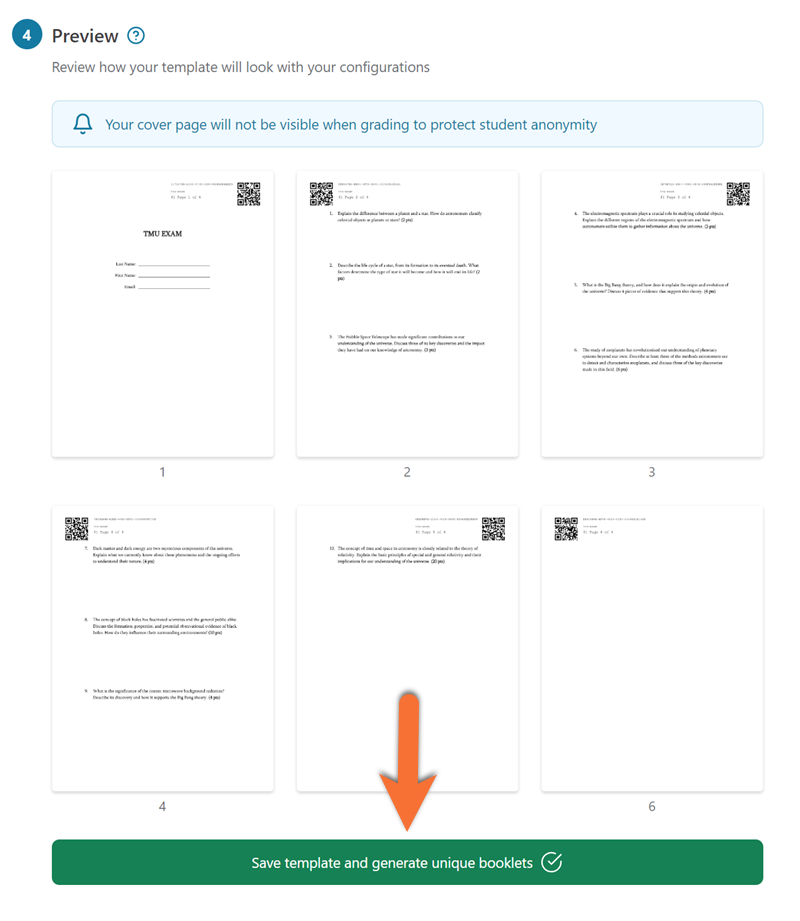
In the preview, verify the QR code placement.
If there are errors, make changes to your assessment template file, then click on Upload a different file near the top of the page. After this, return to stage 4 and click Generate preview to review the new document with QR codes.
Once you are satisfied with the layout, click Save template and generate unique booklets.
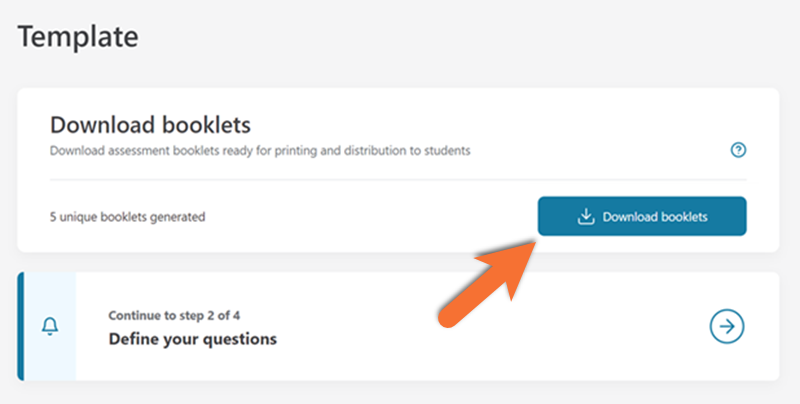
On your assessment’s Template page, click Download booklets to save a PDF copy for printing.
Select Define your questions to move on to the Questions page.
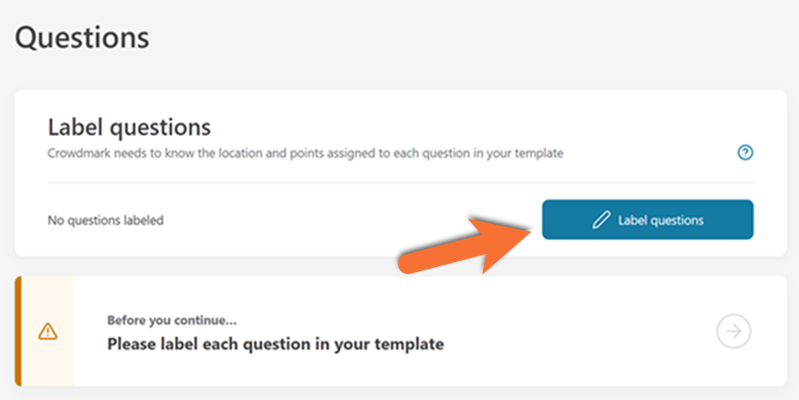
Click Label questions on the Questions page to locate and label each question on your assessment.
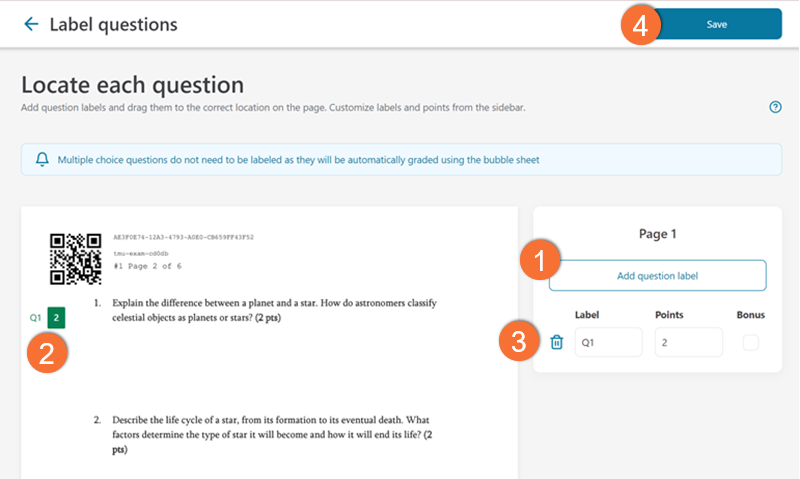
1. Click Add question label. A green label will appear on your page.
2. Click, drag, and drop the label to reposition it next to its corresponding question.
3. Rename the label using the Label box and adjust the maximum allocated score using the Points box.
Repeat these steps to label every question on each page.
4. After labeling all questions, click Save in the upper right corner.
These steps only apply to Administered assessments.
Assigned assessments do not require printing or scanning as the students submit them online.
Note: Printing and scanning assessments through Ricoh will still require you to complete the Exam Matching process.
Toronto Metropolitan University has an agreement with Ricoh to take care of Crowdmark printing, binding, and scanning, as well as pick-up, delivery, and drop-offs.
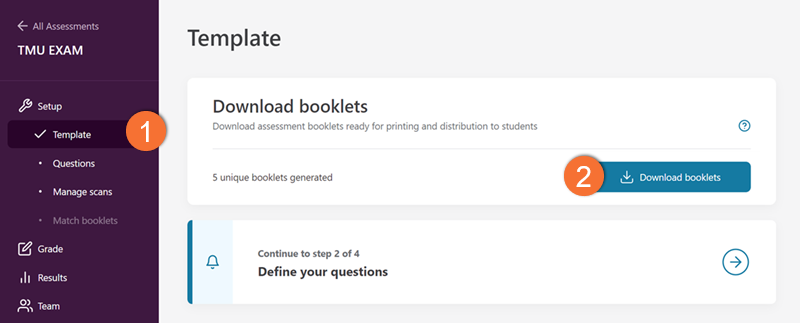
Download a PDF copy of the assessment booklets from Crowdmark for printing by navigating to your Assessments dashboard: Click on Courses in the left sidebar, select your course, and then on your assessment.
From your assessment:
1. Click on Template in the left sidebar.
2. Click Download booklets
Email your PDF copy of the assessment booklets to Ricoh at torontoworkflow@ricoh.ca.
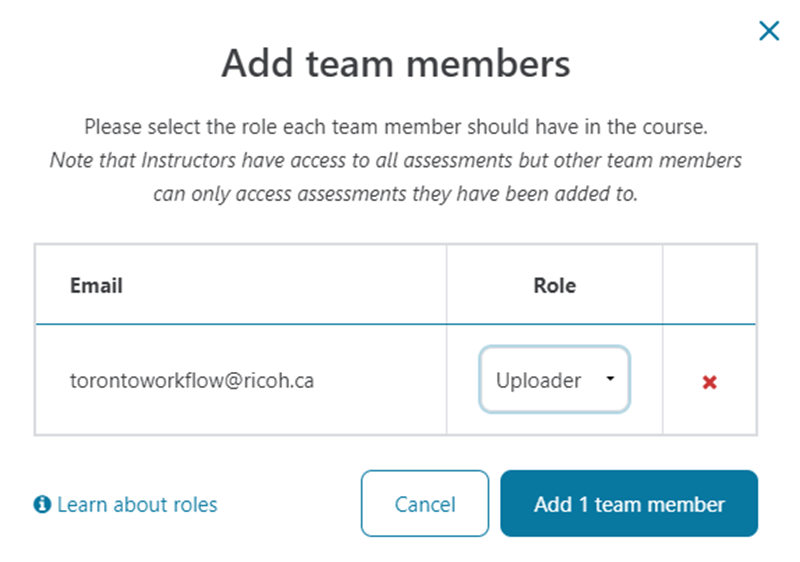
Invite torontoworkflow@ricoh.ca to Crowdmark as an uploader/downloader:
- Navigate to your course dashboard and click on Course Team in the left sidebar.
- Click + Add by email and input torontoworkflow@ricoh.ca. Click Continue.
- Select Uploader from the dropdown menu under Role and click Add 1 team member.
Verify that the Team page now lists torontoworkflow@ricoh.ca as an uploader.

Fill out the request form linked below to arrange for Ricoh’s printing/scanning pick-ups and deliveries.
When you submit the form, Ricoh staff will receive an email providing the details of the printing and scanning pick-up/delivery arrangement (be as specific as possible when specifying the pick-up/delivery location).
Printing: Ricoh will print and drop off the assessment booklets on the date and at the location you indicated in the Google form.
Scanning: Ricoh will pick up the exams at the time you scheduled on the Google Form and will scan them for you. You will get an email when your exams are uploaded and can move on to Exam Matching.
Please invite torontoworkflow@ricoh.ca to Crowdmark as an uploader/downloader before you submit a request.
Note: Printing/Scanning and uploading usually takes 24 hrs.
This tutorial only applies to Administered assessments.
Assigned assessments do not require printing or scanning as they are handled online by the students.
To print booklets yourself:

Download a PDF copy of the assessment booklets from Crowdmark for printing by navigating to your Assessments dashboard: Click on Courses in the left sidebar, select your course, and then on your assessment.
From your assessment:
1. Click on Template in the left sidebar.
2. Click Download booklets
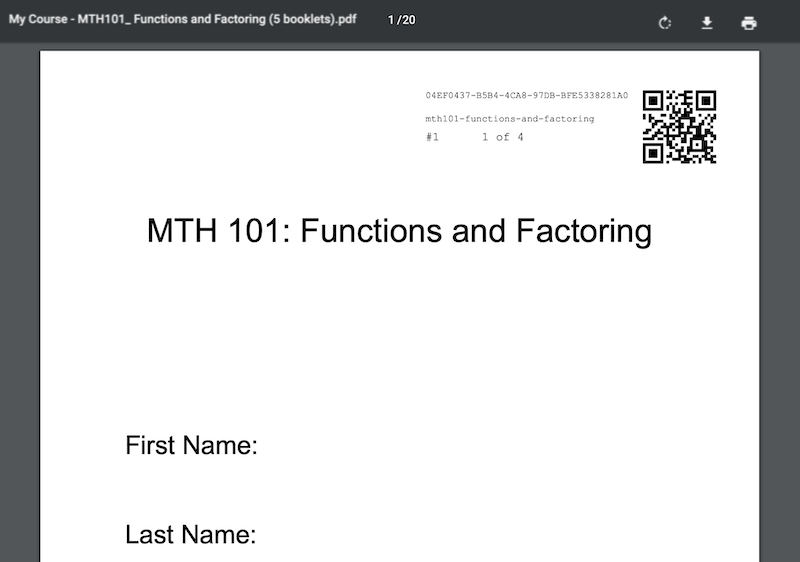
You can print your Crowdmark assessment yourself using any printer.
Note: As Crowdmark supports multiple paper sizes, the printer you use must support the paper size you created your assessment on.
Most printers default to 8.5x11" paper which matches the default page size in writing applications including Word and Google Docs.
To scan booklets yourself:
Take an image of the completed booklets using a scanner or a phone camera. Be sure to clearly include the QR code as this uniquely identifies each sheet without requiring specific labeling or ordering. Crowdmark supports the upload of PDF and JPG booklets as either individual files or packaged pdfs.
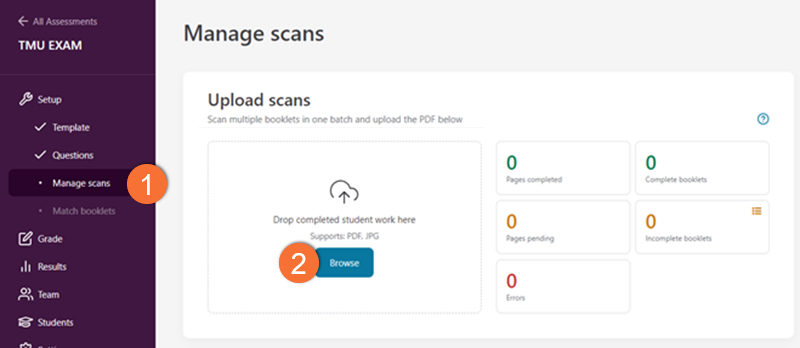
Go to your Assessments dashboard by clicking on Courses in the left sidebar, select your course, then your assessment.
1. Click on Manage scans in the left sidebar.
2. Click Browse and select a file to upload your scanned booklets.
Note: You can upload multiple files at once. Wait until they have all been uploaded and all of your pages display the green pages completed indicator. Any issues will be indicated in red.
Upon completion, be sure that the green "Complete booklets" number matches the number of students that sat at the assessment.
Crowdmark requires you to complete Exam Matching, a process of digitally pairing your students' exam booklets to their university email within the online system.
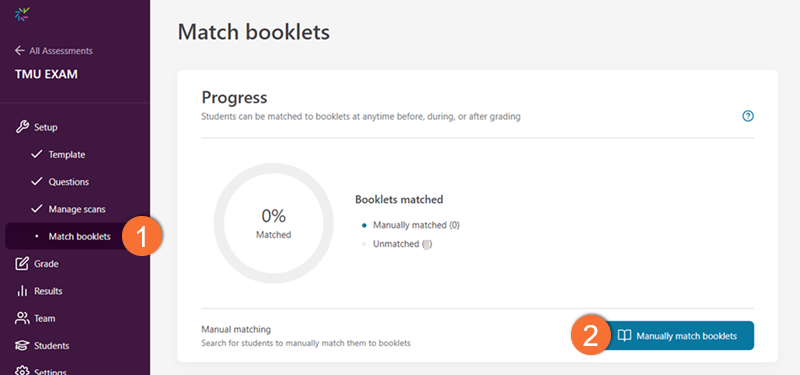
After you have uploaded your assessment booklets, go to your Assessments dashboard: Click on Courses in the left sidebar, select your course, then your assessment.
1. Click on Match booklets in the left sidebar.
2. Click Manually match booklets.
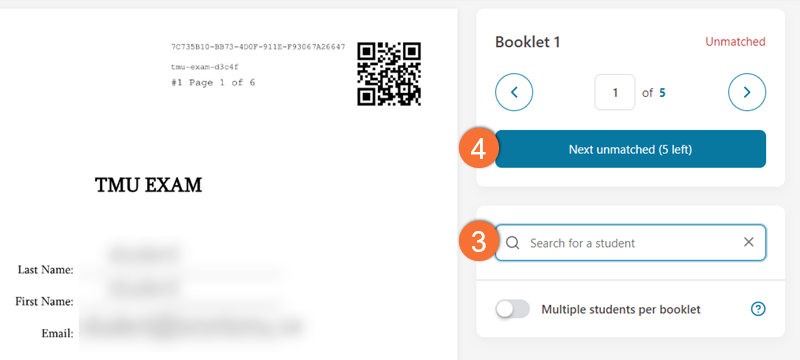
3. Search for the student's name, email, or student number as displayed on the first page of their assessment, and select the corresponding student from the drop-down list.
4. Click Next unmatched or the left and right arrows to navigate through student booklets.
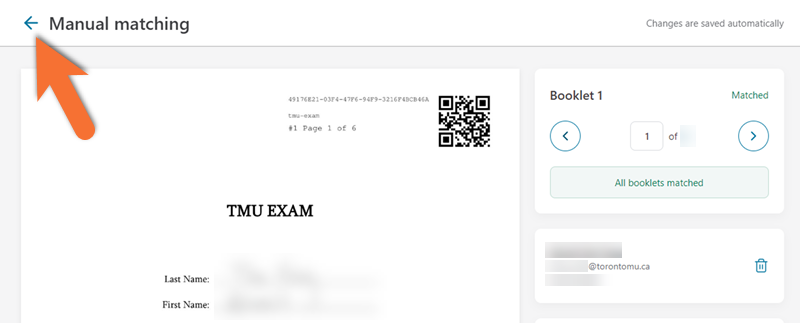
Once you have matched all booklets to a student, a green box will confirm that all booklets have been matched.
All changes are saved automatically and you are now ready to start the grading process.
Click on the blue arrow in the upper left corner of the screen to return to your Assessments dashboard.
Crowdmark requires you to complete Exam Matching, a process of digitally pairing your students' exam booklets to their university email within the online system.
If you would like to take attendance and match students to booklets during the assessment, you can do so using any mobile device. Please note that the iOS and Android Exam Matcher apps are no longer supported by Crowdmark.
Assigned assessments are completed and submitted by students independently or in groups, such as assignments, homework, or take-home exams. Assessments are emailed to the students and they must either complete the assignment digitally or print and complete it on paper. Students must scan and upload their completed assignments to submit them as PDFs.

Navigate to your Assignment dashboard by clicking on Courses in the left sidebar and then on your course.
Click on Create assessment.
Title your assessment and click Next.
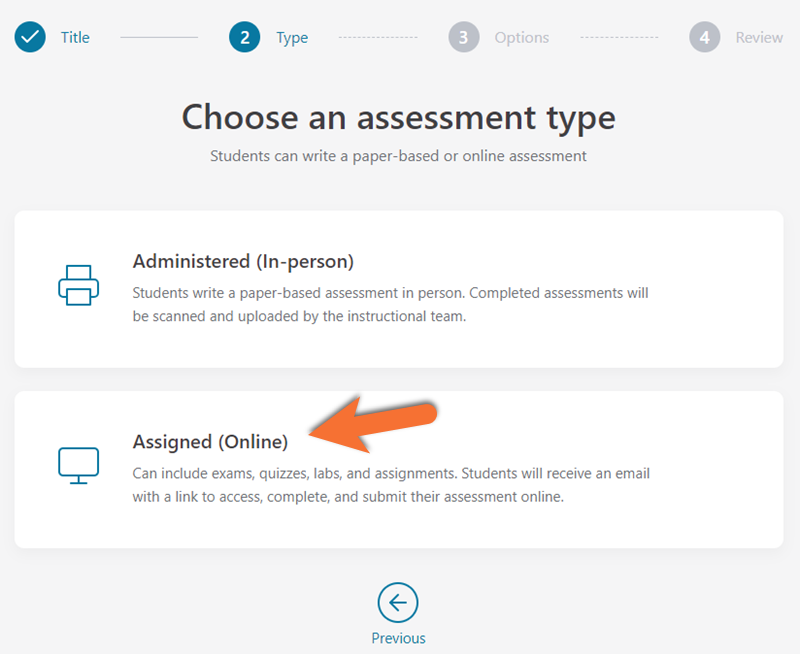
Click Assigned (Online).
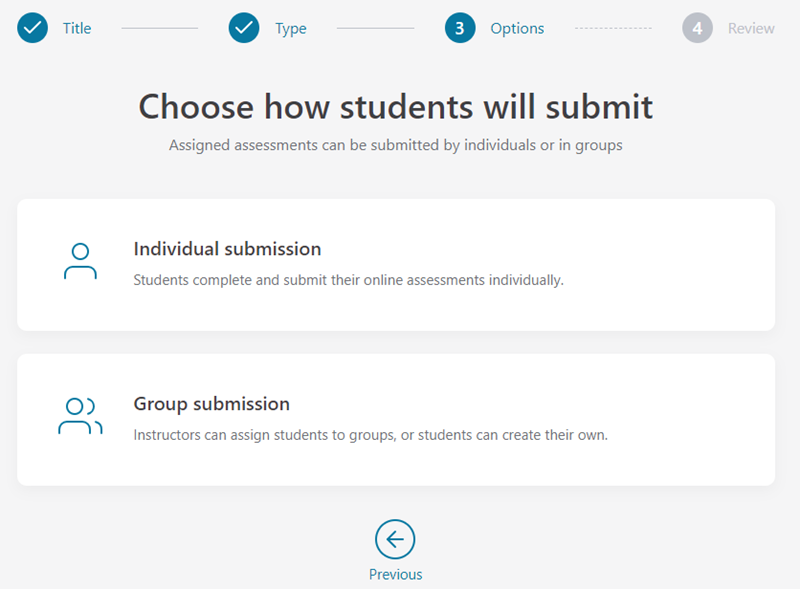
Select either Individual submission or Group submission.
Individual submission: Students complete and submit online assessments individually.
Group submission: Instructors can assign student groups or students can create their own.
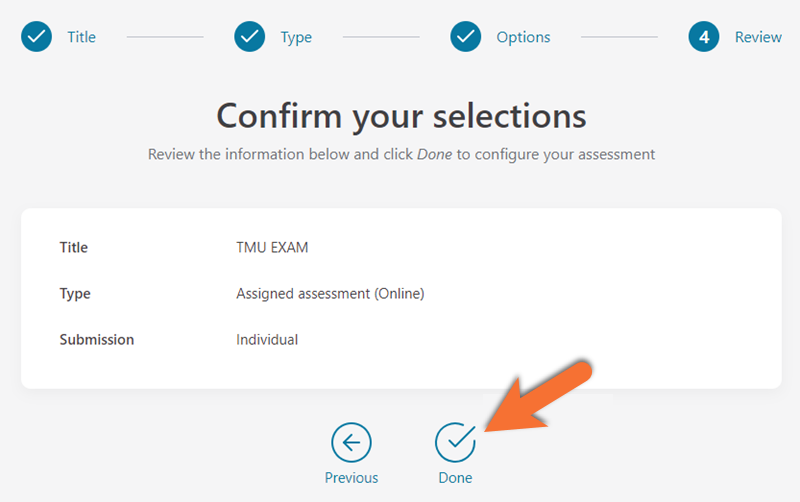
Click Done to confirm your selection and move on to the Assessment setup page.
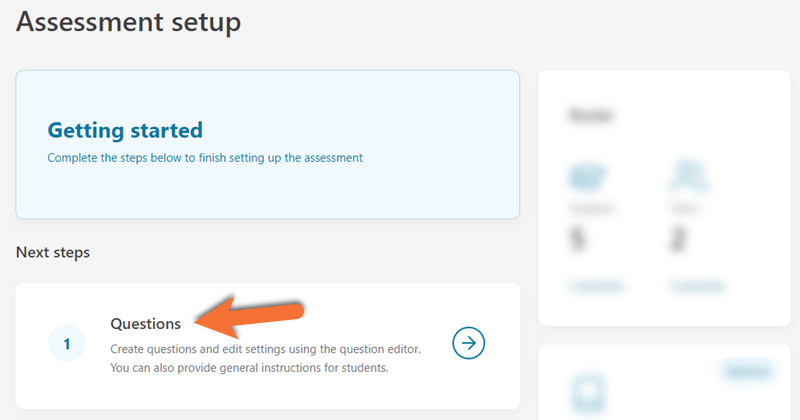
Click Questions to create and edit questions for students.
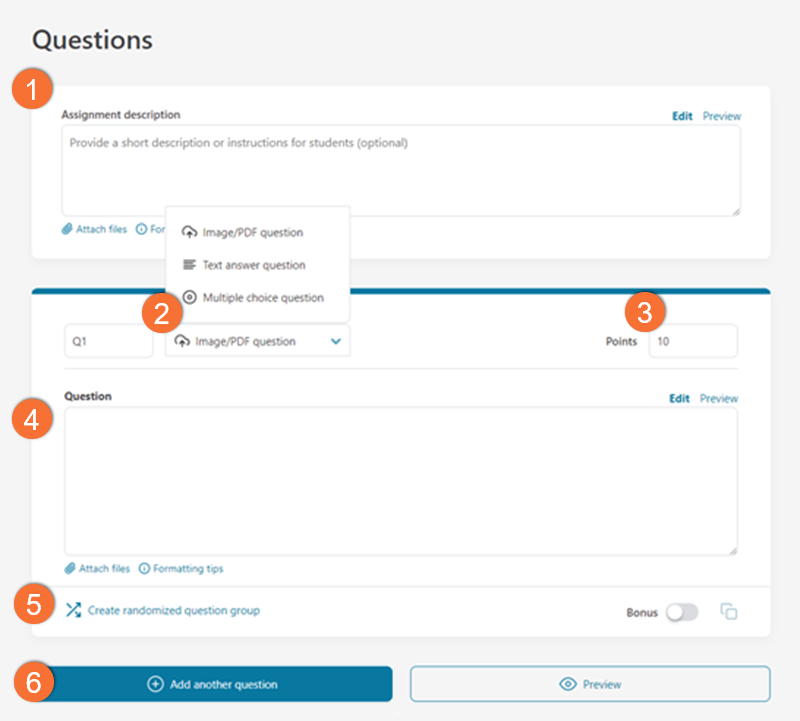
1. Optional: Select + Add assignment description at the top of the page. A textbox will appear where you can write a description or attach a file.
2. Select a question type from the dropdown menu. Learn more about Crowdmark’s questions and response types on their website (external link) .
3. Adjust the maximum score allocated for each question by editing the Points box on the right.
4. Write your question in the textbox.
5. Optional: Click Create randomized question group to create a new version of the question. These versions will be randomly and evenly distributed amongst students’ assessments.
6. Click Add another question to add additional questions to your assignment.
When you are done creating your questions, click Continue to step 2 of 2 Schedule your assessment at the bottom of the page.
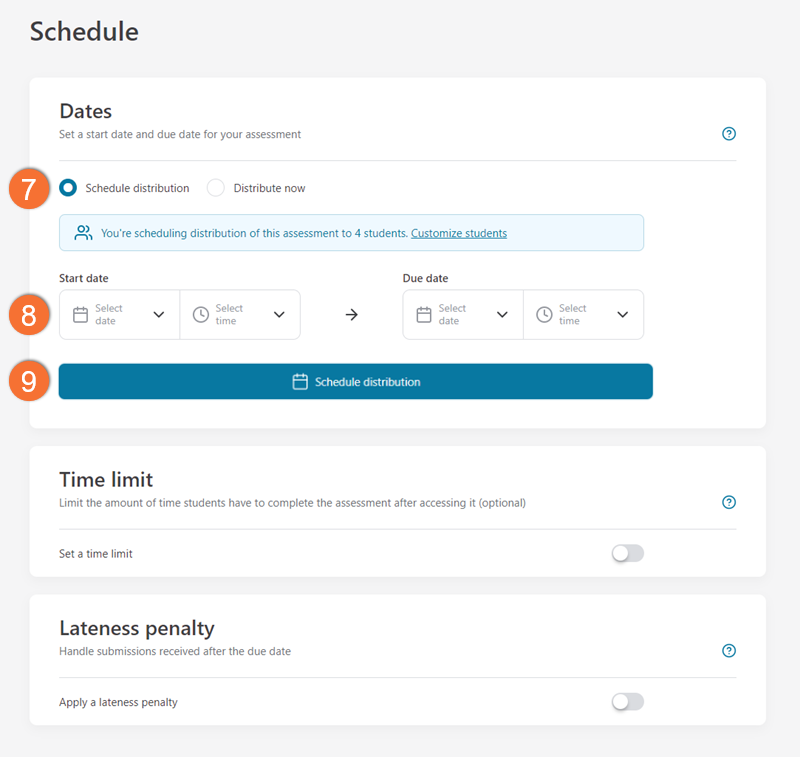
7. Select Schedule Distribution and adjust the Start date to schedule your assessment for the future.
OR
Select Distribute Now to distribute an assessment immediately.
8. Adjust your assignment’s due date.
Optional: Set a Time limit and a Lateness penalty. Learn more about Crowdmark's scheduling and distribution options on their website (external link)
9. When you are satisfied, click Schedule distribution or Distribute now. Crowdmark will email your assignment to students at your selected start date and time.
Before you start grading, you will need to import your team from Brightspace.
Note: Only users with roles within your Brightspace course should be added as graders to Crowdmark. To learn more about user roles within TMU's Brightspace, please see the Add users to your D2L shell resource.

Navigate to your course dashboard by clicking on your course name in the Courses area of the platform.
1. Click on Course team located in the left sidebar.
2. Click on Sync with Brightspace.
3. Select an appropriate role for each team member from the dropdown menu. Learn more about Crowdmark's team member roles on their website. (external link)
Added team members will receive emails from Crowdmark inviting them to the assessment.
Grading may be conducted by you or by teaching assistants added to your team once all of the student booklets are uploaded to the system.
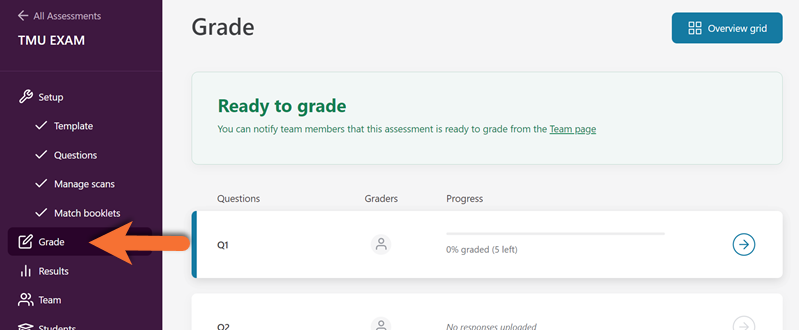
Navigate to your Assessments dashboard by clicking on Courses in the left sidebar, then on your course, and then on your assessment.
Click on Grade in the left toolbar.
Select the Question box (Q box) you would like to grade.
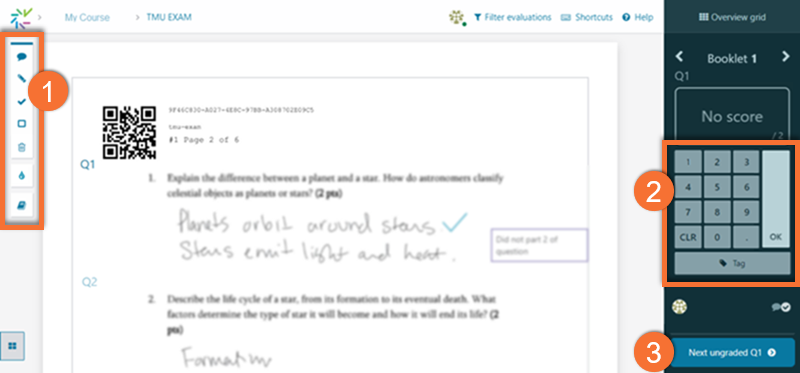
1. Use Crowdmark’s grading tools in the left sidebar to annotate responses. Learn more about Crowdmark’s Grading Tools on their website (external link)
2. Provide a grade for the question by inputting a number using the number pad and clicking OK to save your grade.
Optional: Add a Tag to bookmark responses you would like to revisit with your grading team. Learn more about Crowdmark’s tagging feature on their website
3. Click on Next Ungraded or use the left and right arrows to navigate to the same question in the next student’s booklet.
Once all the questions of that specific Q box have been graded, click on your assessment's name in the upper left corner to return to your assessment's Grade page and move on to grading the next Q box.
Once all the booklets have been graded, you can export the scores to your Brightspace shell's Grade tool.
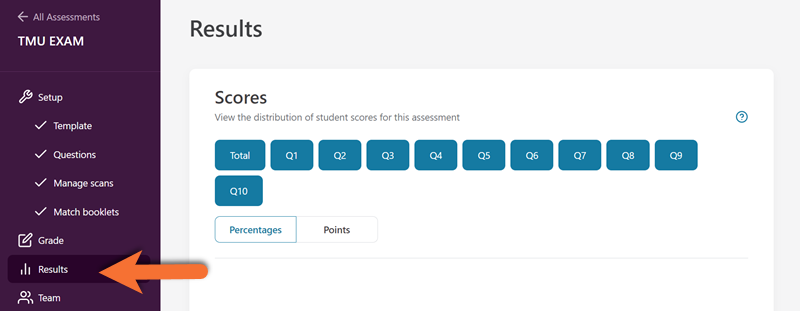
Navigate to your Assessments dashboard by clicking on:
- Courses in the left sidebar
- Your course name
- The assessment
Click on Results on the left sidebar.
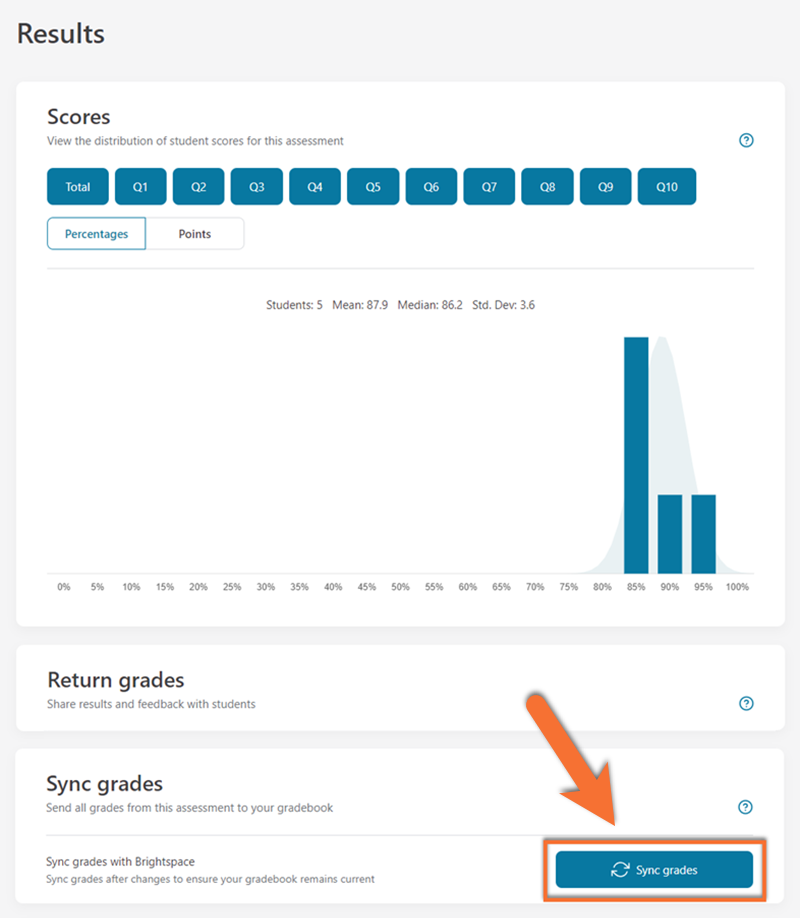
Scroll to the bottom of the Results page and click on Sync grades.
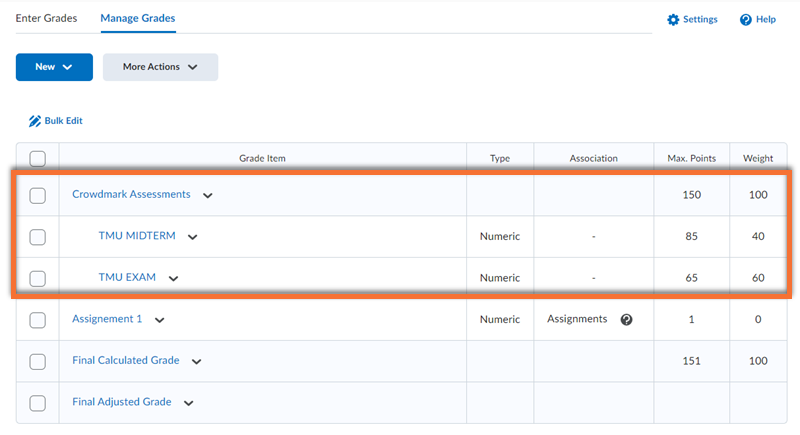
Once this step is completed, a new Grade Category will be created in your Brightspace shell's Grade tool with the same name as the Crowdmark assessment.
Within the Grade Category, be sure to set your grade item(s) from Crowdmark to sum 100% of the category weight.