Grades
The Grades tool in D2L allows you to enter and manage grades for your course. When entering the Grades tool, the default view will be the Manage Grades page - the perfect place to begin setting up grades.
Students only see their own grades when viewing the Grades tool.
On this page:
Find Grades in the top menu. If it isn't there, review how to enable course tools.
Grade items
Grade items are the core of your course gradebook. A grade "item" refers to the column created to enter grades.
Grade items can be one of a few different types, but keep in mind that you can only enter grades in a "numeric" grade Item.
Grade categories
Grade "categories" are a way to group grade items together so that a common weight can be applied (i.e. all quizzes are worth 20% of the final grade) and possibly apply some additional settings (i.e. drop the lowest of the quiz grades).
Grades cannot be entered into a category - the category can only calculate and display grades based on the settings you enter into the category.
You do not need to create any categories in your course gradebook.
For example, you might want to create a grade category called “Quizzes”, or “Assignments” to group together items of the same type. This is especially useful if you have multiple quizzes in your course, and all the “Quizzes” make up 30% of the final grade. A category will allow you to apply a weight of 30% to the Quizzes category. In the image to the right, you'll see the Quizzes category is comprised of four weekly quizzes. Categories appear in the darker grey row.
For most instructors who are using the most typical settings in their gradebook, the total of the weights of all top-level grade items and categories must total 100%.
If you have grade items inside a grade category, all items inside that category must have weights that total 100% for that category.
For most instructors who are using the most typical settings in their gradebook, the total of the weights of all top-level grade items and categories must total 100%.
It's a good idea to set up your gradebook early in the term, so that student grades can calculate as you enter their interim grades. Start by reviewing your course outline - this should give you an idea of how to weight each component of the course.
If you have a component of your course that is comprised of multiple graded entries - such as discussion posts or weekly quizzes - a category is a great way to represent the weight of the group of items.
If you have grade items inside a grade category, all items inside that category must have weights that total 100% for that category.
The example below shows how weights are applied for individual grade items as well as categories.
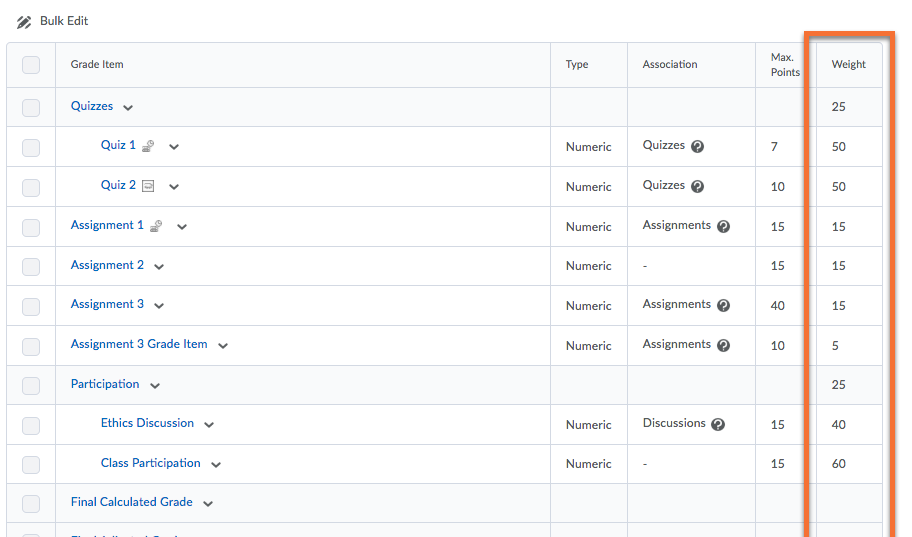
Example 1: You have an exam out of 75 points.
If the exam counts for 20% of the final grade, the grade item has a weight of 20 and a max points of 75.
You will input the student's score out of 75.
The Grades tool will do the weighted calculation, using the score out of 75 to calculate the item's weight of the final calculated grade (in this case, 20%).
Example 2: Your course outline shows that "quizzes" represent 25% of the final grade and there are two quizzes delivered in the course.
You will create a category for the Quizzes that has a weight of 25% in the final grade calculation, and create the grade items for each of the two quizzes within that category. The two quizzes within the category must have weights adding to 100% (of the category).
The Grades tool will do the weighted calculation, representing the two quizzes together as a score out of 25 in the final grade.
Once you're ready to begin, start creating your grade items and categories.
We highly recommend hiding your grade columns at the start of the term.
There are a few reasons for this:
- It may be upsetting for a student to see a 0 value grade (or even an F), even if they know it is too early for those grades to be official.
- As you begin entering grades, students may receive notification emails (if they have enabled them). Some students may contact you if they hear that their peers have received grades when they haven't yet.
- Also related to email notifications, some workflows may send students notifications of incomplete grades - again, leading them to believe they have achieved a 0 on an assignment.
Overall, based on feedback we have received from instructors , setting all grade items as 'Hidden' (or scheduled for a future date release) seems to offer the best student and instructor experience.
Two methods for controlling students' access to the grades:
- Hide the grade items (detailed instructions provided below).
- Use a release condition to set criteria to release the grades to students. You can review our tutorial about how to add or edit release conditions.
You can review our tutorial about how to add or edit release conditions.
Hiding grade items/categories:
Grade items and categories can be hidden from learners by either manually hiding from the user, or by scheduling a start and/or end date for the items’ visibility.
The Manage Grades page allows you to see which Grade Items are hidden/visible:
A crossed-out eye icon beside the grade item indicates that it is currently set to be hidden from students.
A clock icon next to the grade item name indicates that it has a scheduled visibility start and/or end date.
Note: Visibility for the actual assignment is controlled separately, under the Assignments tool.
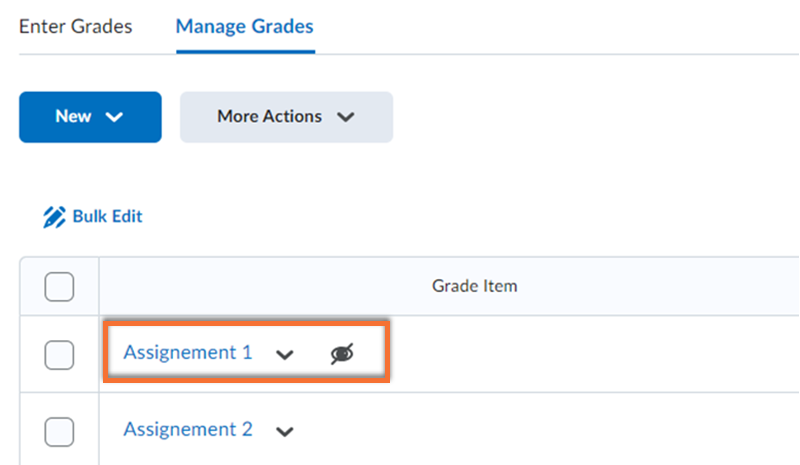
To hide grade items/categories from users:
Selecting Hide from Users ensures that users will not be able to see a category or grade item, regardless of other release settings.
Grade items/categories that are set to “Hide from Users” are indicated by a crossed-out eye icon next to the assignment name on the Manage Grades page.
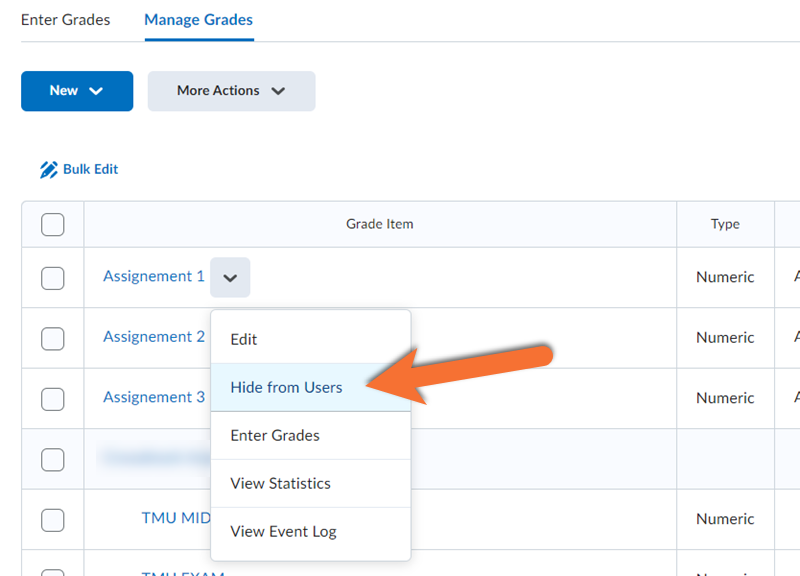
On the Manage Grades page, select Hide from Users from the drop-down menu of the category or item you want to edit.
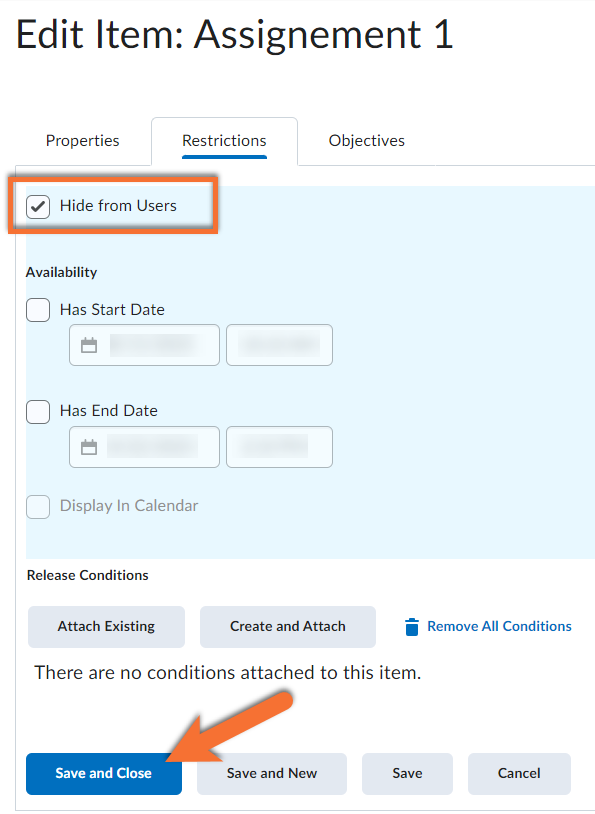
OR
Select the Hide from Users checkbox in the item/category’s edit page under the Restrictions tab.
Click Save and Close.
The crossed-out eye icon will appear next to the assignment name on the Manage Grades page.
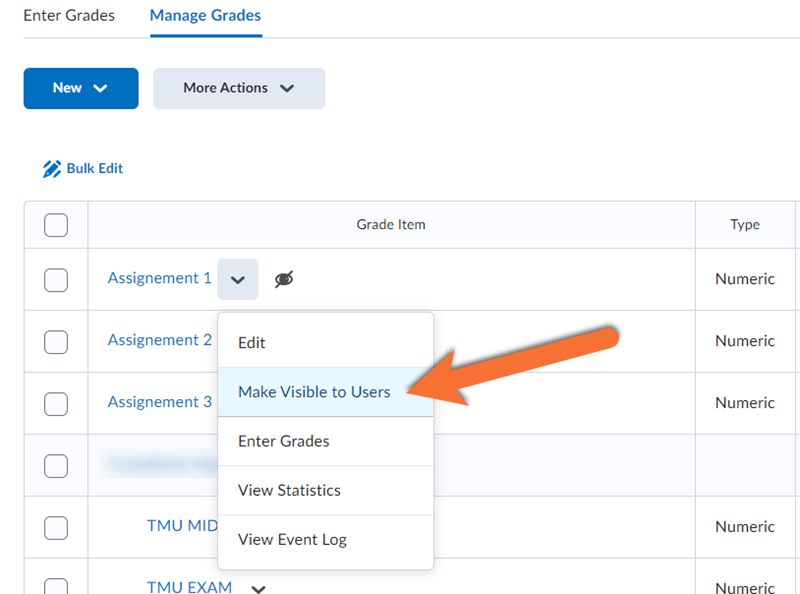
To make grade items/categories visible to users:
On the Manage Grades page, select Make Visible to Users from the drop-down menu of the category or item you want to edit.
OR
Uncheck the Hide from Users checkbox in the item/category’s edit page under the Restrictions tab and select Save and Close.
The crossed-out eye icon next to the assignment name on the Manage Grades page will disappear.
To schedule grade items/categories availability:
The availability settings allow you to schedule start and/or end times for grade items and categories to be visible to users. When scheduled, grade items and categories will remain hidden from users outside of the selected star and end times.
Grade items/categories with scheduled visibility start and/or end dates are indicated by a clock icon on the Manage Grades page.
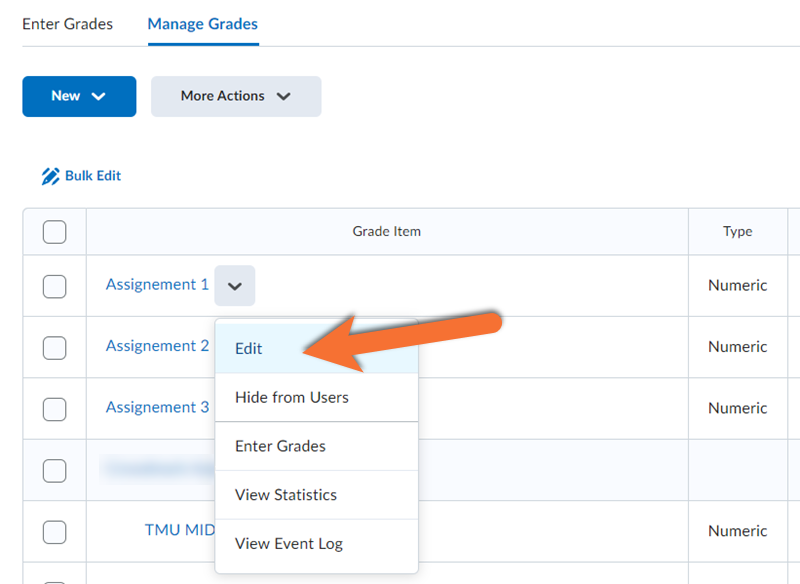
On the Manage Grades page, select Edit from the drop-down menu of the category or item you want to edit. Navigate to the Restrictions tab on the Edit Item/Category page.
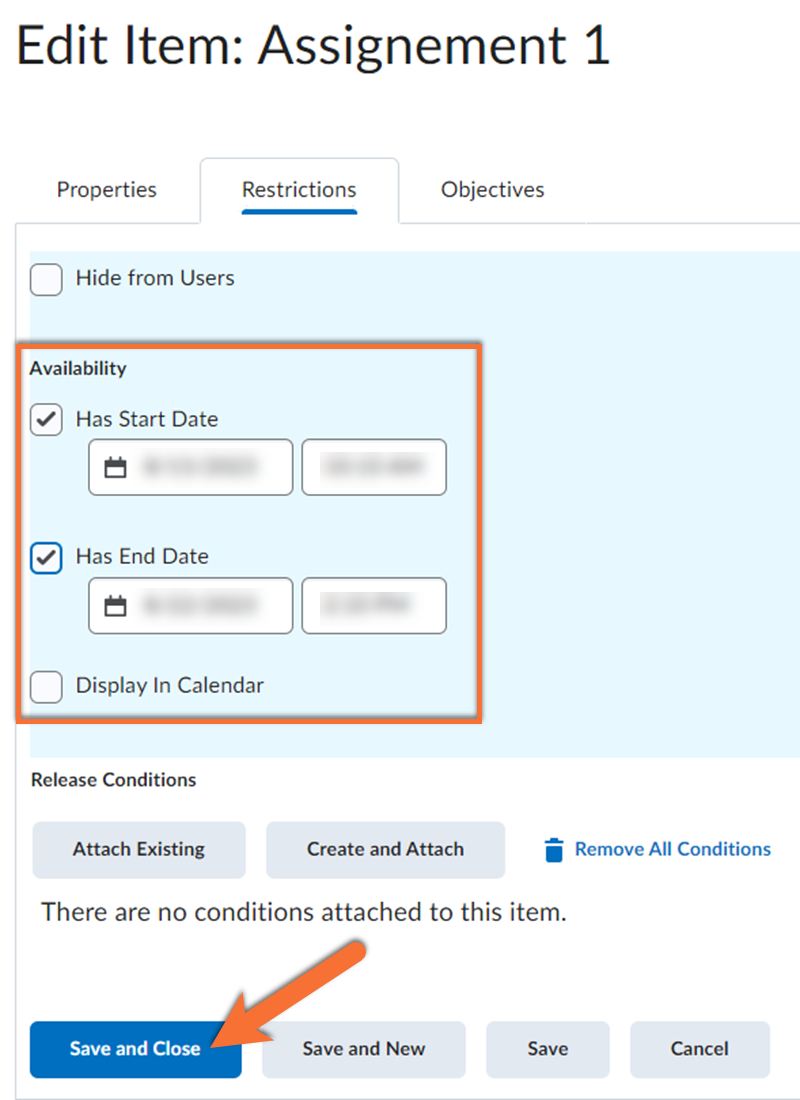
Check the option you want to enable under Availability, then select an appropriate date and time. You can set both start and end dates or just one of the two options.
Note: If you are releasing grades using the availability dates, you must uncheck the “Hide from users” box otherwise the item will not be visible.
Click Save and Close.
Note: If a grade item/category has a scheduled availability and is also set to “Hide from users”, the item will remain hidden from users throughout the scheduled availability until it is selected to “Make Visible to Users”.
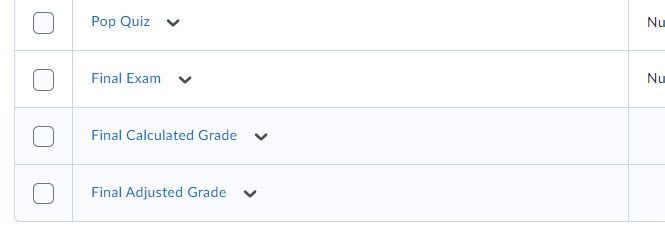
In your gradebook, regardless of how you created your course shell, at the very bottom, you will see two grade items that you did not create. These are automatically created by Brightspace for each shell. Students cannot see these grades, because the university only releases final grades via MyServiceHub.
If you requested a blank shell, the two columns will be labelled as you see in the image to the left, "Final Calculated Grade" and "Final Adjusted Grade". The "Final Calculated Grade" is the grade that D2L calculates based on all of the other grade items in the grade book. The "Final Adjusted Grade" is reserved for use only when you want to manually change one or more students' final grades at the end of the term, before you submit final grades (ie. if you grade on a curve). Most instructors will not use that column. If you anticipate using this, you can find detailed instructions linked from our All About Final Grades page.
If you requested a course shell that is a copy of a previous course shell, you may see a different name for one or both of these columns.
If one or both of the columns are named "RAMSS Grade", this is an older label that was used prior to when the university changed its name. At some point, you will need to update this label.
Most instructors will rename the first of the two to "TMU Final Grade", as that will be the grade that is sent to MyServiceHub at the end of the term. You can make this change now, or you can wait until the end of the term.
The "Settings" area of the Grades tool provides ways to control a number of elements, including final grades are calculated and the default settings for displaying grades to students and to the instructor.
For most instructors, the default settings are acceptable.
Grade "settings" can be found in the top-right of the Grades tool.
The Grading System
The 'grading system' refers to the method used to calculate the final grades in Brightspace.
There are three grading systems in Brightspace Grades:
- weighted
- points
- formula
This feature can be found in the grade settings, in the "Calculation Options" tab.

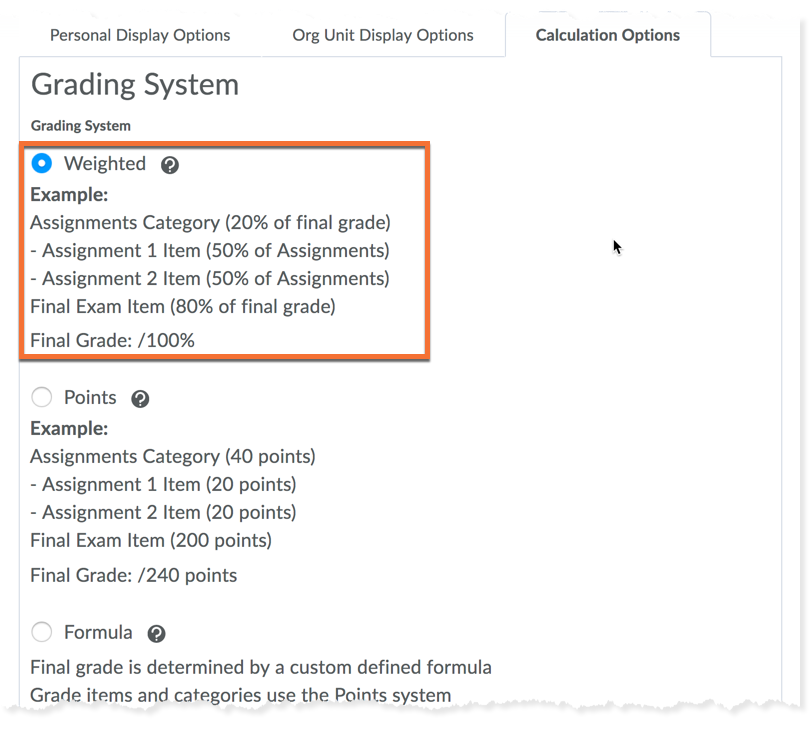
Weighted (default)
Your course in D2L will automatically have the gradebook set to the weighted grading system.
99% of the time, instructors will use this grading system, as it matches the way that most of us structure our course outlines. It is based on the idea that a graded item has a percentage value in the final grade.
If bonus items are included in the final grade, a student may achieve more than 100%.
For example, the midterm test may be worth 20% of the final grade, and can be marked out of 100 points. Therefore, the midterm test has a weight of 20.
Points
This calculation method simply adds up the maximum points of all of the items in the grade book, and creates a final grade based on that value. As seen in the example, this can create a grade out of more than 100.
Adding a new item increases the total points for the final mark
Formula
With the "Formula" grading system, you can define a custom formula for how grade items contribute to a final grade.
For the Formula system, grade items use the points system, but a formula is used to set conditions as to how grade items contribute to the final grade. For example, you could require that users receive at least 50% on their midterm and final exam to pass a course.
This calculation method is rarely used for courses at Toronto Metropolitan University, and relies on a certain level of comfort with a formula generator.
If you are interested in trying this method of calculating your final grade, we highly recommend meeting with one of our support team so that we can work with you.

Example: a simple weighted gradebook
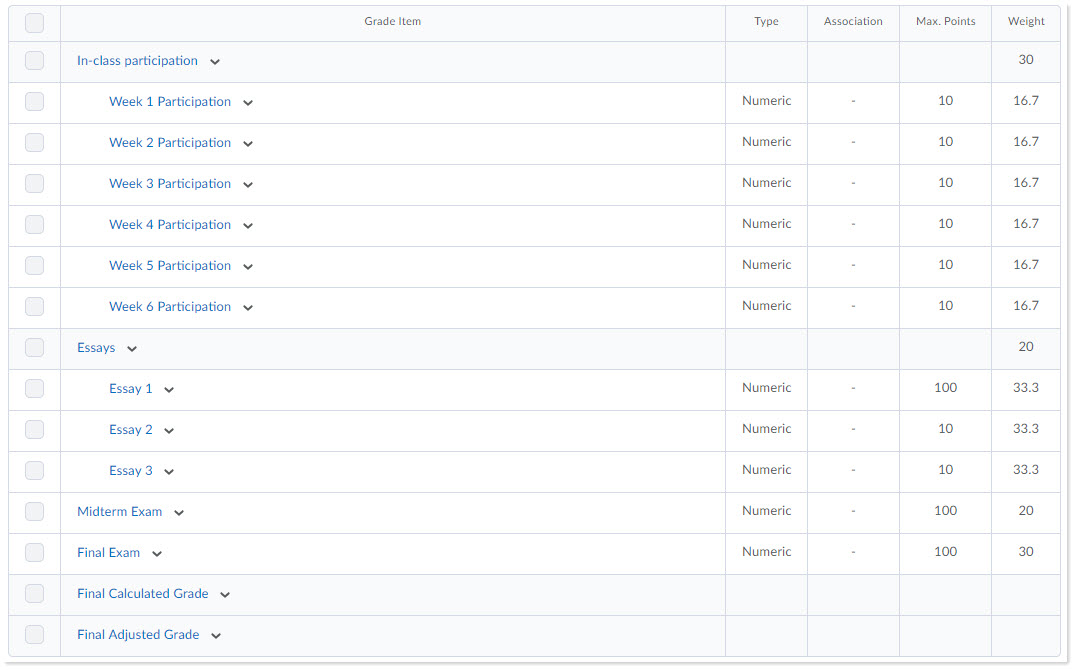
Example: a complex weighted gradebook, using categories
Final Grade Released
The Grades tool in Brightspace has two options for the final grade: Final Calculated grade and Final Adjusted grade.
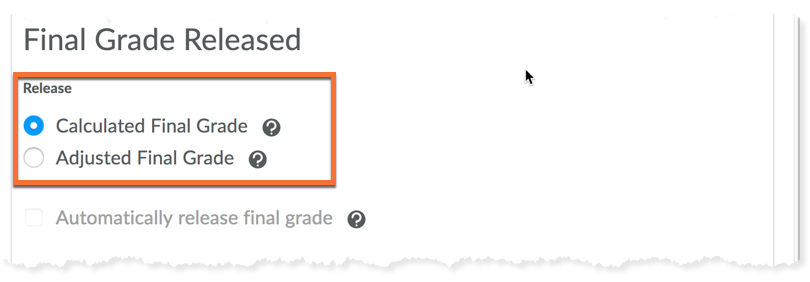
This feature can be found in the grade settings, in the "Calculation Options" tab.

Final Calculated
Your course in D2L will automatically have the gradebook set to the 'Final Calculated' grade.
The 'Final Calculated' (or 'Calculated Final') grade is the grade that D2L calculates for the final, based on the values you have entered into the grade columns and the grading system you have selected.
The 'Final Calculated' grade cannot be edited itself, but you can exempt students from certain grade items.
Final Adjusted
If you need to manually edit the students' final grades, you will want to use the 'Final Adjusted' (or 'Adjusted Final') grade.
The 'Final Adjusted' grade can used to manually enter the students' final grades. This can be useful if you have completed the final grade calculation outside of D2L (i.e. in Excel).
Ignore "Automatically release final grade"
Please ignore the 'Automatically release final grade' checkbox in this section. As final grades are not permitted to be shared with students in D2L Brightspace, we have disabled the ability to release the final grades at all.
Ungraded Items
'Ungraded items' are items in the grade book that haven't yet been graded. In some cases, the student may not have even submitted to that particular assignment/test.
These settings allow you to determine how these 'ungraded' items appear (to you and the students) and how they factor into calculations.

This feature can be found in the grade settings, in the "Calculation Options" tab.

Treat ungraded items as 0
Your course in D2L will automatically have the gradebook set to 'treat ungraded items as 0'.
This setting assumes that all student grades are considered 0 until you update it with another value.
The benefit to this option is that the calculations will remain accurate, even if a value is not entered. For example, if a student does not complete an assignment, you don't have to actually enter a grade of 0 for that value to be set in the calculations.
The downside is that, unless you hide the grade items initially, students may see that they have a value of 0 for their work and may be concerned.
The reason this is set as the default setting is as a safety net in case a value of 0 is not manually entered for a student (which would result in an inflated final grade submitted to the Registrar's Office).
Drop ungraded items
This setting assumes that the grade is excluded/exempted from the student's grades and calculations until you update it with another value.
The benefit to this setting is that, if the grades are visible to the students, the students will see a dash instead of a grade value for any grades where the instructor hasn't actually entered a grade.
The downside is that any student who doesn't complete an assignment needs to have a value of 0 entered for their grade, otherwise their final grade calculation will be inflated, which could result in an incorrect (higher) final grade submitted to the Registrar's Office.
Auto Update
You can choose whether D2L automatically keeps the final grades updated or not. If you turn this off, you can choose to turn it back on at any time.
Your course in D2L will automatically have the gradebook set to 'automatically keep final grades updated'.
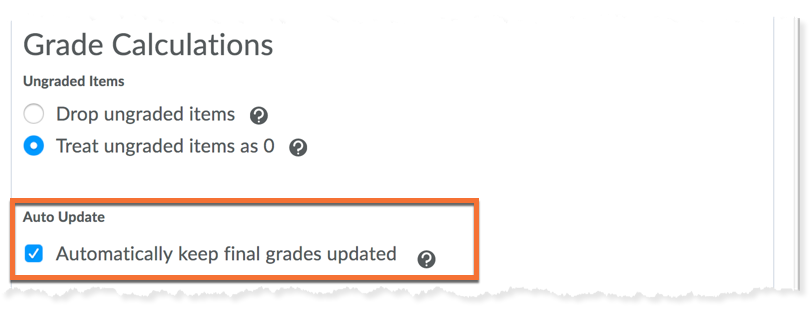
This feature can be found in the grade settings, in the "Calculation Options" tab.

Student View - Grade Details
This section lists the different formats of the grade that can be displayed to the students in the gradebook.
Select all of the variations of the grade that you want them to see.

This feature can be found in the grade settings, in the "Org Unit Display Options" tab.

Points grade
This is the score grade that you enter into the grade column (i.e. 52/55)
Weighted grade
This is the calculation of the grade item as it is represented in the final grade (i.e. 20/30)
Grade scheme symbol
This is the grade as dictated by the grade scheme you have selected. The default grade scheme is 'percentage', but you may select a different grade scheme, like Letter RU or Complete/Incomplete.
Grade scheme color
Each level in a grade scheme may have an associated colour. This is often most beneficial to the instructors, so they can easily use the colour cues to see how many students have achieved each level, at a glance. This may not be as useful for students to see

Characters & decimals
These two settings allow you to determine how many decimal places to display (in a numeric grade item) and number of characters to display (in a text item).
Personal Display Options
This tab contains settings that impact you, personally. You, as the Instructor of the course, are able to modify your display settings individually. These changes will not impact what other Instructors in the course see, or what the TAs see.

This feature can be found in the grade settings, in the "Org Unit Display Options" tab.


User details
Automatically, your gradebook will show the students' first and last names in the Enter Grades view.
Here, you can enable two more pieces of information:
- their username
- their Org Defined ID (student number)

Grade Details
This section lists the different types of grade that can be displayed to you in the gradebook.
Select all of the variations of each student grade that you want to see.
Points grade
This is the score grade that you enter into the grade column (i.e. 52/55)
Weighted grade
This is the calculation of the grade item as it is represented in the final grade (i.e. 20/30)
Grade scheme symbol
This is the grade as dictated by the grade scheme you have selected. The default grade scheme is 'percentage', but you may select a different grade scheme, like Letter RU or Complete/Incomplete.
Grade scheme color
Each level in a grade scheme may have an associated colour. This is often most beneficial to the instructors, so they can easily use the colour cues to see how many students have achieved each level, at a glance. This may not be as useful for students to see
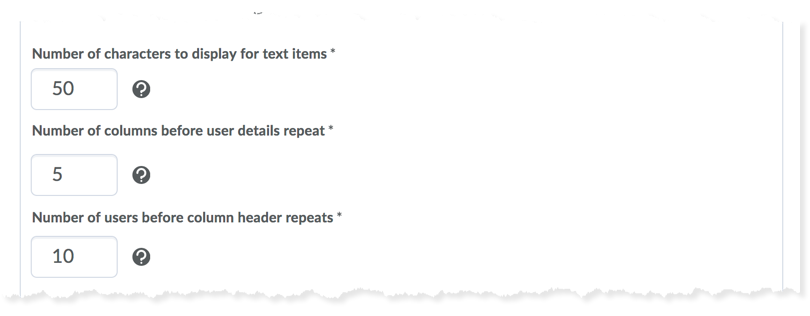
Numbers of things
The next three settings allow you to determine
- The number of characters to display for a text item
- The number of columns displayed in the Enter Grades view before the user information repeats
- The number of users listed in the Enter Grades view before the column headers (column titles) repeat
What you set for these values depends entirely on your preference in your work environment. If you have a large screen, for example, you may have the screen space to display many columns before repeating the user information.
These two settings allow you to determine how many decimal places to display (in a numeric grade item) and number of characters to display (in a text item).

Repeat final grade
Automatically, your gradebook will show the Final Calculated grade at the beginning of the grades (in addition to the end).
You may choose whether to display the Final Calculated or Final Adjusted grades at the beginning of the grade columns.
![Set-up a Gradebook in D2L Brightspace [06:09]](/content/dam/courses/images-interface/video-tutorial-thumbnails/video-tutorial-thumbnail-set-up-your-gradebook-in-d2l.png)