Assignments: View and evaluate assignment submissions
There are a number of different options for reviewing and evaluating student assignment submissions, as well as options for publishing grades and feedback.
We recommend reviewing these options when creating your assignments, so you can have these strategies in mind. Some of the settings are best completed before the grading has begun.
Assignments can be found in the top navigation, under Assessment. If it isn't there, review how to enable course tools.
NOTE: Before you view and grade your students' assignment submissions, make sure that you have connected the assignment to a grade item, so that their mark counts toward their final grade in the course.
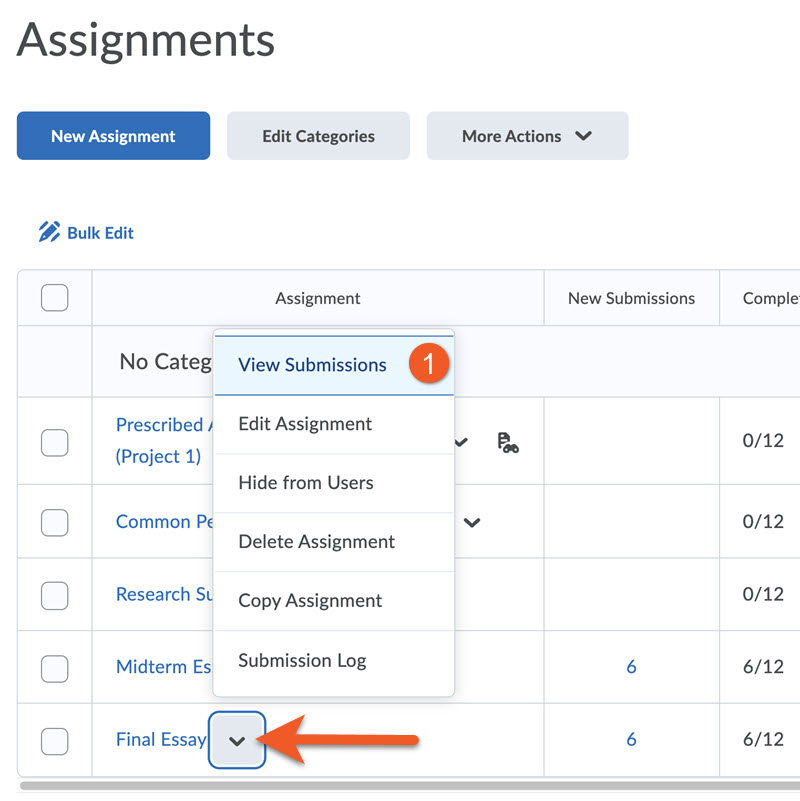
While it is possible to enter grades for student assignment submissions in several different ways, we always recommend this method, using the Assignments tool.
Make sure you always use the same workflow to grade all students, to ensure that grades and feedback appear consistently.
1. On the Assignment Submission Folders page, click on the folder you want to view submissions for, or click View Submissions.
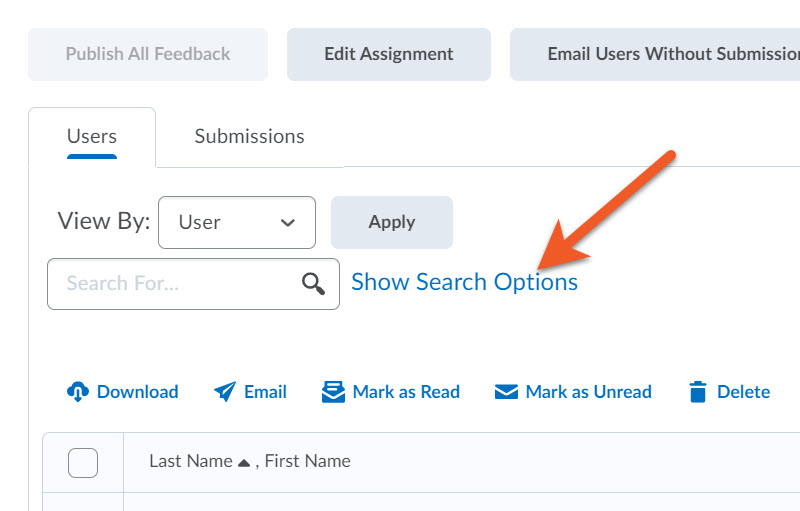
2. By default, you should see the full list of students below. If they have submissions, you will see the submission name below the student's name. While you can also click on the student's name, we recommend that you click on the submission/file name to load the evaluation page. If the file type is one that is supported in Brightspace's content viewer, the submission will load. This may take a moment or two.
Using Search Options to find a user or submission
If you are having difficulty locating a particular user or their submission, you can use the Users tab or Submissions tab to view and search submissions by user or file name.
You can also use the search options to find what you're looking for.
If you do not see the search options, click on Show Search Options.
Searching by User enables you to search by first name, last name, submissions, and feedback.
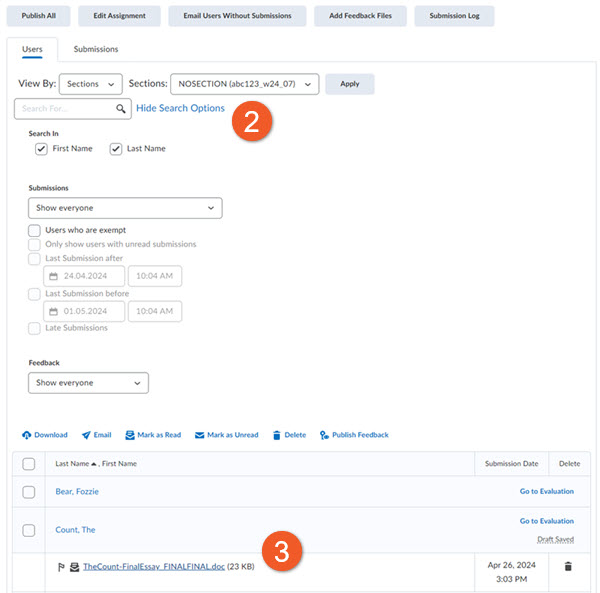
Searching by Submissions enables you to search by file name, submission date, read status, and flagged status.
Filter the results using Show Search Options to access the dropdown menu and checkboxes below. Here, you can choose to display only the users with submissions, only the users without submissions, users with graded submissions that haven't been published yet, and so on.
Click on the magnifying glass icon in the search box, to update the view.
3. Submissions appear at the bottom of the page.
It is easiest to grade student submissions within D2L Brightspace, but if the nature of the assignment or file type makes this difficult, it is possible to download all student submissions to your computer.
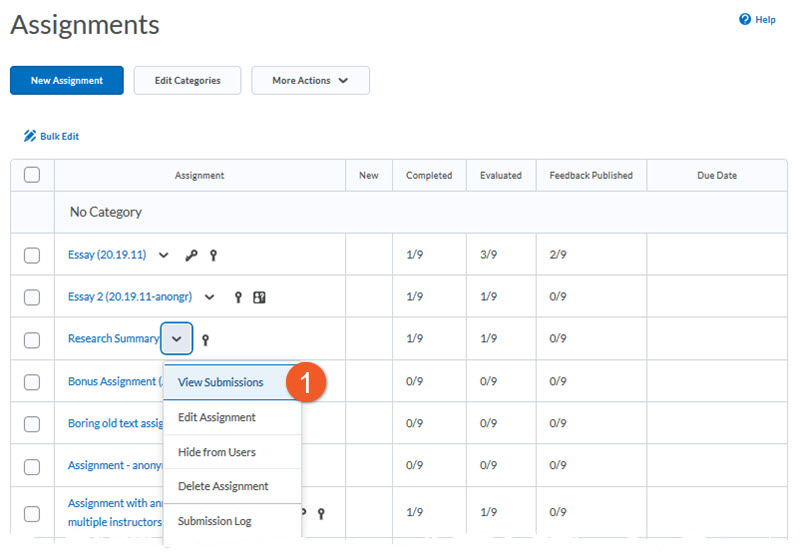
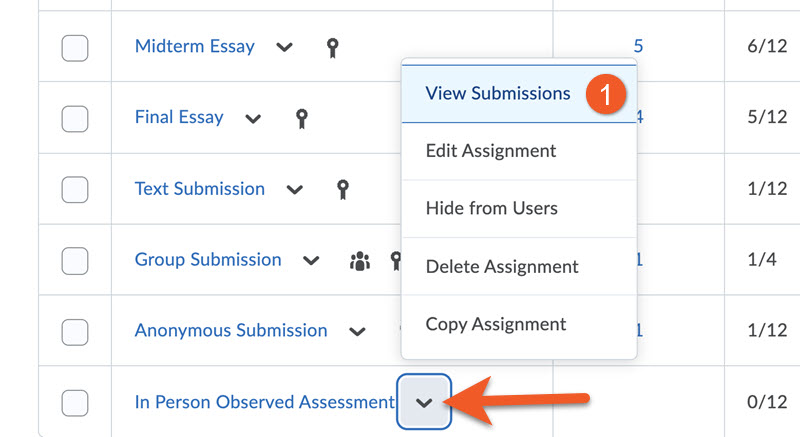
1. Go to the Assignments tool in your course, and click the arrow to the right of the name of the assignment, and select View Submissions.
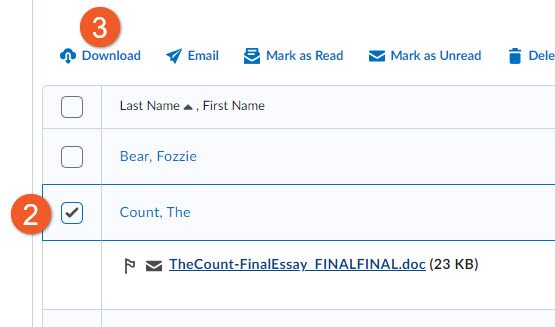
2. Using the checkboxes, select the submissions you want to download. By clicking the top checkmark, you can download all submissions on that page. (Note that you can adjust the number of submissions per page).
3. Click Download.
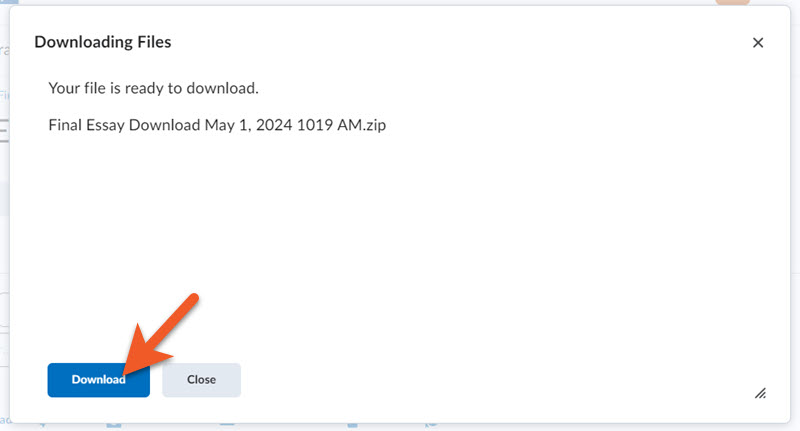
4. Download the resulting .zip file by clicking on the Download button in the dialogue box.
If you have students who have yet to submit an assignment to a submission folder, you can email all those students at once.

1. From the appropriate assignment folder, click Email Users Without Submissions.
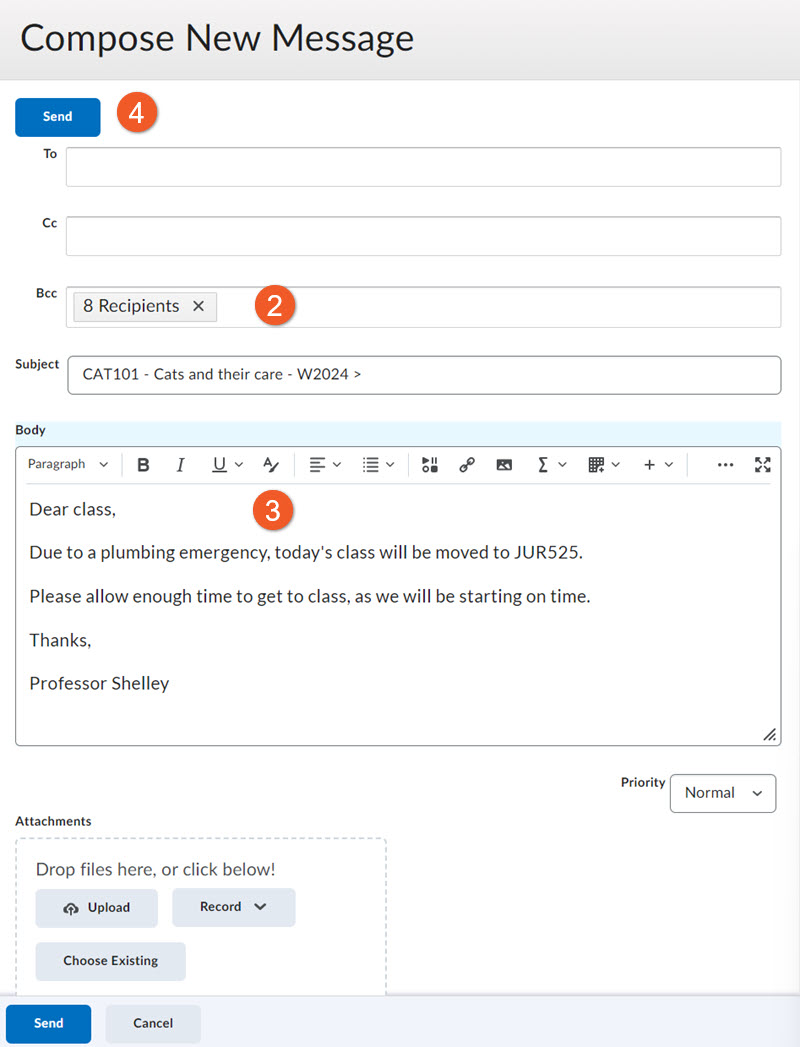
2. All the users without submission will appear in the BCC field.
3. Compose your email.
4. Click Send.
If you are emailing a large number of students (ie. more than 100), after you click on the Send button, you may see a message that your message is queued to be sent as a background task. This is to help manage performance on the server. It should only take a few minutes for all of the emails to be sent.
This is a useful workflow to apply if you don't want the students to see any of their results (grades, feedback, rubrics) across any of the tools in Brightspace (Grades, Assignments and Progress). You may wish to do this while grading, so you can release all feedback to the class at the same time.
Outline of the required steps:
- Hide the grade item
- "Save draft" when grading the assignments
- Once all submissions are in, hide the assignment
- Publish the assignment grades and feedback
Hide the grade item
This step ensures the students cannot see the grade item in the Grades tool.
We recommend using this setting when creating all grade items, as it provides you with more control to release grades.
To hide the grade item:
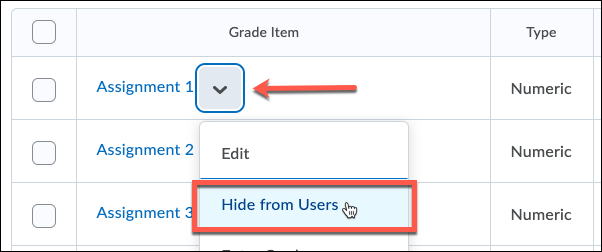
- Go to Grades > Manage Grades, and locate the grade item you would like to hide.
- Click the arrow icon to the right of the title.
- Select Hide from users.
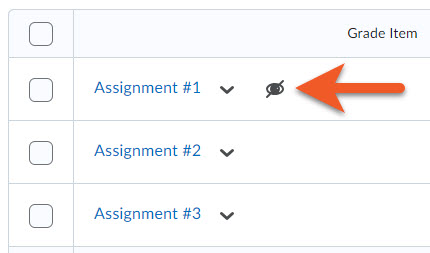
4. Once clicked, you will see an icon (which looks like an eye with a line through it) appear next to the grade item to indicate that it is now hidden from the students.
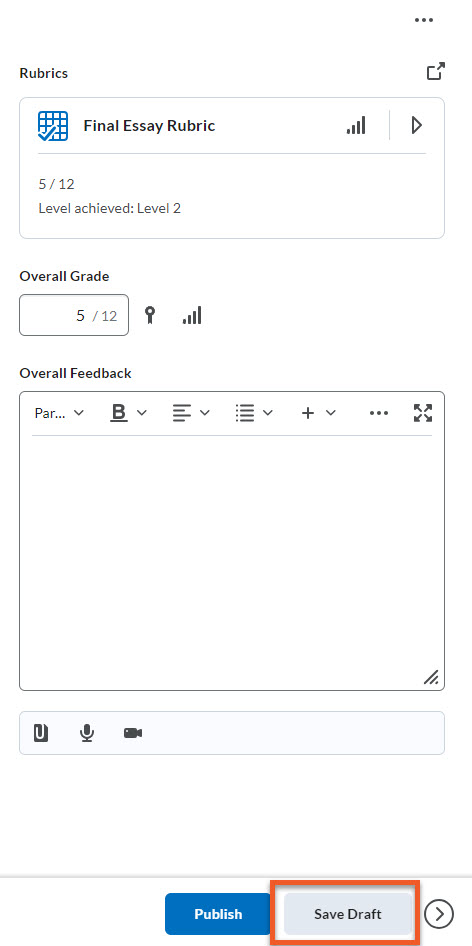
"Save draft" as you grade the assignment
When grading the assignment, be sure to "Save Draft" as you go.
You should wait until you have graded all of your students' submissions before "publishing", so that all students receive their grade and feedback at the same time.
Proceed to grade all of the submissions. This can happen while students are submitting (if you have allowed some extensions, for example).
After all submissions are in: hide the assignment
This step can only be completed if all of the students have submitted their assignment, as it will hide the assignment from them completely.
This ensures the students cannot see the assignment nor the assignment results (grades, feedback) in the Assignments tool nor the Progress tool.
To hide the assignment:
- Go to the Assignments tool and edit the assignment.
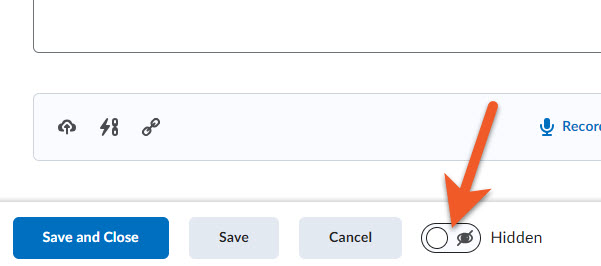
- At the bottom of the page, check the button to change the status to "Hidden".
- Save the assignment.
- When viewing the list of assignments in the Assignment tool, you will now see an icon next to the assignment to indicate that it has been hidden.
Important! This step should only be taken once all of the assignment submissions are in. If there are any students who still need to submit their assignment, this would prevent them from submitting.
After all submissions have been graded: publish all feedback
Once you have graded all of the submissions, you can publish the assignment grades and feedback.
Note that this will not display the results to the students, because you have hidden both the grade item and the assignment in the steps above.
To publish all feedback:
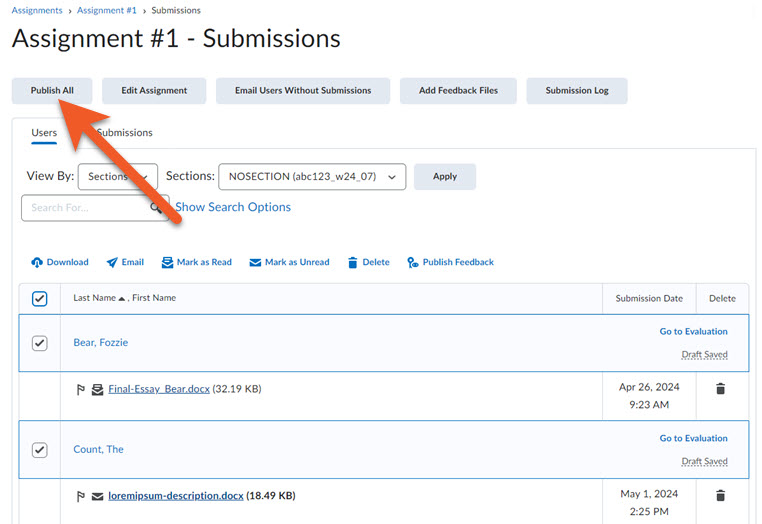
- Go to the Assignments tool and view the assignment submissions.
- Click the Publish All button in the top left of the page.
This will push the score and feedback to the gradebook.
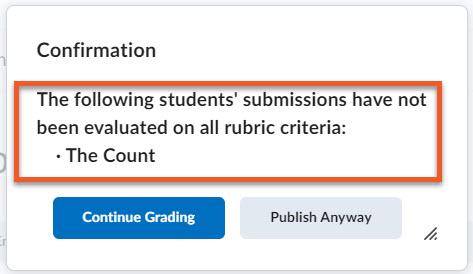
Pay attention to the information in the popup window, before you click on Publish. You will see information about any potential problems, such as partially-graded submissions. This can help you spot when you've missed something.
If you are not ready to publish all feedback yet, and want to publish the feedback in batches, please see the section on publishing feedback on this page.

1. On the Assignments page, click on the assignment you want to evaluate submissions for, or click on View Submissions.
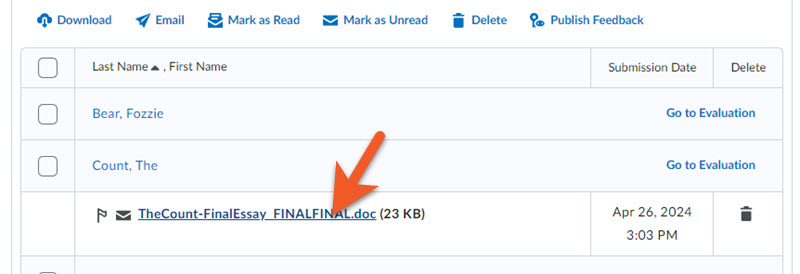
2. Click on the student's submission that you wish to evaluate.
If there are multiple submissions for one student, look at the file name and submission date to determine which file you wish to evaluate.
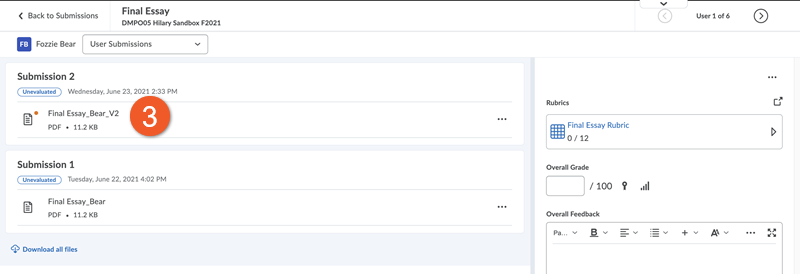
3. If the document doesn't load, click on the file name to load the student's submission in the document viewer.
Depending on the file type, the submission may appear directly in the browser. The following file types are compatible with the document viewer:
- MS Word (DOC, DOCX)
- MS PowerPoint (PPT, PPTX, PPS)
- Adobe Acrobat (PDF, PDFS)
- Web (HTM, HTML)
- Plain text (TXT)
- Images (BMP, GIF, JPG, JPEG, PNG)
If clicking on the file does not load it in the browser, the file may be in a format that the document viewer does not support. Download it to your computer, and view using the appropriate software.
NOTE: If the student has uploaded a file type that you can't open, you may need to contact the student and ask them to resubmit in a particular format (ie. DOC, PDF). If the end date for the assignment has passed, you may need to make sure the assignment is not hidden, then add the student to Special Access with a start/end date that allows them to resubmit.
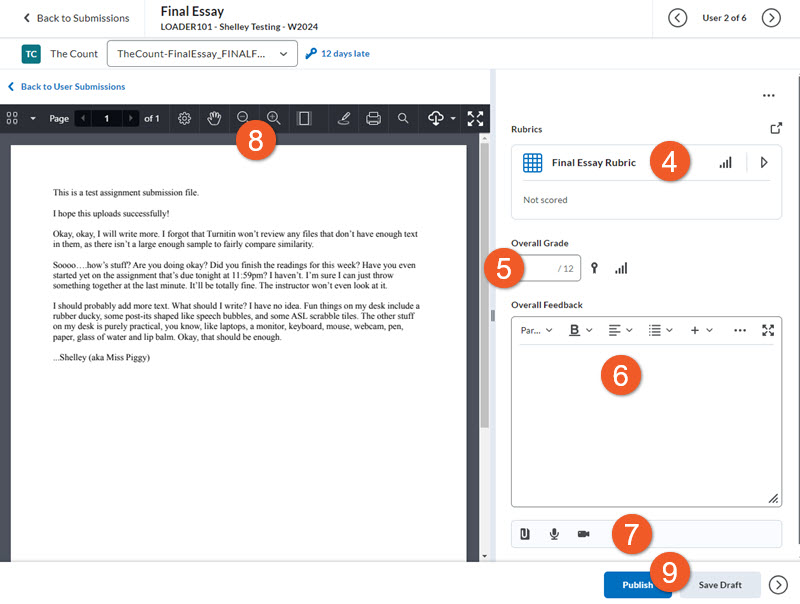
4. If you choose to associate a rubric with this assignment, it will be available when grading. Detailed instructions for grading with the rubric can be accessed on our Rubrics for Assessments page.
5. Enter a score for the submission.
6. Enter written feedback, if desired.
This box is ideal for shorter feedback. If you are providing more than about a page of feedback, it's better to use option 7 (below) so that students can download and read offline.
7. Feedback can also be provided as an uploaded file, or as audio or video recorded directly into the platform.
8. If you wish, you can use the annotation toolbar tools to add comments, highlight, or even draw to mark up the student's submission.
To learn more about the Annotation tool, open the Using the Annotation tool section, located on this page.
9. Select Publish when you're ready to release your feedback. Click Save as Draft if you want to publish at a later date (students won't be able to see grades or feedback until you click Publish). You can bulk publish at a later time from the Submissions page.
To proceed to the next student, click on the right-facing arrow, located in the lower-right corner of the page. To go back to the previous student's submission, click on the left-facing arrow.
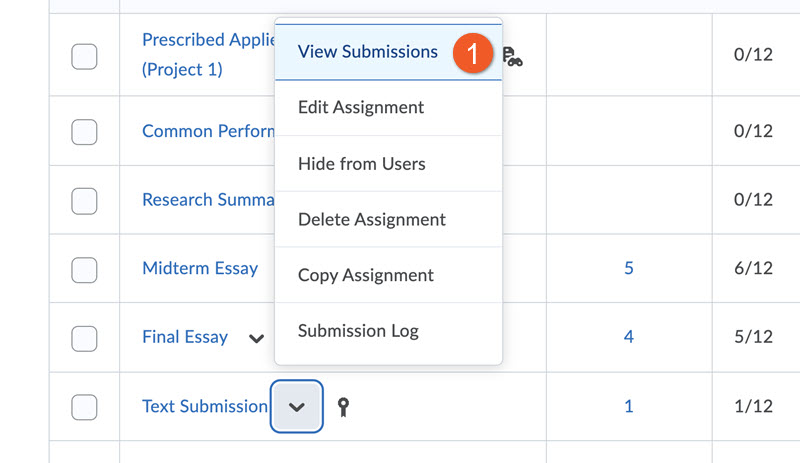
1. On the Assignments page, click on the assignment you want to evaluate submissions for, or click on the downward-facing arrow beside the assignment name, and select View Submissions.
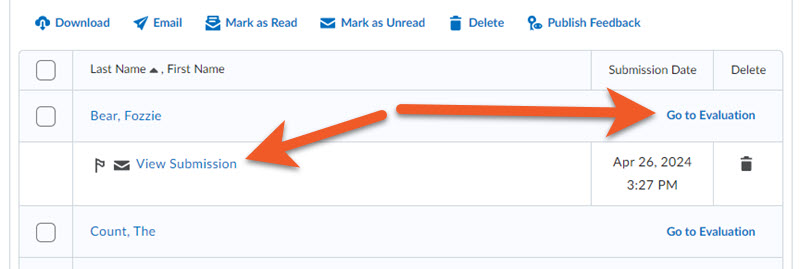
2. For the student you wish to evaluate, click on either View Submission, or on the far right, click on Go to Evaluation (both take you to the same place).
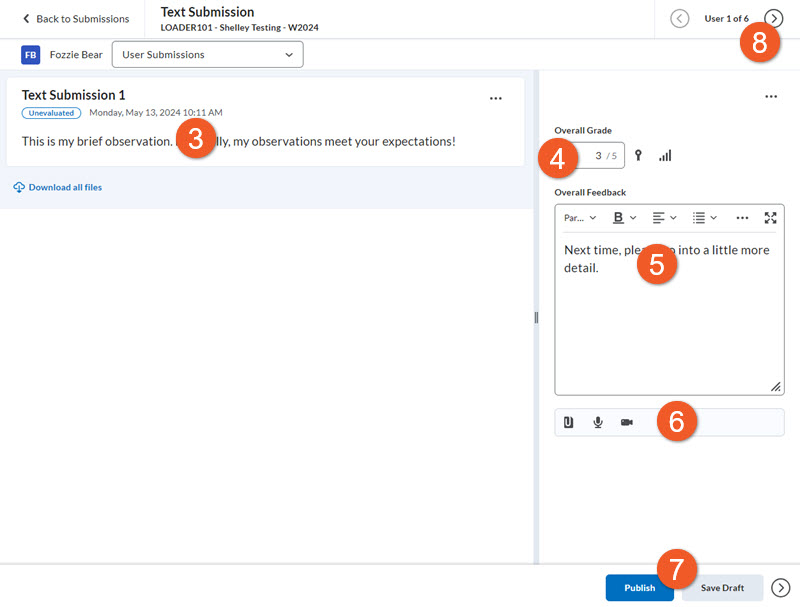
3. The submission will load in the left pane of the evaluation screen.
4. Enter a score for the submission.
5. Enter written feedback if necessary.
6. If desired, you may attach feedback, by uploading a file, web link, audio or video.
7. Select Publish when you're ready to release your feedback. Click Save Draft if you want to publish at a later date (students won't be able to see grades or feedback until you click Publish). You can bulk publish at a later time from the Submissions page.
8. When you are ready to evaluate the next student's submission, click on the right arrow in either the upper right or lower right of the page.
The annotation tool in D2L Brightspace assignments allows you to mark up a student's submission as a means of providing feedback in-situ.
IMPORTANT: Annotations are not recommended for use with assistive technology. If your students use assistive technology, consider providing written feedback in the feedback field.
The "Annotations" feature can be enabled in the assignment editor, in the Evaluation & Feedback panel.

When you open a student's submission on the evaluation page, you will notice the annotation toolbar along the top of the document.
The main tools that you will use to mark up a student's document can be found under the "Annotations" tool, and are noted by an orange arrow in this screenshot.
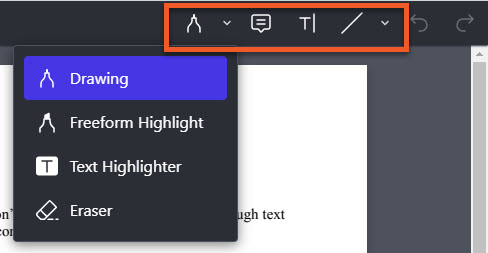
Drawing tools include the drawing, note, text and line tools.
NOTE: The annotation tool does not autosave. Save as Draft frequently if providing extensive feedback. Otherwise, you risk losing your work if you close your browser without saving.
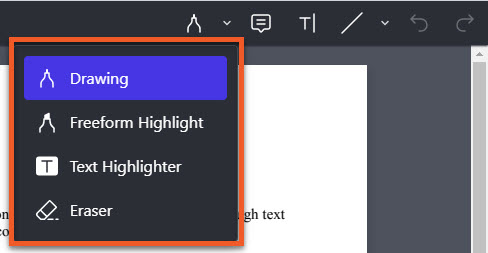
Drawing
Under the Drawing icon, there are four options:
Drawing: Use this tool to circle or underline items of note, or draw on the document, such as editorial markup.
Freeform Highlight: Use this tool as you would a physical highlighter, to highlight an area of the document in a freeform manner.
Text Highlighter: Use this tool to highlight specific text.
Eraser: Use this tool to remove marks made with any drawing tools.
Choose a tool by clicking on the icon.
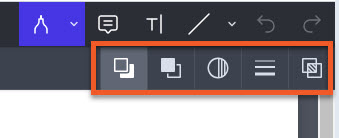
Secondary toolbar
After selecting a tool, if it has more options, you will see a secondary toolbar below the main toolbar, which provides various options, such as pen colour, pen width, etc. Click on the options to make your choices before using the tool to mark up the document.
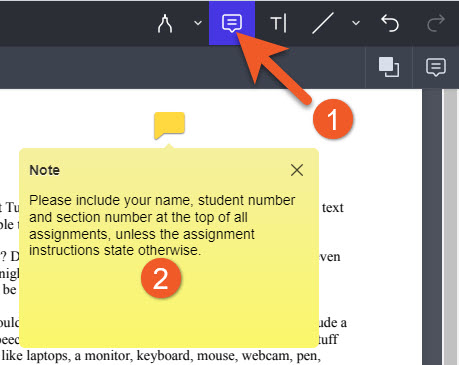
Notes + Flags
Add a location-specific flag to your markup. The note displays an icon, and expands to reveal a longer note with optional written feedback.
- Click on the Note tool in the main toolbar, and choose the type of note and style: colour, font, etc in the secondary toolbar.
- Click where you would like to place the note, and type your message. Once you are done, click out of the note.
- Save as Draft frequently if providing extensive feedback or multiple notes.
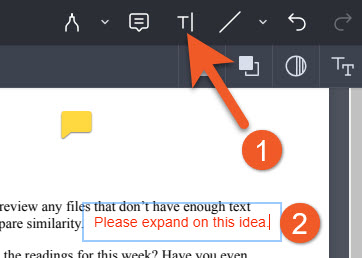
Annotated Text
If you want to add a small piece of text to your markup:
- Click on the Text tool in the main toolbar, and choose colour, font, etc in the secondary toolbar.
- Click where you would like to place the text, and type your message. While the text is active, you may notice a red squiggle under any possible spelling errors. Click and type to correct. Once you click out of the text, you will no longer see the spell checking indication.
NOTE: This tool is intended only for short pieces of text. We recommend using the note tool or the Overall Feedback box for longer messages.
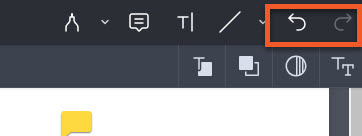
Undo/Redo your last action
If you accidentally did something in the annotation tool, if you haven't clicked on anything else, you can click on the Undo button.
Similarly, if you accidentally clicked on the Undo button and haven't clicked on anything else, click on the Redo button to restore that action.
You can also use keyboard shortcuts:
- Ctrl-z (PC) / Command-z (Apple) - Undo
- Ctrl-Shift-z (PC) / Command-Shift-z (Apple) - Redo
If you discover your mistake after you have clicked on other things, see the instructions below to delete a markup item.
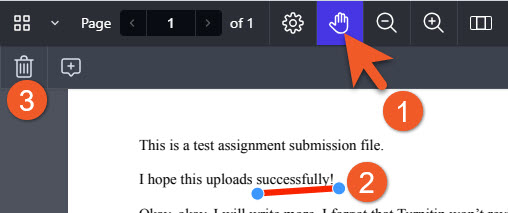
Delete a markup item
To remove a markup item:
- Click on the hand icon in the main toolbar.
- Click on the item to be deleted.
- Click on the trash can, located on either the far left or far right of the secondary toolbar.
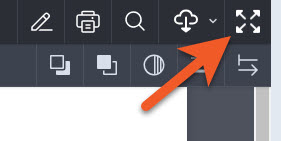
View and mark up document in full screen
If you wish to view a student's document in full screen, you can do this by clicking on the Toggle Fullscreen icon, located on the far right of the main toolbar.
Exit full screen
When you wish to exit full screen mode, and view the document back in D2L (so you can Publish or Save Draft), click on the Toggle Fullscreen icon, located in the far upper-right of the screen.
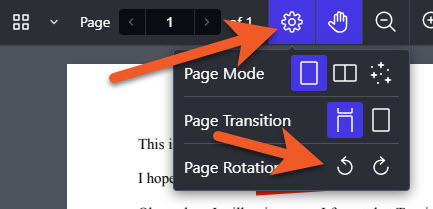
Rotate page
Depending on the format of a learner submission, documents may appear rotated when initially rendered in the document viewer. Use the Page Rotation tool to quickly reorient the document so it displays as expected.
You can find this tool under the Page Layout icon, which looks like a gear.
If you have co-instructors, TAs and/or graders in your course shell, and you have already set up those users in this assignment with roles as evaluators/publishers and allocated team members to specific students (or groups of students), the process described above to view, provide a score and add feedback are the same.
The interface may look slightly different, depending on your role in this assignment
What each member of the grading team sees when they click on a student's assignment submission may vary slightly, depending on their role, or if they are only assigned to some of the students.
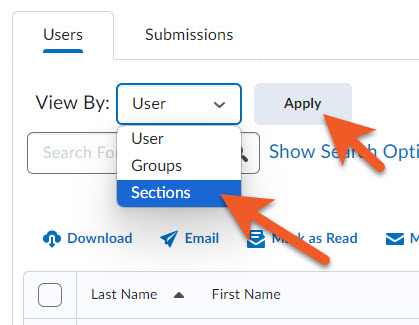
If you have been allocated students who belong to a specific section or group, you can use the search options to view only your students.
Unfortunately, if you were allocated to random students, you will just have to click on their names to find them.
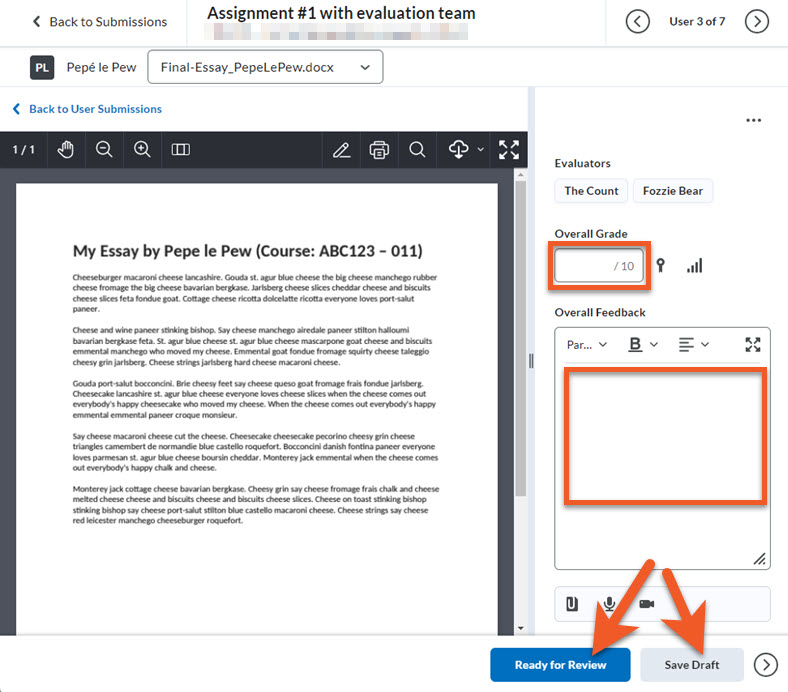
If you have been assigned to evaluate certain students in this assignment, when you click on their submission, you will see all of the typical fields - score, overall feedback, etc, and you can grade as usual. Click on the Ready for Review button in the lower-right when you are done adding a score and feedback. Or, if you plan to return at a later time to finish grading this student, you can click on Save Draft.
If each student's submission is being graded by more than one Evaluator, and the assignment has been set up as "One Shared Evaluation", you will simply add your feedback to that of your colleague's. In this scenario, it may be best to have a discussion with your grading team to confirm how you want to handle conflicting opinions about feedback.
Keep in mind that the person with the publisher role in this assignment will only be able to publish your evaluation after you have clicked "Ready for Review" for each submission that you are responsible for evaluating. Please ensure you do this, so that your grades and feedback can be published in a timely manner, and students do not miss out on being graded.
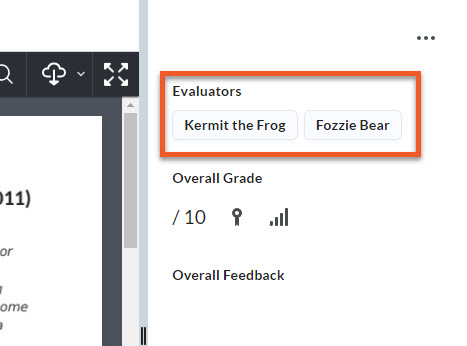
If you click on a student that you are not allocated to, you can view their submission, but you will not see the score or feedback fields. You can see the names of the evaluators who are assigned to this student.
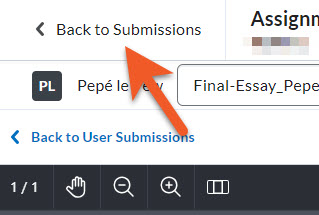
Simply click on Back to Submissions in the upper-left of the page, to return to the list of student submissions, or click on the back/next arrows in the upper-right of the page, to view the next student.
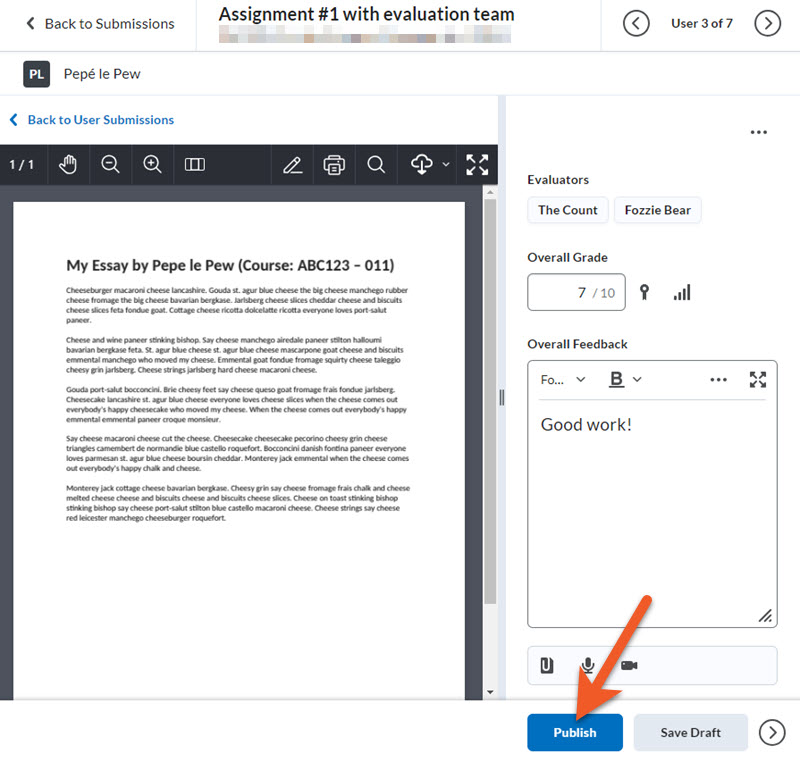
If you are a "Publisher" and an "Evaluator" in this assignment, you can view each student's graded submission, make changes to grades/feedback (if needed), and click on Publish.
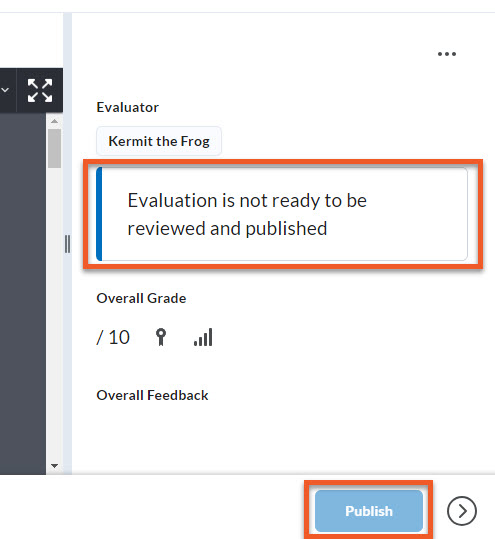
If you only have a "Publisher" role in the assignment, you will only be able to publish a student's submission after it has been graded and set as "Ready for Review" by an Evaluator. If a submission is ungraded, you will see a message on the evaluation page for that student's submission that tells you this, and the "Publish" button is greyed out. You may wish to contact the evaluator to confirm that the submission will be graded before you are ready to publish.
If you don't wish to review or update any grading/feedback before publishing, go to the "Submissions" page for the assignment, and you can bulk publish all grading/feedback for all students, but please try to avoid doing this, as it is easy to accidentally publish ungraded submissions, and then miss grading some students. If you do this, the only way to find ungraded students will be to view each submission to confirm.
Multiple Evaluator Mode (optional, not relevant for most)
NOTE: We only recommend "Multiple Evaluator Mode" for well-coordinated grading teams, as there is some risk of incomplete student assessment.
While most grading scenarios are best suited to choosing the "One Shared Evaluation" setting, you may find that you wish to use an "independent multi-marker" approach, where multiple evaluators each complete a separate evaluation of each student's work. Those independent evaluations must be manually aggregated by the publisher before being released to the student.
If you wish to do this, you must choose this setting prior to starting to evaluate any student submissions. You cannot change this once you start grading.
Reminder: Only people hired by HR, who have an appropriate role in the course shell (which allows access to private student information) can be an evaluator in an assignment. These roles include Instructor, TA and Grader.
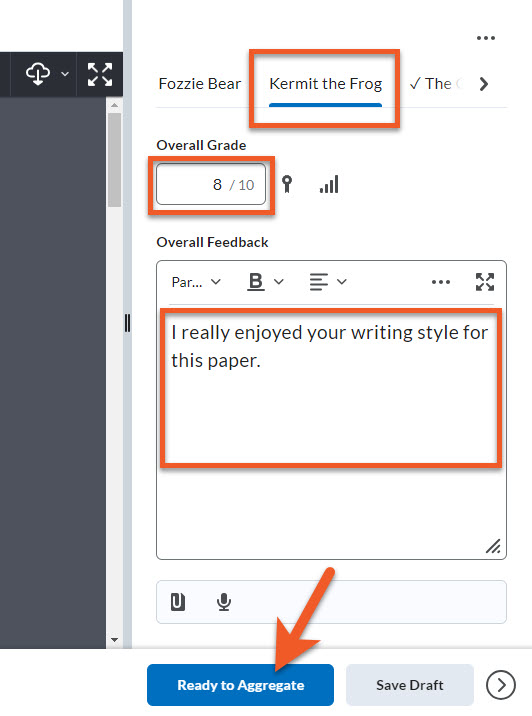
In this situation, when each evaluator evaluates a student's work, they will see their own "tab" where they can enter their grade and feedback. If they wish to, they can click on other evaluators' names to view their work, but cannot edit other evaluators' work.
Enter a score and feedback as usual, and click on Ready to Aggregate when you are done, or Save Draft if you will resume assessing this student later.
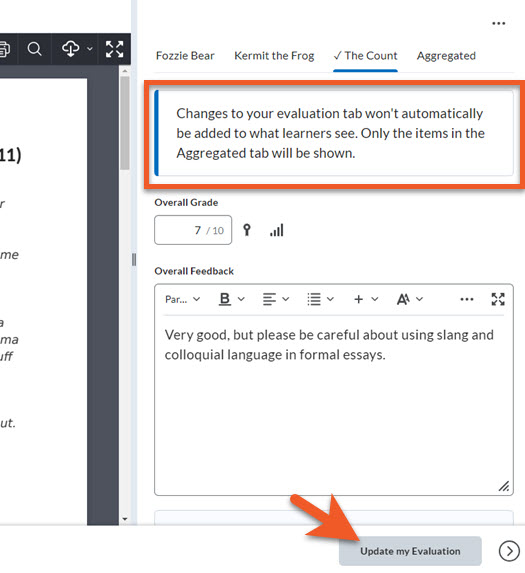
Once you have saved your assessment, you will see a checkmark beside your name to indicate that your evaluation is complete, and a message to remind you that your assessment will not be available to the student until it has been aggregated with the other Evaluators' work.
If you want to make changes, do so, and then click on Update my Evaluation.
Aggregate and publish
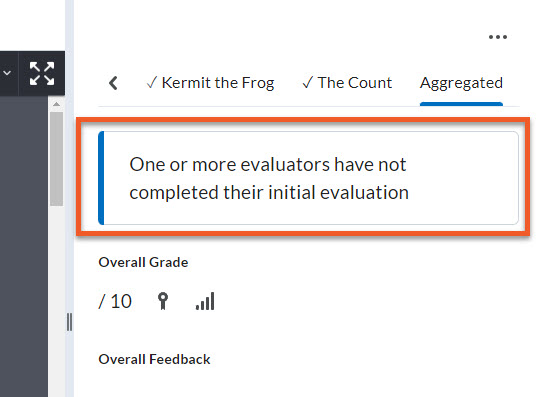
Please note that if all Evaluators who are allocated to a student have not contributed, when the Publisher clicks on the "Aggregated" tab, they will see a warning message. If you are missing contributions from any Evaluators, consider reaching out to remind them to complete their assessment.
It is not possible to proceed without all Evaluator contributions. The student will not receive a grade or feedback for this assignment until all Evaluators have assessed their work, and the Publisher has aggregated and published.
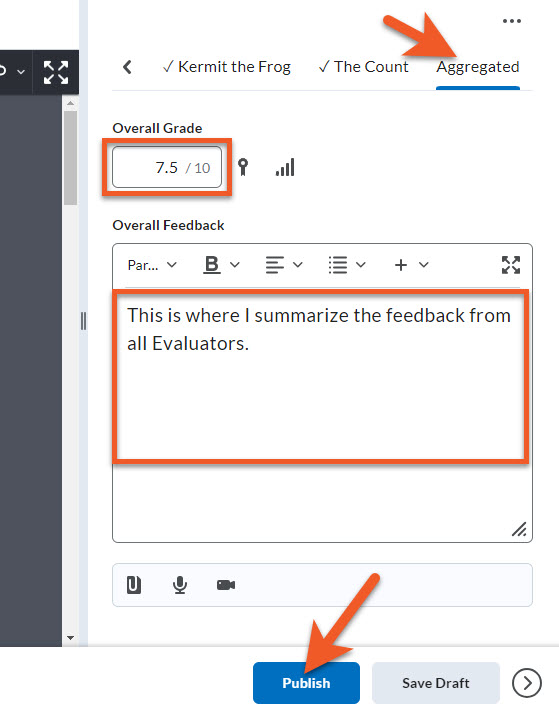
When all Evaluators have contributed, the Publisher can review their work, click on the "Aggregated" tab, and enter a score, add annotations, fill in a rubric (if used), and include a summary of the feedback for the student.
The student will only see this feedback summary, rubric and/or any inline annotations added to the Aggregated view, and will never see the feedback from individual Evaluators, so make sure to include all constructive feedback.
Click on Publish, to push the grade and feedback to the gradebook.
Note: If the grade item is hidden, the student will not see this information in the gradebook until the grade item is unhidden.
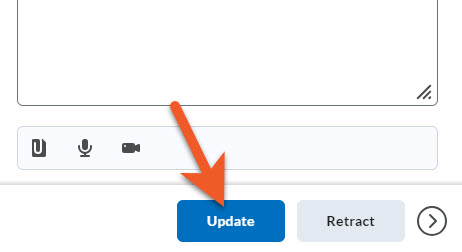
Later, if you need to revise the grade or feedback, you can return to this screen, make the necessary changes, then click on either Update to republish, or Retract, if the changes are still a work-in-progress, and you are not ready to publish yet.
If you set up a grading team for the assignment, but the team members have changed
Occasionally, there is a staffing change, and you may lose or gain a co-instructor, TA or grader, after you have already set up your assignment to use that team.
If a team member is removed from your shell, any students that were previously allocated to them in an assignment will no longer be allocated to that person.
If you manually remove someone's ability to evaluate or publish grades in an assignment, the same is true, they will no longer be allocated to the students that they were previously allocated to.
If you add a new instructor, TA or grader to your shell, they will not automatically be added to the evaluation team in each assignment.
While D2L does its best to reallocate students to the teaching team that is assigned, we've found that their automatic allocations do not always work in the expected way. This can result in some students having more than one evaluator assigned to them, or some students with no evaluator.
If you have removed or added someone to your grading team, we strongly recommend that you follow the instructions found on our "Deliver online assignments" page to go through the process again to select evaluators and publishers, and allocate evaluators to learners. This way, you can be confident that the settings are correct, and there will be fewer misunderstandings within your evaluation team.
Avoid unconscious bias in the grading and feedback process by configuring assignments to anonymize learner names.
When the feature is selected while setting up an assignment, instructors will only see an anonymized learner name on assignment submissions.
NOTE: You must enable anonymous grading before students start to upload assignment submissions. You should also provide students with instructions to omit any identifying information from their document, including the file name.
To ensure the anonymity of submissions, you must grade completely within D2L.
Advise your students to remove their name and all identifying information from the assignment submissions and filenames.
Turnitin should not be used with anonymous grading, as it displays the students' names.
Tips for the effective use of anonymous grading:
- Publishing of evaluated submissions ends anonymous grading. If you are accepting late submissions, they will not be anonymous.
- Grading may take place over multiple sessions, but publishing of graded submissions should be done all at once, to maintain anonymity.
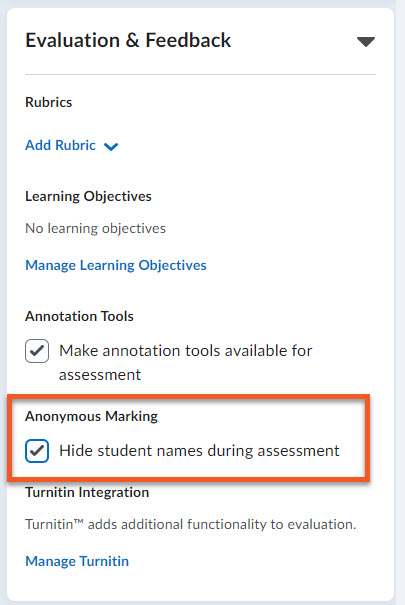
Enable anonymous marking in an assignment
If you want to enable anonymous grading in an assignment, you can do this either when you are creating the assignment, or you can edit the assignment settings before any students submit.
- Expand the Evaluation & Feedback panel.
- Check the box beside Hide student names during assessment.
- Make sure you click on either Save or Save and Close.

Once you have saved your changes, if you return to Assessments > Assignments, you can see the anonymous grading icon indicated to the right of the assignment name.
Grade 'anonymous' submissions
When you are ready to grade student's submissions, go to Assessments > Assignments, and click on the name of the assignment to see the list of submissions.
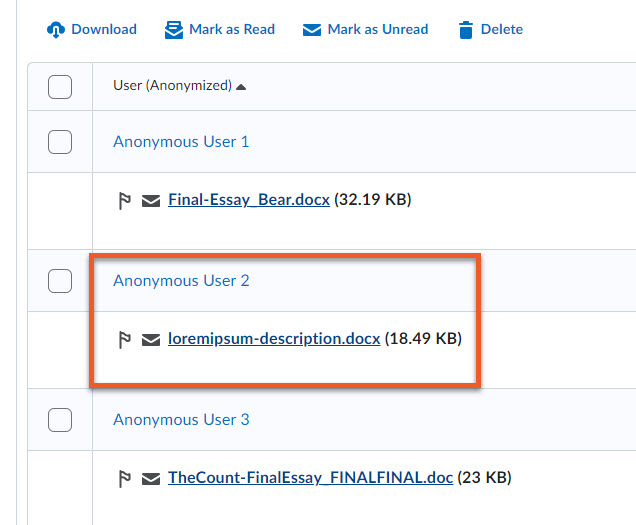
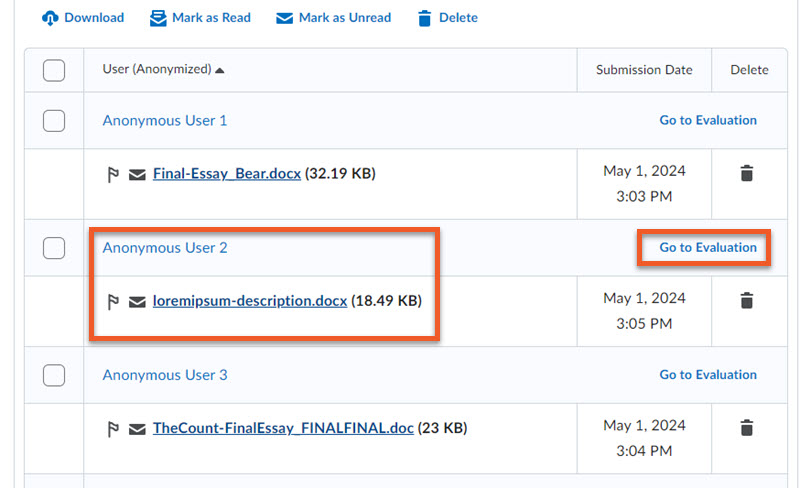
Note that instead of seeing student names, you see "Anonymous User 1", "Anonymous User 2", etc.
Also note that you can still see the name of the file the student uploaded, so you will want to instruct students not to include their name or other identifying information anywhere in the file or filename. If you have mentioned to your students that you are grading anonymously, and need them to leave out identifying information, assure them that when they login to D2L Brightspace and upload a file, that file is permanently associated with their profile. There is no concern about losing track of which student uploaded a file.
Click on a file name or the 'Go to Evaluation' link to view and grade the assignment.
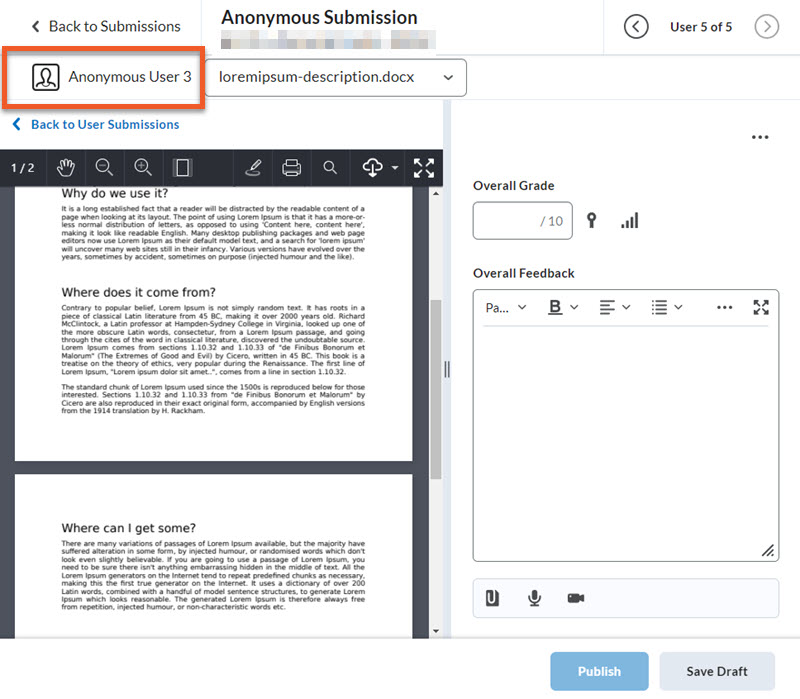
Note that grading, providing markup comments and feedback are the same as regular assignments. You just can't see any information that identifies the student.
The only difference is that while grading anonymous submissions, you should save all marked assignments as Draft.
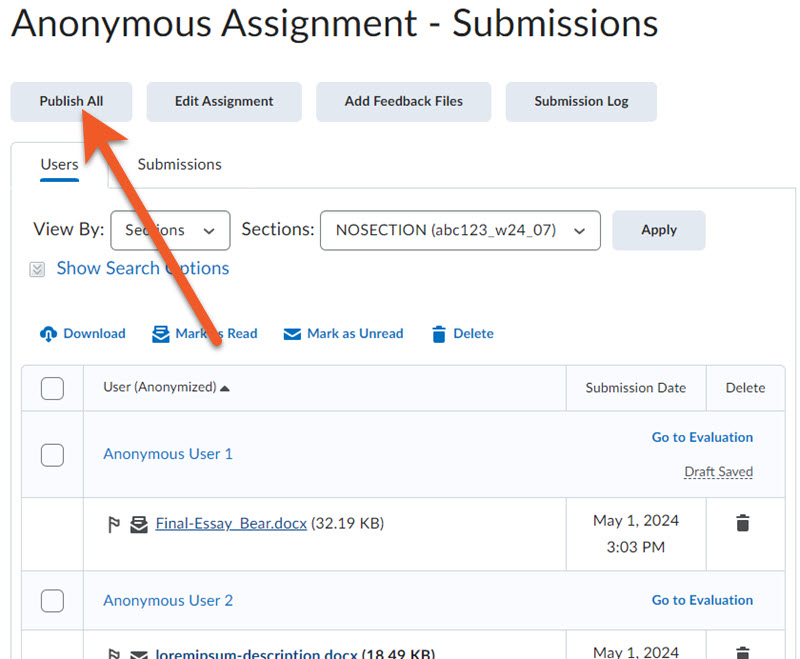
When you are done grading all submissions, and you are ready to publish all grades to the gradebook, and make all feedback available to students, return to the list of submissions, and click on the Publish All button.
It may take a few minutes to publish, particularly if you have a large class, so please be patient.
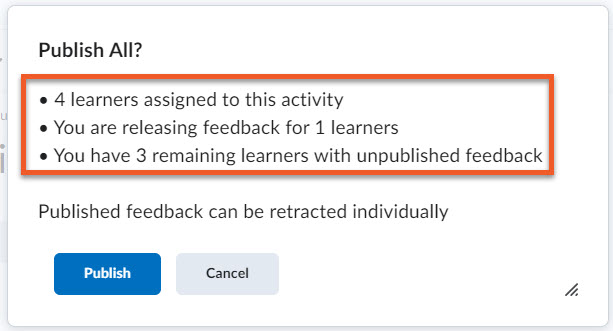
If you have not graded all students, you will receive a warning.
IMPORTANT: If you publish grading before you have marked all assignment submissions, you will lose the anonymous functionality. Once grading/feedback have been published, student names will be revealed.
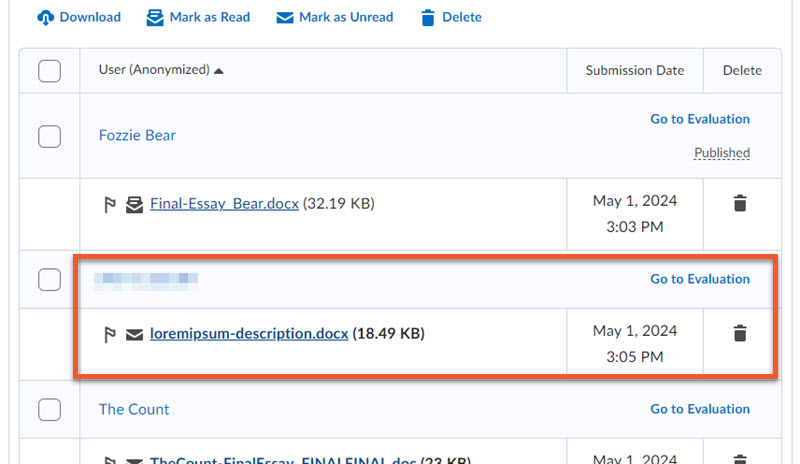
You can now see all student names and their submissions.
Any submissions that have not been evaluated can still be graded in the usual way, and saved as Draft or Published.
If you decide to revisit a previously graded assignment submission after you have published, you will not see an active Draft or Publish button. Just make the changes and then click on "Next Student", and you will be prompted to save. You will then need to Publish All Feedback for the student to see the updated grade or feedback.
If you click on Publish All again, keep in mind that if you have made any changes to previously entered feedback for any students, it will all be updated at this time. If the grade item is visible, students who have notifications enabled, will receive a notification of the updated grade.
Mark assessments as "Complete"
Before you even start grading papers that have been submitted in person or presentations, you may want to quickly mark those students who have submitted or presented as "complete". This will enable you to see at a glance how many students have yet to complete the assignment.
1. Go to Assessment > Assignment, and click on the assignment name or View Submissions to see the list of students.
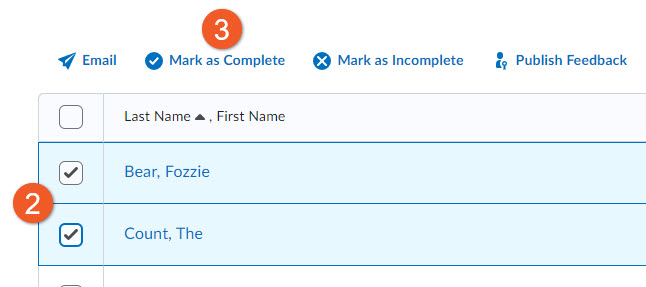
2. To mark those students who have completed the assignment, scroll down the list of student names, and select the checkbox to the left of each student's name.
3. Click on the Mark as Complete link, located above the list of students.
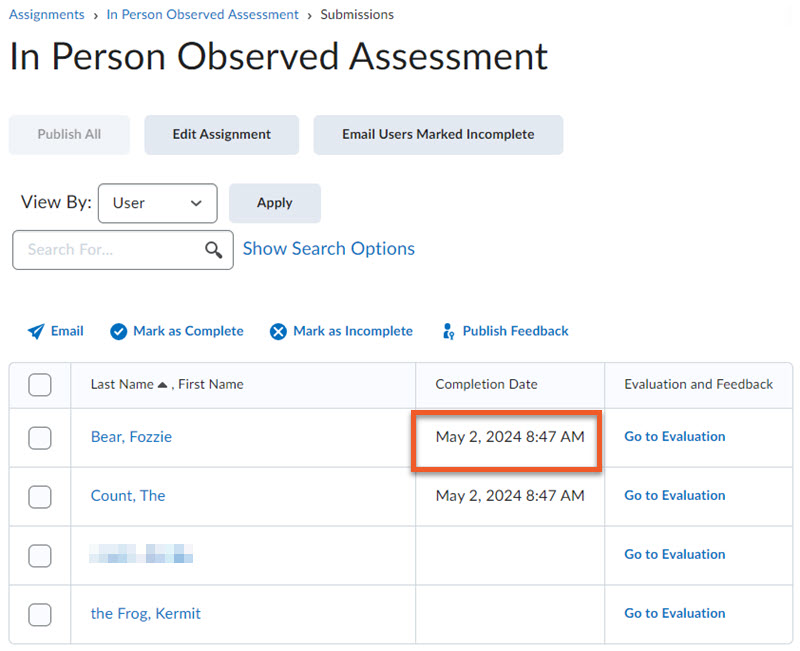
You can now see the date/time that each of these students was marked as complete.
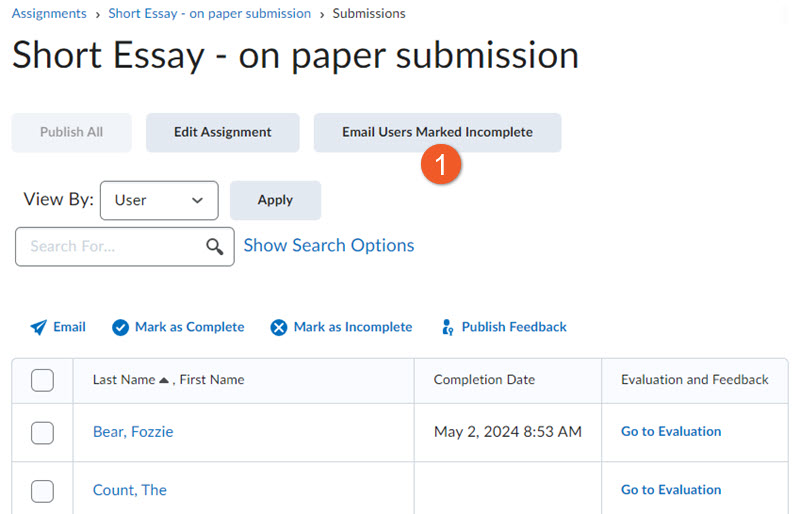
Email students who have not submitted/presented
You may wish to check in or remind students who have not yet submitted their assignment or presented in class. Once you have marked the students who have completed their assignment as "complete", this is quite easy.
1. Click on the grey Email Users Marked Incomplete button.
2. A message window will open with the students added in the BCC field. Type in a subject line, compose the email message and click on Send. You will receive a copy of this message in your university email inbox.

Evaluate submissions
1. In your course shell, go to Assessment > Assignments.
2. Click on the assignment name to view the list of students.
3. To evaluate a particular student, to the right of the student's name, click on Go to Evaluation.
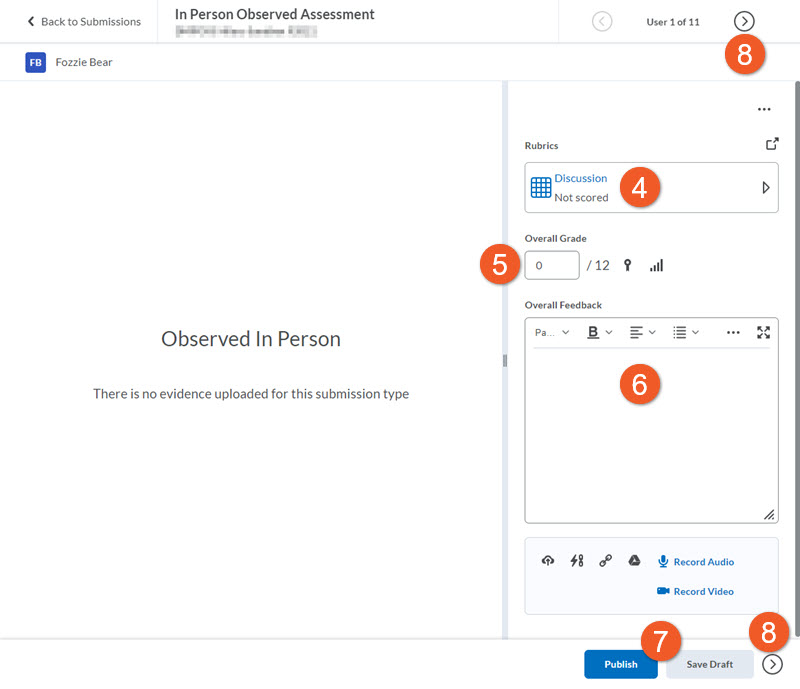
4. If you have associated a rubric with the assignment, it will be available at the top of the right-hand pane. Click on the name of the rubric you wish to use to evaluate this assignment. The rubric will expand in the pane.
5. Type the grade into the Overall Grade field.
6. If desired, you can type any feedback into the Overall Feedback field.
You can also attach a file, a web link, record audio or video feedback, if you wish.
7. If you are not ready to publish grades to the gradebook, click on the Save Draft button. If you are done, click on the Publish button.
Before you publish, you may wish to make sure the grade item is hidden, so that you can make sure that all students see their grade at the same time.
8. When you are ready to evaluate the next student's submission, click on the right arrow in either the upper right or lower right of the page. To return to the list of students, click on the Back to Submissions button, found in the upper-left of the page.
If you saved evaluations as Draft, make sure you publish grades to the gradebook when you are done grading. Also, when you are ready for students to see their grades, make sure that the grade item is visible.
What if the student didn't submit their assignment?
While you cannot submit the student's paper on their behalf - and therefore cannot use tools such as annotations - you can still provide the student with a score, completed rubric (if used) and written feedback.
Evaluators can provide the following for students who did not submit their assignment:
- A score grade
- A completed rubric (if applicable)
- Feedback
Evaluators will not be able to utilize the following tools without the student's submission:
- Annotations
- Turnitin
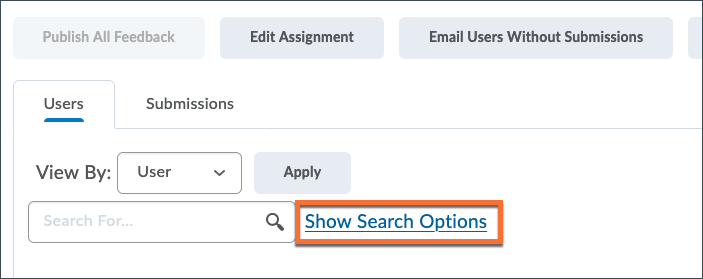
First, go into the Assignments tool, locate the assignment you wish to grade, and click its title to view the submissions for that assignment.
By default, you should be shown a full list of the students, but if you only see a list of who did complete a submission, you can change the filter to show all students, so that you can find the student who did not complete a submission.
Click the "Show Search Options" link.
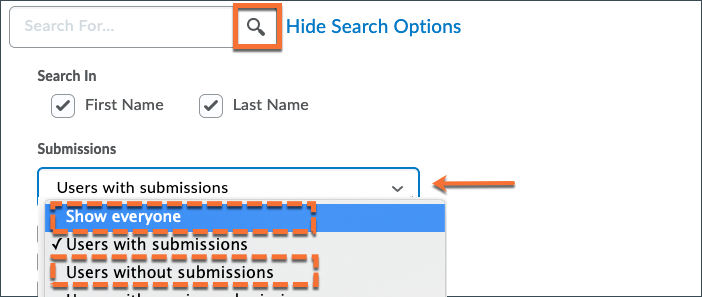
Scroll down the page to the "Submissions" section and click the dropdown menu there.
Select the option to "Show everyone".
Alternatively, if you only want to view the students who did not make a submission, you can select "Users without submissions".
Next, look to the search field at the top.
To view a specific student, type the student's last name into the search field.
Click the magnifying glass icon. This will show a list of all students that match the search criteria.

Review the list of students that match the search criteria you set above.
In this example, you will see one student with an assignment submission, and one without.
Click the "Go to Evaluation" link, in either case, to provide the student with an assessment.
NOTE: While the above is an acceptable process, a much better solution is to add the student to "Special Access" with a different start/end date/time, allowing them to upload their assignment submission, so that all of your students' submissions reside within your D2L Brightspace course shell. This ensures easy follow-up, in the case of any kind of dispute.
Publishing feedback can serve two purposes:
- It pushes the grades into the gradebook, if you have connected the assignment to a grade item.
- It provides the students with their scores, feedback and rubric evaluations.
If you only want to push the grades into the gradebook, and you do not want the students to see the results, please see the workflow above to hide the assignment results from the students.
The steps below outline two options:
- Publish all feedback
- Bulk publish feedback for select students' submissions

After all submissions have been graded: publish all feedback
Once you have graded all of the submissions, you can publish the assignment grades and feedback.
Note that this will not display the results to the students, because we have hidden both the grade item and the assignment in the steps above.
To publish all feedback:
- Go to the Assignments tool and view the assignment submissions.
- Click the "Publish All" button at the top of the page.
This will push the score and feedback to the gradebook.
Not ready to publish all of the feedback? Select which ones to publish
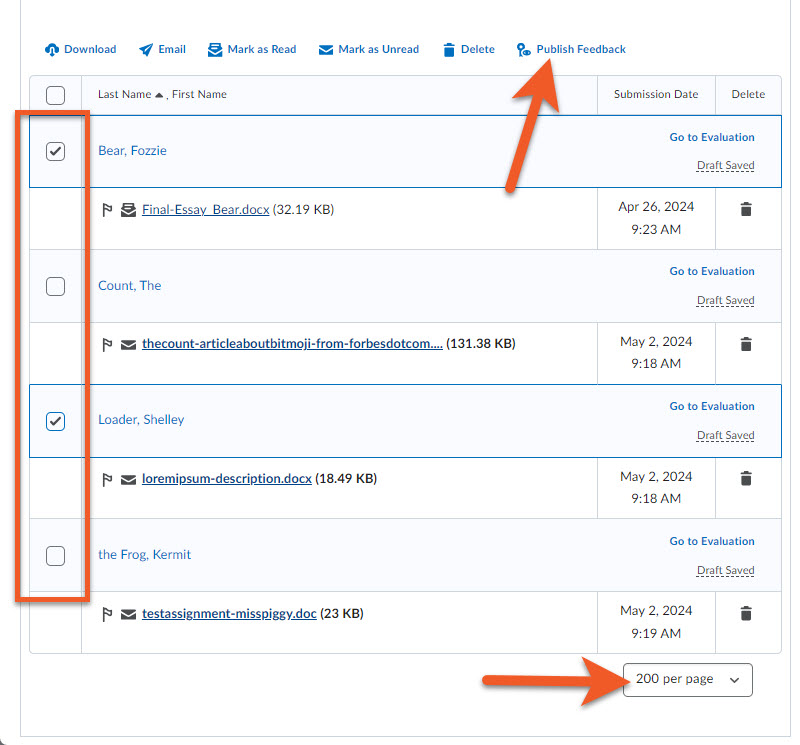
The checkboxes can be used to select which students' grades and feedback should be published.
To publish feedback for select students:
- Go to the Assignments tool and view the assignment submissions.
- At the bottom of the page of submissions, review the number of submissions displayed per page -- raise this to a higher number, if necessary. The maximum will be 200 per page, so you may still have multiple pages of submissions.
- Use the checkboxes to select the student submissions to publish.
- Click the "Publish Feedback" link at the top of the list of submissions.
- If needed, repeat the process for each page of students.
This will push the score and feedback to the gradebook.
If you have discovered an error, you could always enter the evaluation page for each student, retract, make the change, then republish, but this can be time-consuming, if you have to fix one student at a time.
Now, if you realize that you have prematurely published all grades and feedback, or perhaps you need to regrade one or more students, you can retract feedback from all or selected students, make the necessary changes, and then publish again, in a much more efficient way.
We recommend that you may want to go to Grades, and hide the grade item while you do this, so that students do not receive email notifications each time you make a change, while you are working through the process. Just remember to unhide the grade item when you’re done, so that students can view their grade and feedback.
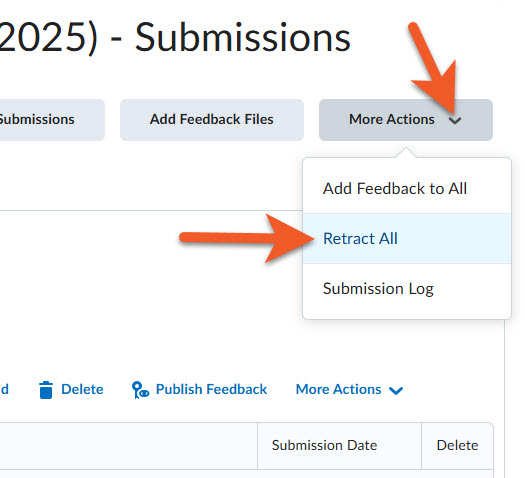
If you want to retract (unpublish) grades and feedback for ALL students
First, go to the Assignment Submissions page by clicking on Assessment > Assignments in the top navigation. Then, click on the contextual menu to the right of the assignment name, and select View Submissions.
Near the top of the page, click on More Actions > Retract All.
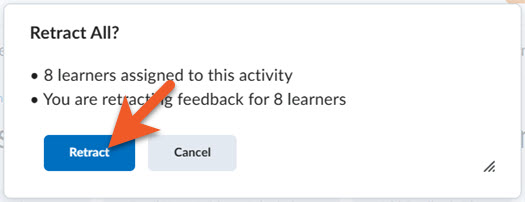
In the popup window that appears, you will see a notice of how many students’ grades/feedback will be retracted (unpublished from the gradebook).
Click on Retract to confirm.
Depending on the volume, it may take a few moments for this to be completed.
The Submissions page will reload, and you will notice that the status beside all students has changed from “Published” to “Draft Saved”. The retracted feedback will no longer be visible to students in Grades.
If you want to retract (unpublish) grades and feedback for one or more selected students
First, go to the Assignment Submissions page by clicking on Assessment > Assignments in the top navigation. Then, click on the contextual menu to the right of the assignment name, and select View Submissions.
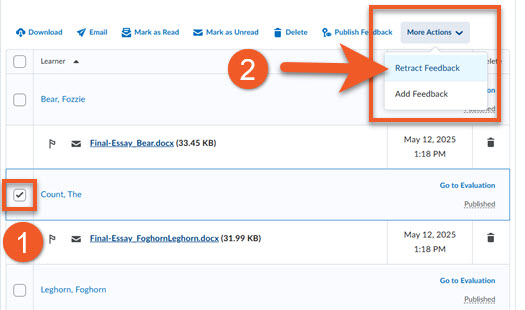
- Select the checkboxes to the left of the student names that you wish to retract.
- In the upper-right of the page, depending how wide your screen is, either click on Retract Feedback or More Actions > Retract Feedback.
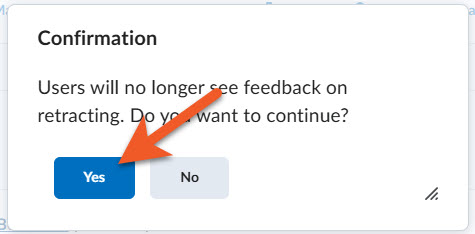
In the popup window that appears, you will be asked to confirm that you wish to retract the selected grade(s)/feedback. Click Yes to confirm.
The Submissions page will reload, and you will notice that the status beside the students you retracted has changed from “Published” to “Draft Saved”. The retracted feedback will no longer be visible to students in Grades.
Sometimes, when you’re grading an assignment, you may notice that you might want to share some common feedback/advice that could benefit all of your students. If you have some standard feedback notes that you would like to provide in the “Overall Feedback” field for some or all of your students, you can do this via “Add feedback” or “Add feedback to all”. This uses the Brightspace editor, so you can format text, add links and images, but you cannot upload files, such as Word docs or pdfs using this method.
Please read these instructions carefully before you decide if this is the best workflow for you.
Warning!: Please keep in mind that this will overwrite all existing text in the “Overall feedback” field for these students, so you will need to rethink your grading workflow to take advantage of this feature. It may be beneficial to lightly review all submissions, compile and post your “feedback for all”, and then proceed with grading each student and adding individualized feedback to the common feedback.
Post the same feedback text to all student submissions
Warning!: Please keep in mind that this will overwrite all existing text in the “Overall feedback” field for ALL students.

Go to Assessment > Assignments.
Click on the name of the Assignment, to view all student submissions.
At the top of the page, click on More Actions > Add Feedback to All.

In the popup window, you will see the Brightspace Editor. Add your message, which will be the same for all students.
You can format text, links, and insert images. You cannot attach files, such as .doc or .pdf.
When you are done, click on Save.
WARNING: This will overwrite all existing text in the “Overall feedback” field for all students, so if you have already provided personalized feedback to students, please don’t use this method, or you will lose your previous work. Instead, you may wish to create a separate document, and upload to each student using the “attach file” link when evaluating that student’s submission.
Once you do this, it is not possible to “undo”. If you change your mind, you will need to overwrite with a new message, or evaluate each student and make changes.

Now, if you go to the evaluation screen for a student, you will see your feedback in the “Overall Feedback” field.
You can append or edit this information for a particular student on this page.
Post the same feedback text only to selected students
Warning!: Please keep in mind that this will overwrite all existing text in the “Overall feedback” field for the selected students.

Go to Assessment > Assignments.
Click on the name of the Assignment, to view all student submissions.
In the left column, select the checkboxes next to the names of the students you wish to give the same feedback.
Above the table of student submissions, click on the Add Feedback link.

In the popup window, you will see the Brightspace Editor. Add your message, which will be the same for all of the selected students.
You can format text, links, and insert images. You cannot attach files, such as .doc or .pdf.
When you are done, click on Save.
WARNING: This will overwrite all existing text in the “Overall feedback” field for all of the selected students, so if you have already provided personalized feedback to these students, please don’t use this method, or you will lose your previous work. Instead, you may wish to manually add this information to each of their evaluations, or create a separate document, and upload to each student using the “attach file” link when evaluating that student’s submission.
Once you do this, it is not possible to “undo”. If you change your mind, you will need to overwrite with a new message, or evaluate each affected student and make changes.

You will now see “Draft Saved” next to each of the selected students.
If you click on Go to Evaluation for a student’s submission, you will see your feedback in the “Overall Feedback” field.
You can append or edit this information for a particular student on this page.
If you make a mistake and post incorrect feedback text to some or all students
If you have used the process described above on this page to provide the same text feedback to all or selected students, then realize that you want to revise that text, repeat the process, but enter the correct text. This will overwrite the feedback text that you previously posted.
Similarly, if you want to remove text feedback, you can follow the same process, but enter nothing in the text box, so that feedback is overwritten with a blank.
Remember to publish all when you have assessed all students, and want them to see their grade and feedback.
Instructors may provide feedback directly within a student's submission (e.g. making track changes in Microsoft Word or Adobe Acrobat) and upload the feedback as an attachment. See the tutorial for instructions to download assignment submissions.

To upload individual feedback files:
1. On the Assignments Submission Folders page, click on the folder you want to evaluate submissions for or click View Submissions.
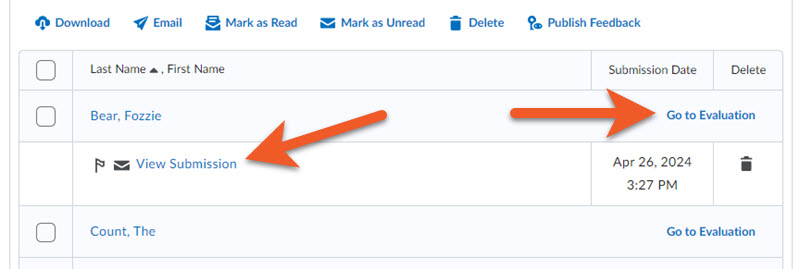
2. Select the file you wish to upload feedback for, by clicking on either the file name or Go to Evaluation.
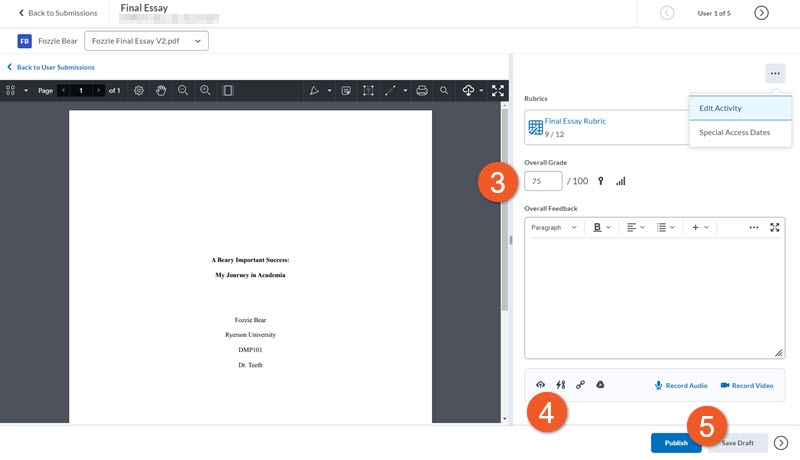
3. Enter a score for the submission.
4. Click the file upload icon to upload a feedback file (e.g. a Word Doc, pdf, etc).
5. Select Publish.
It is possible to upload all feedback files simultaneously, however the naming convention must be accurate so Brightspace can assign the correct file to the correct student.
The instructions outlined below can mostly be applied to both Mac and Windows.
PC Users will follow the steps with the following adjustments:
- After downloading the files and adding feedback to the documents, save the files and folders with the same names as downloaded. Do not change any of the file/folder names. Zip the folder and proceed to Step 3.
- When adding the feedback files in Step 5, simply add the zipped folder of all the feedback files.

1. When downloading the students' submissions, note the naming convention of the files once unzipped. Each student has their own folder and each folder begins with a unique code that identifies the student (e.g. 7627-9289). You will need these codes in order to proceed.

2. For each feedback file you wish to upload, copy the corresponding student code (e.g. 7627-9289) to the beginning of the feedback file.
- For example, if your feedback file is called "JDoe-Assignment1-Feedback.doc", and the student's unique code is 7627-9289, the filename must read "7627-9289 - JDoe-Assignment1-Feedback.doc".
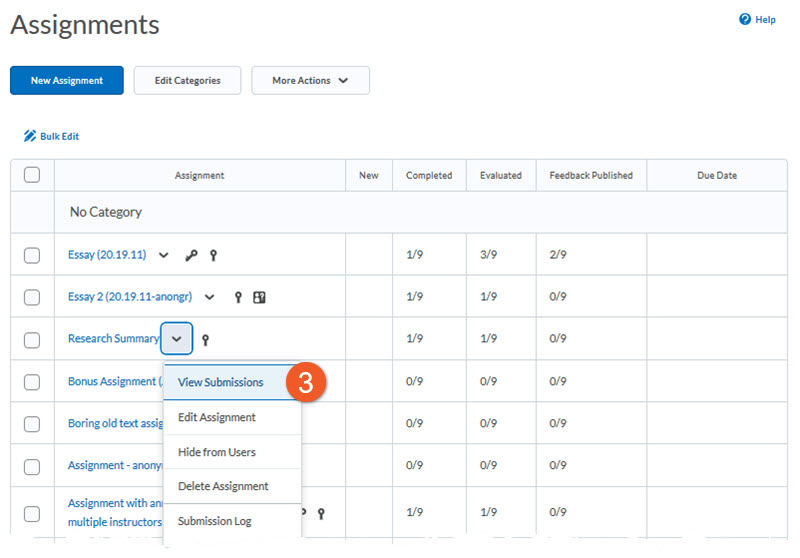
3. Upload the feedback files by clicking on the appropriate assignment folder on the Assignments Submission Folders page.
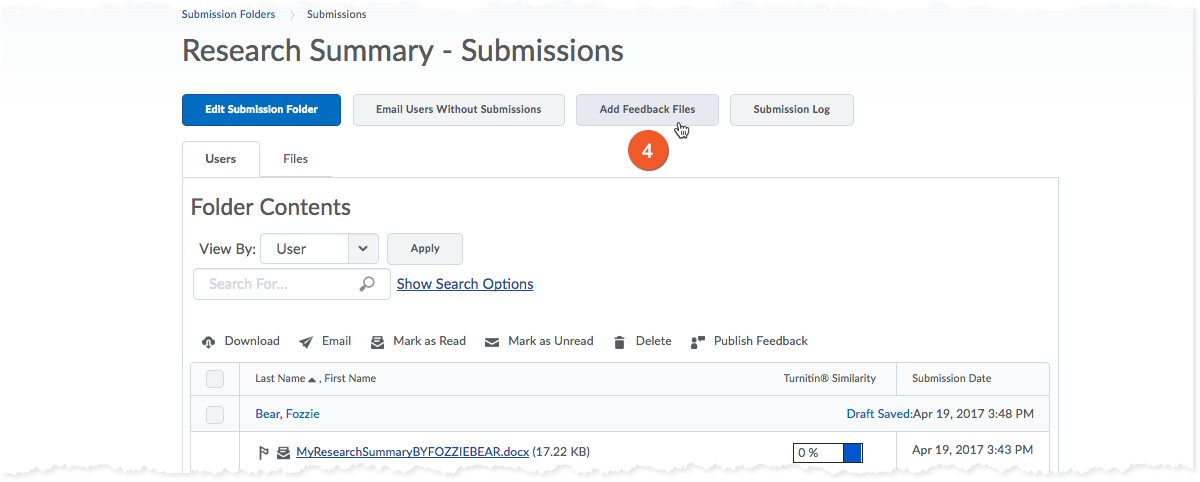
4. Click Add Feedback Files
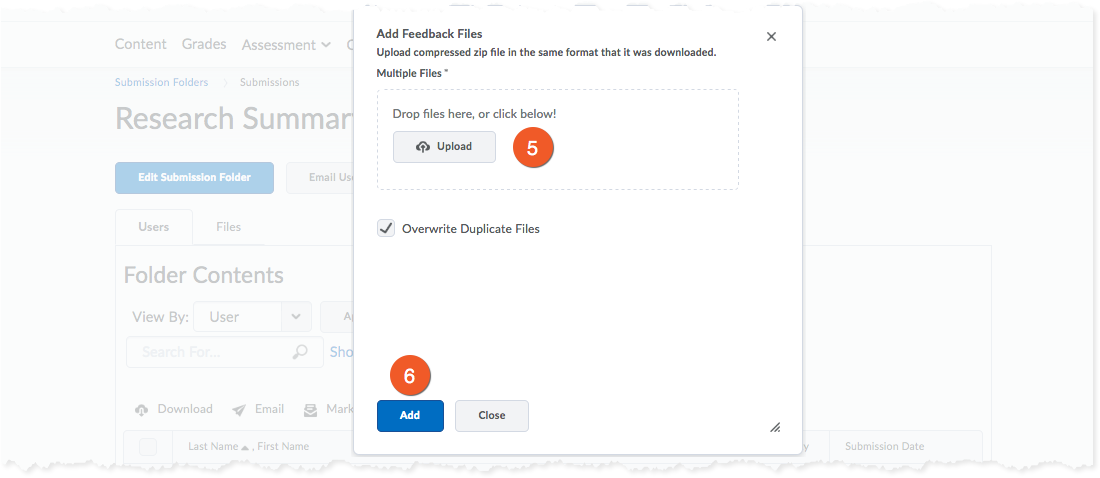
5. Drag and drop all feedback files or click Upload and select the appropriate files.
6. Click Add.
Be sure to check if the feedback was correctly assigned! We recommend reviewing the submissions of a couple of students and check that the appropriate feedback file has been uploaded.
To proceed with the rest of the grading, enter a score and select Publish.