How to Look and Sound Fabulous on a Webcam
The Easy Stuff
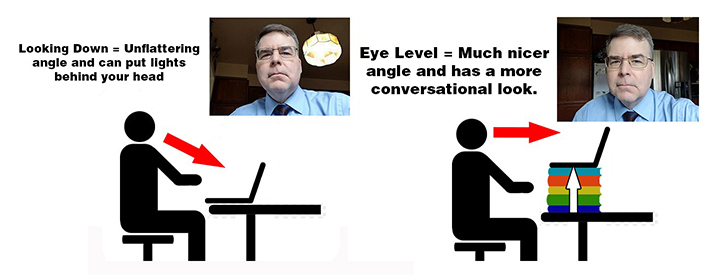
POSITION YOUR LAPTOP PROPERLY: Put your Camera at Eye Level
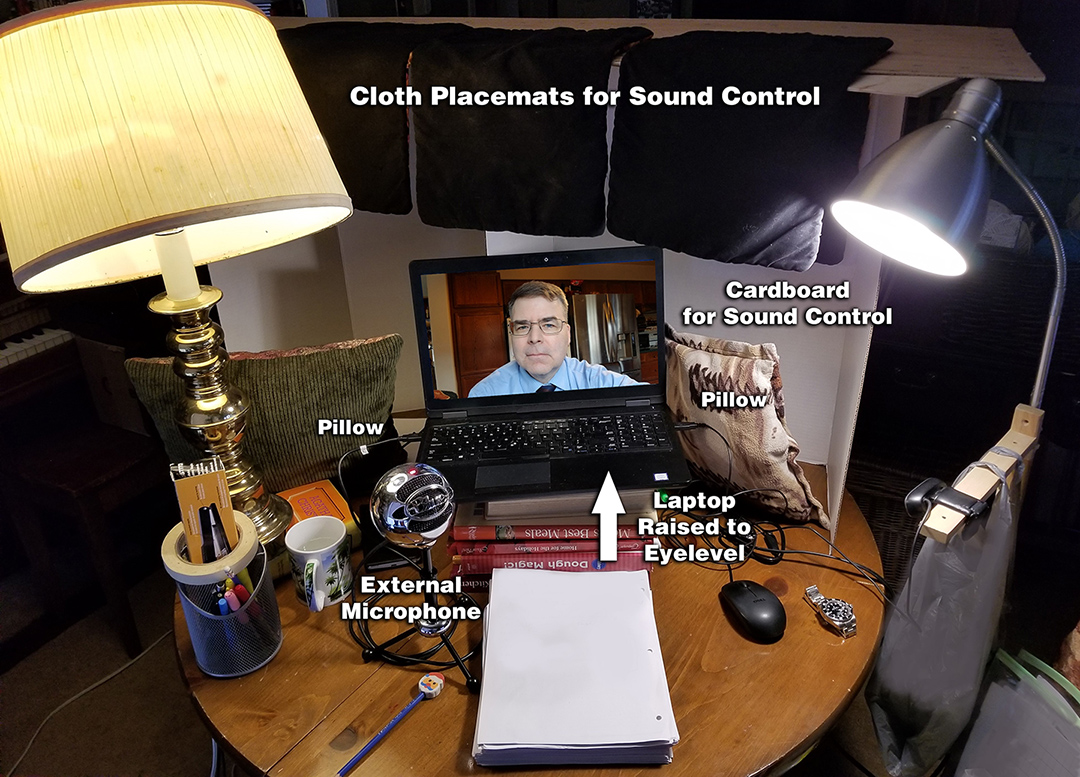
This is as simple as putting your laptop on some books. By raising the camera, you get a more flattering angle. This will also help you avoid shooting any ceiling lights that might be behind you.
POSITION YOURSELF PROPERLY: Make sure your background is not overly busy or distracting
Whenever you are on camera, you should always be aware of what your background looks like. People will not just look at your face the whole time; they will definitely look at your surroundings. If there is a TV in the background make sure it is off. Is there a door that someone might come through, surprising both of you? If there is, tape a note on the outside warning people you are on camera. Are their other items you would not want people to see? Check and then double check.
Do not shoot too close to a wall either – give yourself space behind you so that your video does not end up looking like a passport photo. This becomes even more important if you light yourself because you will get shadows on the wall behind you.
POSITION YOUR LIGHT PROPERLY: Make sure your main light is directed towards your face
Avoid having a window (or any light) in the shot behind you, as this will create exposure problems. The camera will try to compensate for the backlighting (it sees a lot of light) and in doing so it will make your face too dark. You will also get terrible shadows on your face and eyes. The shots below were taken in the exact same spot. The image on the left is backlight but simply turning the camera 180 degrees corrected the issue.

More Lighting Tips
Lighting is important for great looking images because it make your face look fabulous, and it improves the colour in the shot (look at the shirt in the example above) and the overall resolution. Any camera has to compensate for underexposed images will start to make them look grainy. More light = more vibrant colour and better resolution!
There are two types of lighting: HARD (direct) and SOFT (diffused) light.

Hard light is what you get with direct sunlight or if you shine light directly on your face. This type of lighting is NOT flattering to your face and it is hard to sit with lights pointed directed at your face for very long.
Soft, diffused lighting is recommended BUT direct lighting is easier.
HARD LIGHT SET UP
Direct sunlight is probably the easiest way to get hard lighting, but in the above photo (the one on the left), you can see some of the problems. Hard light creates hard shadows. To eliminate this, you need a second light source. Using house lamps is the easiest way to create a balanced, consistent direct lighting set up. Of course, if you were doing this for a living you might buy a basic lighting set up, but even with simple house lights, you can drastically improve your images.
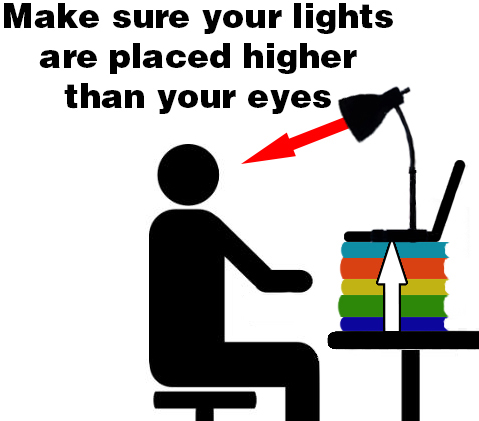
Use two desk or table lights – one light on each side of your face will give you a nice balanced light. Make sure that the lights are placed higher than your eyes. .
The type of bulb you use matters – First, try to make sure the light bulbs are the same colour. Yes, light bulbs come in different colours and colour temperature is rated in degrees Kelvin (see the chart below). Second, you want to use bulbs that are in the range of 2700K to 3200K. This will provide a warm, flattering light for your face. Light bulbs also come in a cool colour (sometimes sold as “Daylight” bulbs) and these are rated at about 5000K, which is more of a bluish tone (see chart below). Bluish light is not flattering. LED bulbs are preferred because they do not get as hot and save on electricity.

Kelvin Temperature Chart image from Wikimedia Commons.
Below is an example of a direct lighting set up using two household lamps. Note the placement and angle of the light. You will also see some sound dampening, an external mic, a second webcam and of course, the laptop set to eye level.
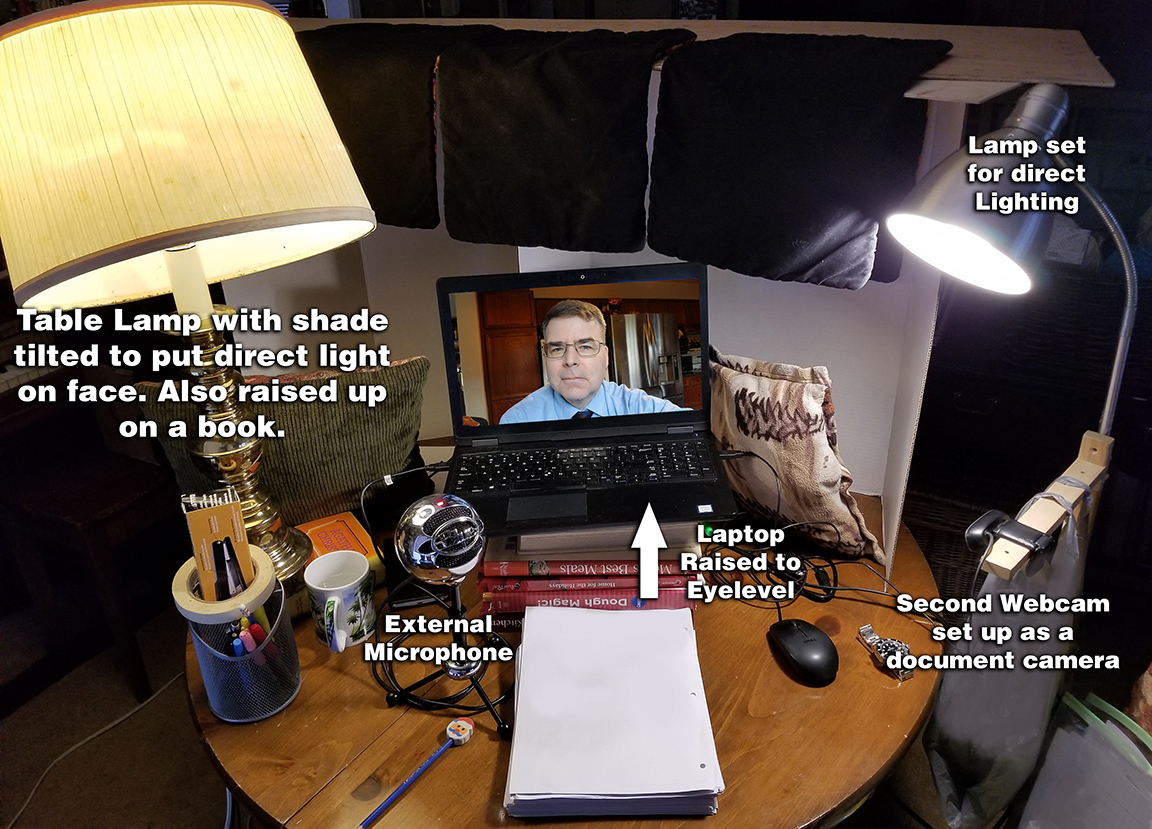
Make sure the light is above eye level – In the example above you will note that both lights are higher up than the subject. The lamp shade is also tilted to make sure the light shines directly on the face.
DIFFUSED LIGHT SET UP
Diffused lighting is a more flattering look and it also much easier on your eyes if you are on camera for long periods. The easy way to set up diffused lighting is to bounce a light off a WHITE surface. It must be white because when the light bounces off the wall it will pick up the colour of the surface. So, if you are facing a white wall you can direct a light off the wall and have it bounce onto your face. A more flexible way is to either tape white foam board together, or buy a white presentation board (both available at dollar stores for less than $2 each), to bounce the light off. Diffused light does not throw far so you have to be closer to the light for best results. Since we are bouncing light off is cardboard, an LED light bulb gives off less heat and is safer to use. As mentioned, look for a warm 2700K-3200K light for a more flattering look.

EASY TIP: One easy way to get soft diffused light on your face is to turn up the brightness on your laptop screen and go to a white screen (maybe a WORD document).
If your laptop is at eye-level, this light from your screen will look quite good. Also, if you have an iPad or tablet, you can also supplement your lighting by selecting a white screen on it and then turning up the brightness all the way.
Other Tips
FRAMING
When you are on camera, you should keep a video window open on your computer with your image on it so that you can see how you are framed. You do not want to be too low in the frame. This is a common problem. Put your head at the top of the frame.
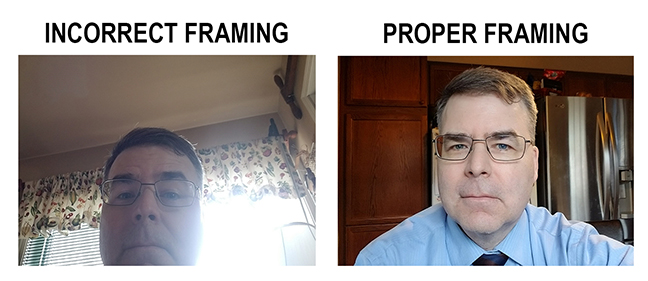
It also helps if you sit back from the screen so your face is not huge. Audio might be a problem, so again having an external mic will allow you to back up from the camera and still have great sound.
AUDIO
Audio is critical to your webcast and it is highly suggested that you purchase an external microphone (more on that in the “Stuff that will cost you Money” section below), but there are some free things you can do to immediately improve the sound.
Find a quiet place. Sounds straightforward but many people forget to turn off a TV or music player in the background. If you live with other people, let them know that you are going on camera. (Again, don’t forget to put a note on the door as a helpful reminder so no one bursts in on your webcast.) Also be sure to turn off your phone ringer.
Build a Pillow Fort. Sound is like a rubber ball that will bounce off every hard surface in your room and this might make your webcast sound very hollow. Placing pillows, jackets, blankets or any other sound muffling material will make a large difference to the overall sound. If you are doing an audio only podcast, recording in your clothing closet will give you outstanding acoustics.
CLOTHING
TVs, smartphones, laptop and desktop displays love three colours – red, green and blue. The final step to looking great is to wear one of those colours on camera. Remember, not a light or dark version of these colours but a midtones. Think cartoon colours that are vibrant and jump off the screen. Look how great these colours look on your screen now:

If you choose not to wear these colours, then wear a colour where you will stand out from the background. In other words, if your background is dark, then wear a lighter coloured top (although try to avoid wearing white). If your background is light, then wear a darker coloured top (although try to avoid wearing black). If you wear the same colour as the background you will blend in when you are on camera. Try to pick a colour that compliments your hair colour. Again, if you have lighter hair – then go with a darker background etc.

You will see in the photos above how a dark shirt/top/hair will blend into a dark background. You can simply change your shirt/top or the background. Often just turning on a table lamp will do wonders for the background (just try to avoid having the light in the shot). In the above example with the lamp (far right), the table lamp is on the floor behind the subject.
Also, when you are on camera, people will only see your shoulders and neck, so watch for stray straps, collars, etc. Again, having a video window open on your computer will be helpful to check that everything is in place throughout your webcast (and as mentioned earlier, that your framing is still correct).
A FEW MORE THINGS TO CONSIDER…
- If possible, plug in your computer directly to your internet connection with an ethernet cable. Wi-Fi can be slow and spotty at times and plugging in will give you a more stable connection.
- Plug your laptop into power so that your battery will not fail part way through your webcast. If you are on location where you can’t plug in your laptop, make sure your computer is fully charged.
- Get a lens cover for your webcam on your computer. Some companies give these out for for free, but it is helpful to have a hard cover for your camera so you don’t accidently webcast yourself after you think you are off air. When you are done – you slide the cover closed and you know that the camera is no longer shooting you. A band-aid will also work.

- Always assume the mic is on when you are webcasting even if you think it is muted. You might have accidently turned on the mic at some point. The same is true of the camera. The only sure way to know that the camera is off is to cover the camera. Some external webcams come with a lens cover as do some laptops. Some laptops however close so tightly that there is not room for a webcam privacy cover so be aware of that when you buying.
The Stuff that Will Cost you Some Money
EXTERNAL MICROPHONE
A great looking image is worthless if people cannot hear what you are saying. So, the number one recommendation for purchase is an external microphone for your computer. Snowball mics are well rated and reasonably priced and come in a variety of models and price points. Pricing is similar on both Amazon (external link) and Best Buy’s (external link) websites but these are solid performers to consider as they will make an immediate difference to your web presence.
Why? Most built in mics on laptops are not adequate for long conversations or interviews. They are tinny and hollow sounding and they require you to sit pretty close to the computer to have decent sound. By sitting closer to the camera your head will become uncomfortably large on screen.
You could wear the ear bud headphones and microphone that are similar to the ones that come with smartphones. However, most of these are white and when you wear them during interviews they stand out and look awkward – almost like you have a stethoscope in your ears. The wireless earbuds, also white, are not much better as you now have these things sticking out of you ear making you look like a character on Star Trek. There was a recent example from CBC’s THE NATIONAL.
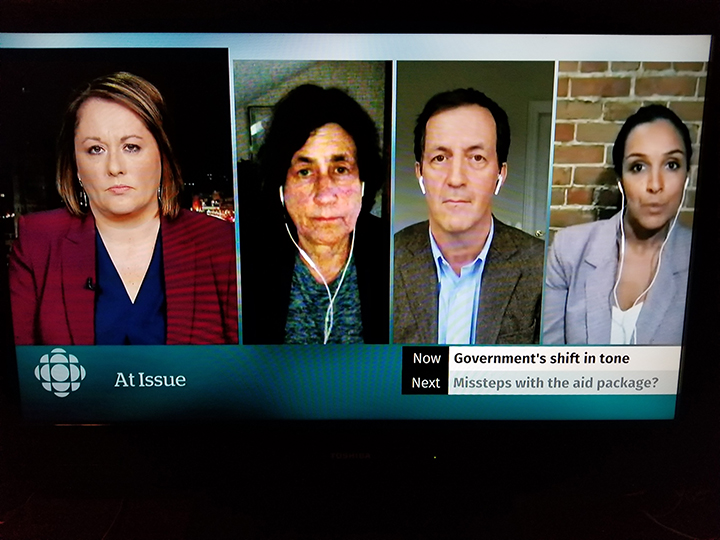
Wearing a mic and earphones look awkward and constantly remind your audience that you’re wired up. You can see in the above example that the microphone on the host is “dressed” (hidden on your subject). This looks so much more comfortable.
You can also see the different video quality of the cameras in the example above because of the variety of lighting used. One shot looks really grainy and one person has a big shadow behind them because they are too close to the wall (although the brick is very nice). In addition, if you see again that if you have dark hair, wear a dark jacket, and put yourself against a dark background, you will blend in.
EXTERNAL CAMERA
If you have an older computer you might have a built in camera that does not look very good. Or you might want to use a desktop computer that has no camera. Or finally, you might need a second camera to use as a document camera set up for teaching on Zoom. A good external camera will definitely make a difference to the overall look of your video stream. This is where external cameras come in and Logitech is a popular brand that are well rated, and come in a variety of models and price points. (external link)
EASY TIP: Of course, you might also just consider using your phone to do the whole interview/on camera. If you want to do this, all of the same tips apply (eye level, etc.) and you will need some kind of stand to hold the phone. It is also highly recommended if you use your phone that you shoot with the phone in the horizontal position and NOT vertical.
One option for a free external webcam is to use your smartphone as a webcam. This involves some work, but below are some links where you can explore this option.
Instructions for Mac. (external link)
Instructions for PC. (external link)
MAKE UP
Once you start to light yourself, you might notice that your face starts to look shiny. Using an inexpensive matting powder (under $10) will help. Here is one that is recommended. (external link)
So there you go. A few things you can do to make yourself look and sound fabulous online!
