Welcome to the D2L Guide for EHS Courses!
This guide is compiled with the EHS courses in mind, divided into sections based on the features of Brightspace used in these courses.
Let us know if you have any questions!
D2L Instructor & Staff Support
courses@torontomu.ca
Before your course begins, you will need to enroll students in your course. Please see the instructions below for the steps you need to follow, and a couple of scenarios, depending on class size.
The first step in the process is to have the prospective students sign up for the training modules via the Learner Profile.
The Learner Profile is a Google form that collects information from the prospective student, including which training modules they wish to complete.
The EHS team maintains this Google form in their accounts at this time.
Once users have filled out the Learner Profile, the EHS team can use the resulting spreadsheet to collect the users' @torontomu.ca email addresses, from which they can collect the usernames required in order to enroll them in D2L.
Their username will be the part before @ in their @torontomu.ca email address. For example, j1smith@torontomu.ca has a username of j1smith.
For groups of under 20 users, the EHS team will facilitate the enrollment individually.
Margie and the SME for each course have 'Instructor' access to their respective D2L shells. This will allow manual addition/removal of users using the Manage Shell Members tool accessed through the my.torontomu.ca (opens in new window) portal.
Users added using this tool can also be dropped using this tool. Users added using the Bulk Enrollment option will not appear here, and therefore cannot be dropped using this tool.
Find out more about the Manage Shell Members tool.
For groups of over 20 users at one time, the EHS team can ask the D2L support team to bulk enroll the users.
Anyone with an Instructor role (Margie and the respective SMEs) in the course may send a request to courses@torontomu.ca for users (20+) to be added.
Note: You CAN submit users to be added for multiple courses in the same sheet, if you like.
A) Filling out the Bulk User Enrollment spreadsheet:
- Open (google sheet) IRM D2L Bulk User Enrollment (external link, opens in new window) document (this is a Google Spreadsheet, and requires that you are logged in with your TMU Google account only).
- Duplicate the Bulk Enroll Template sheet and rename your sheet to indicate the course and the date (i.e. ADD Ergo 20170601, or if multiple courses just put the date).
- Enter the users' TMU usernames (the part before @ in their @torontomu.ca email address) in the Username field.
- Enter the D2L shell code in the Shell Code field. If you don't know the code for your course, you can look it up in the IRM Shell Codes worksheet.
B) Emailing the request to D2L Support:
- Send an email to courses@torontomu.ca (opens in new window) with a link to your document.
- In the message, request that the users be added, with the name of the worksheet to be processed. Be sure to mention that this has been approved for IRM safety courses by Restiani Andriati (as we do not provide this service to most other courses).
- The D2L Support team member will respond once the users have been added/removed.
Please note that users added using this method must be removed by the D2L support team, and users added using the manual method must be removed by the EHS team.
Follow this tutorial to view your classlist.
You may then email your entire class, if you wish to do so. On the same tutorial page, you can also find instructions to email only select students and to receive a copy of any messages that you send to your students.
If you need to add or change the instructor for your course, please contact Stephanie Goetz in the DMP.
To add other types of users, other than students, there is now a self-service tool, "Manage Shell Members", accessed through the my.torontomu.ca portal, that will allow you to add individual shell members, such as a TA, Course Builder or Auditor.
An excellent way to get things started for students in your course is to provide them with welcome messages, in the form of a welcome announcement and an email message.
A welcome announcement will appear on the main page of your course where the student logs in.
An email message can be set using an Intelligent Agent, to be sent to the student dependant upon a particular trigger, such as when the student has enrolled in the course, or if they haven't logged in for a particular amount of time.
Overview
It is helpful for new students in your course if you provide a welcome announcement. This is the first thing students see when they login to the course, and will introduce the student to details about the course and provide guidance with regard to how to get started, expectations, etc. It is recommended that you create this announcement before the course begins.
Settings and sample content
It is best to craft the welcome announcement based on info from the course's first module SCORM package. You may wish to modify the wording to make it more applicable to an announcement, rather than the conversational tone found in the module lessons.
The announcement should briefly touch on each of the following items:
Focus of course
Number of modules/quizzes
How is completion calculated?
Where to start?
IRM icon
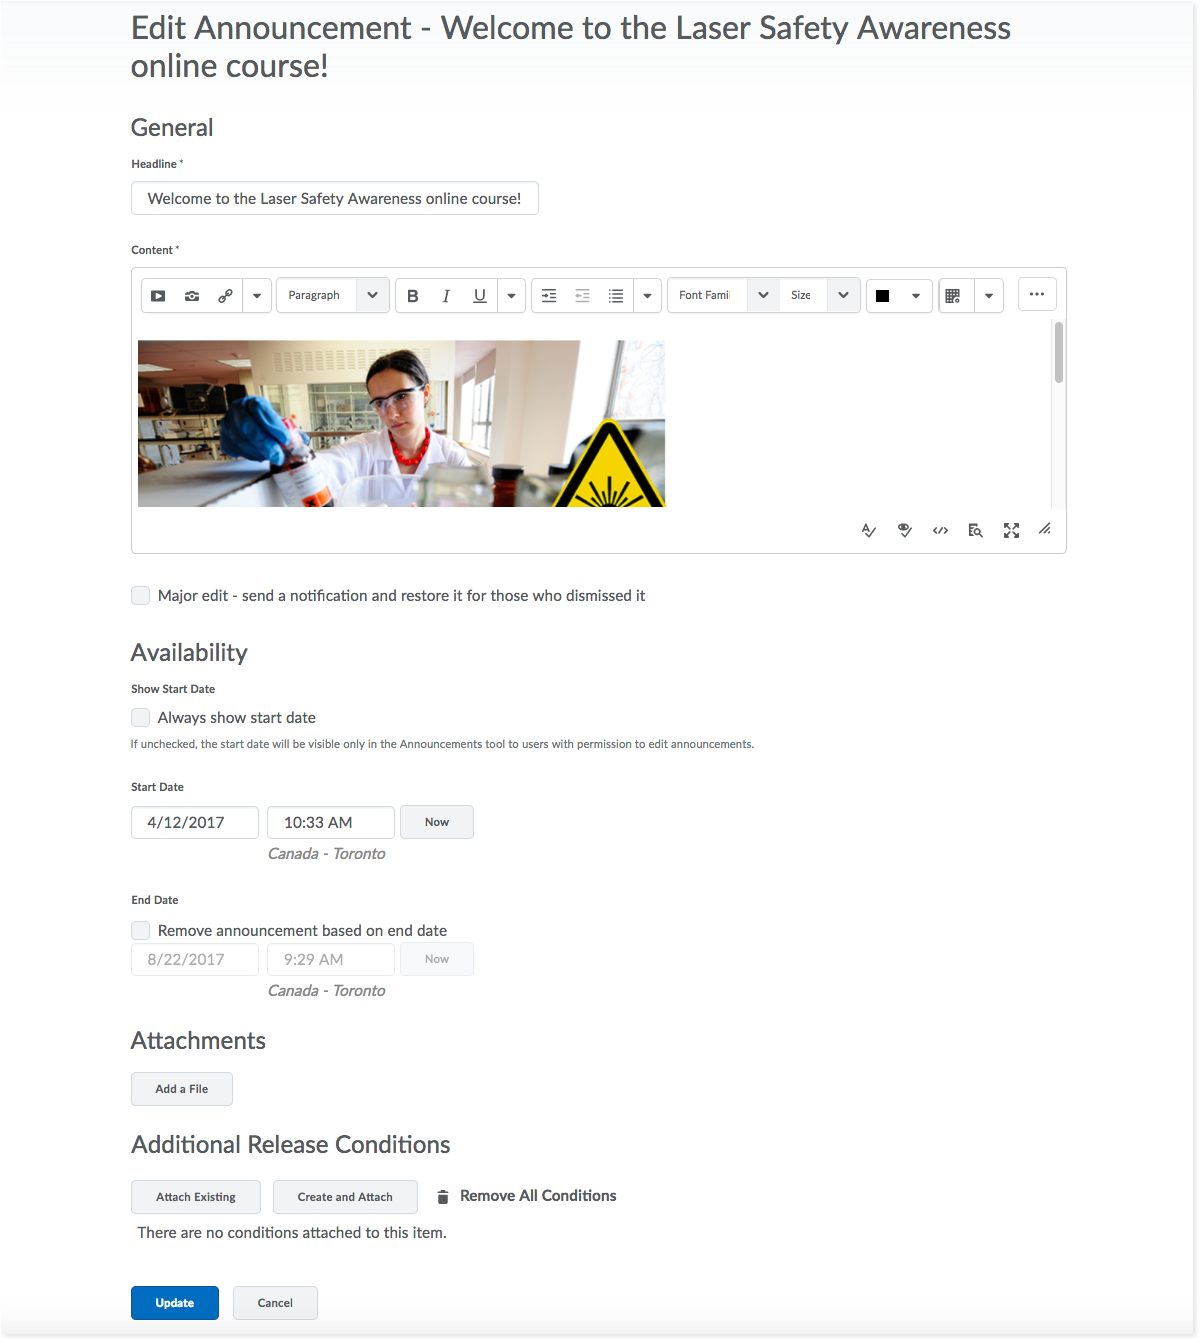
Headline example:
Welcome to the Laser Safety Awareness online course!
Content example (enter this in HTML source code mode):
<p><img src="/content/enforced/92710-pd_irm_biosafety_01/biohazard2.png" alt="" title="" width="591" height="253" /><br /><br />Welcome to the Laser Safety Awareness Training course. This awareness course will help you to recognize a laser or laser-containing device, identify whether the laser or device is harmless or hazardous, and know how to control the hazards.</p>
<p>There are a total of four modules, and <strong>at the end of each module you will be asked questions</strong> to help solidify your understanding of the material presented in that module. <strong>You must complete all modules in order to obtain a certificate of completion</strong> for this course.</p>
<p>Please click on <strong>Content</strong> tool on the top menu to start and enjoy!</p>
<p></p>
<p><img src="/shared/ryerson-logos/RU-IRM-rgb.png" alt="IRM Logo" title="IRM Logo" height="51" /></p>
Settings:
Uncheck the "Always show start date" checkbox.
Don't worry about entering start or end dates for a welcome announcement.
Overview
Another excellent way to reach out to students with important information about a course is to create an email using Intelligent Agents, to be sent to the student once they have taken an action. In the case of EHS courses, we recommend 1 day after students have enrolled in the course.
For more information: Learn about how to use Intelligent Agents to send email
Suggested settings
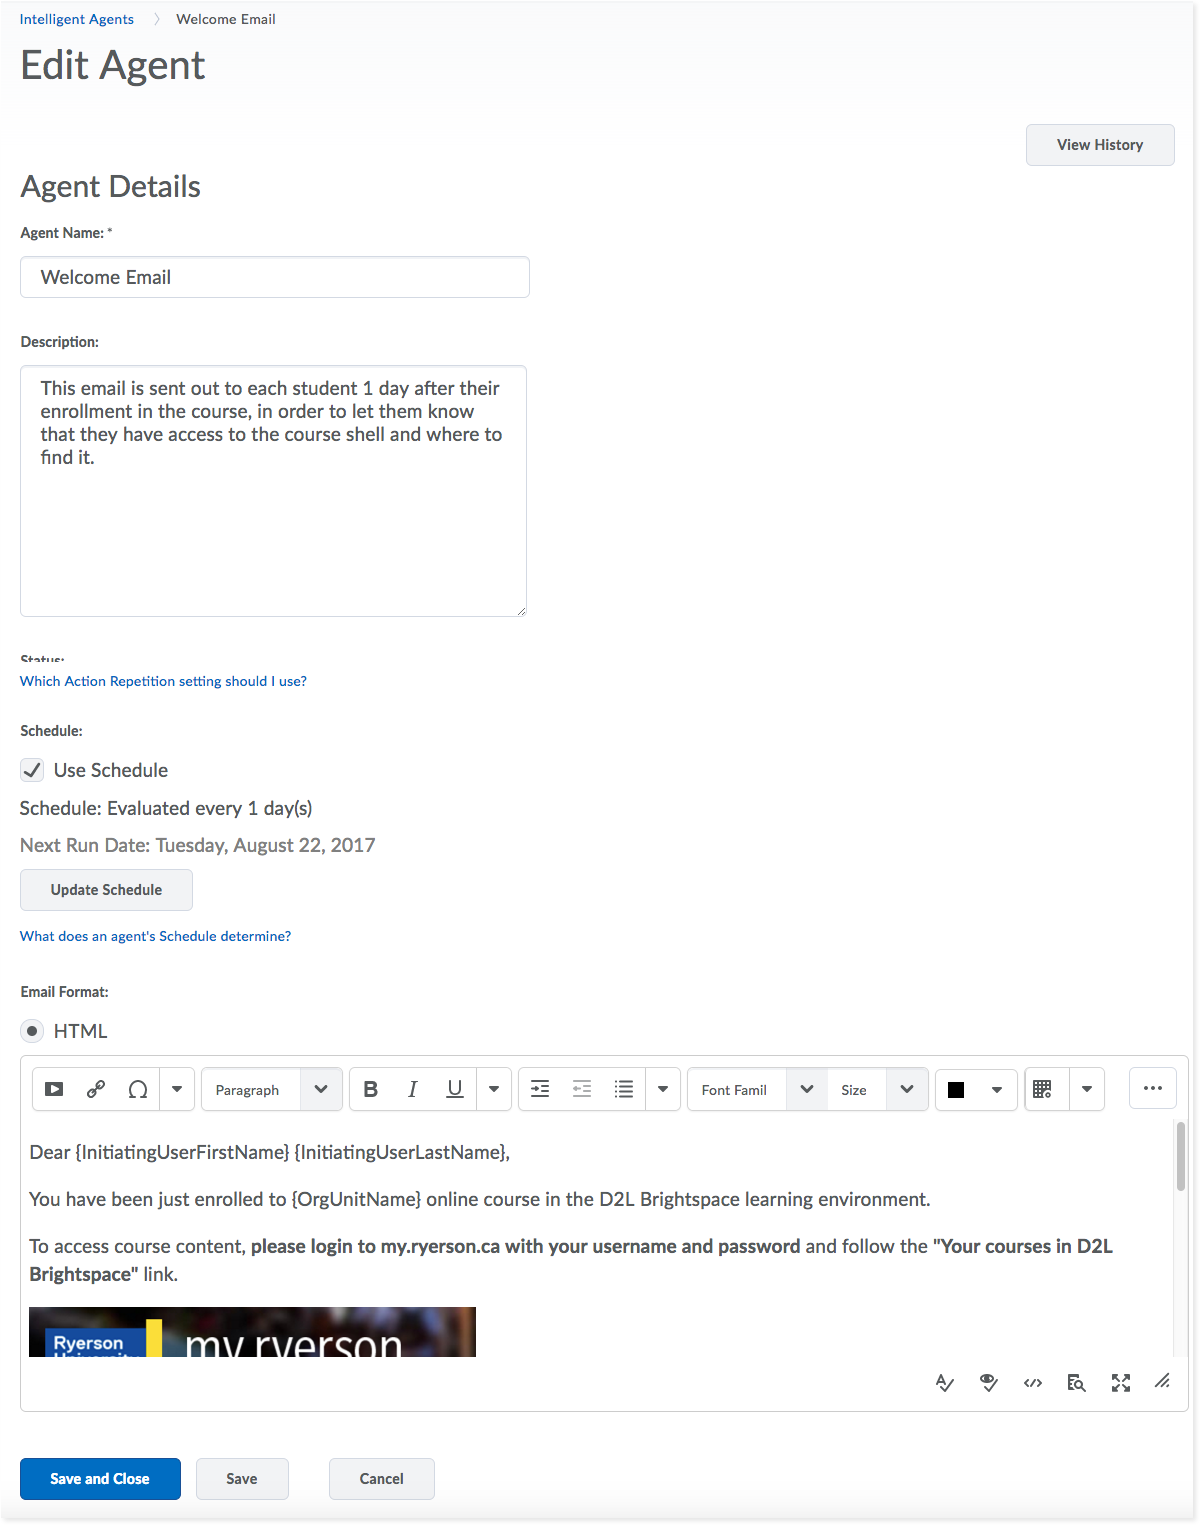
Agent Name: Welcome Email
Description: This email is sent out to each student 1 day after their enrollment in the course, in order to let them know that they have access to the course shell and where to find it.
Status: Leave disabled until you are ready to make the course shell active.
Course Activity (not Login activity):
Check "Take action when the following login criteria are satisfied"
Select "User has not accessed course for at least 1 day(s)"
Agent Repetition: select "Take action only the first time the agent’s criteria are satisfied for a user"
Schedule:
Check "Use Schedule"
Update schedule:
Repeats: Daily
Repeats every: 1 day(s)
Leave dates empty
Email format: HTML
To: {InitiatingUser}
Email Subject: Welcome to the {OrgUnitName} online course!
- Message (enter this in HTML source code mode):
<!DOCTYPE html>
<html>
<body>
<p>Dear {InitiatingUserFirstName} {InitiatingUserLastName},</p>
<p>You have been just enrolled to {OrgUnitName} online course in the D2L Brightspace learning environment.</p>
<p>To access course content, <strong>please login to my.torontomu.ca with your username and password</strong> and follow the <strong>"Your courses in D2L Brightspace"</strong> link.</p>
<p><img src="/shared/d2l/d2l-access-courses.png" alt="Finding D2L courses link in my.torontomu.ca" title="Finding D2L courses link in my.torontomu.ca" /></p>
<p>Once D2L Brightspace opens, please <strong>enter the course by clicking on the course title</strong> and follow the instructions in the <strong>Welcome announcement</strong>.</p>
<p>In case of any questions, please contact <a rel="noopener" href="mailto:irm@torontomu.ca">irm@torontomu.ca</a>. <br /> We hope you enjoy the course!</p>
<p>IRM Team</p>
<p><img src="/shared/ryerson-logos/RU-IRM-rgb.png" alt="IRM Logo" title="IRM Logo" height="51" /></p>
</body>
</html>
The learning modules for EHS courses have been developed using a file format known as SCORM. Content is developed externally, and packaged so that it can be imported into D2L Brightspace, one lesson at a time.
- If you are adding a NEW SCORM lesson (i.e. not replacing an existing one), follow the instructions outlined in sections A and B.
- If you are replacing an existing SCORM lesson, follow instructions outlined in sections A through E.

Follow the instructions to import the new SCORM package to the Content tool of the course.
For more information: Import SCORM package

The import process will create a new content module, found at the bottom of the list of modules. You will need to go into that new module and drag the SCORM item into the existing module for that lesson.
- In the Table of Contents, locate the new module at the bottom of the list of content modules. Click on it to open the module in the right-hand panel.
- Click and hold on the icon to the left of the content item.
- Drag the content item into the appropriate module in the Table of Contents. Release the item when you see the module selected.

4. Be sure to go back and delete the empty module that was created during the import.

Once you have moved the SCORM lesson into the appropriate module, you will need to add a Release Condition. Release Conditions control who can see content items - in this case, the students should not see the SCORM lesson until they have passed the test for the previous lesson.
- Locate the SCORM item, and edit the dates and restrictions.
- Click to add an existing Release Condition (if you are updating an existing SCORM) or create a new Release Condition (if this is a new SCORM lesson that didn't already exist in the course).
- Set a condition on a Quiz Score.
- Select the previous module's quiz, and set the threshhold at 80%.
- Save.

Once you have set release conditions on the SCORM item, you need to set release conditions on the test that takes place immediately after that lesson.
- Locate the test and edit the dates and restrictions.
- Click to add a Release Condition.
- Set a "Condition Type" of Content > Visited content topic.
- Under "Condition Details", choose the lesson that immediately precedes the test.
- Ensure that you have chosen "All conditions must be met" before selecting "Update".
Once you have uploaded the replacement SCORM lesson and followed the instructions to set the release conditions for it and the corresponding quiz, you need to delete the old/outdated SCORM lesson, so that it will no longer appear in the module.
- Ensure you are in the correct module.
- Select the downward-facing arrow beside the old SCORM lesson that you wish to delete.
- Select Delete Topic.
It can be helpful to provide a description for each module to explain details such as the topics that module will cover, and requirements to complete the module, and move on to the next module.
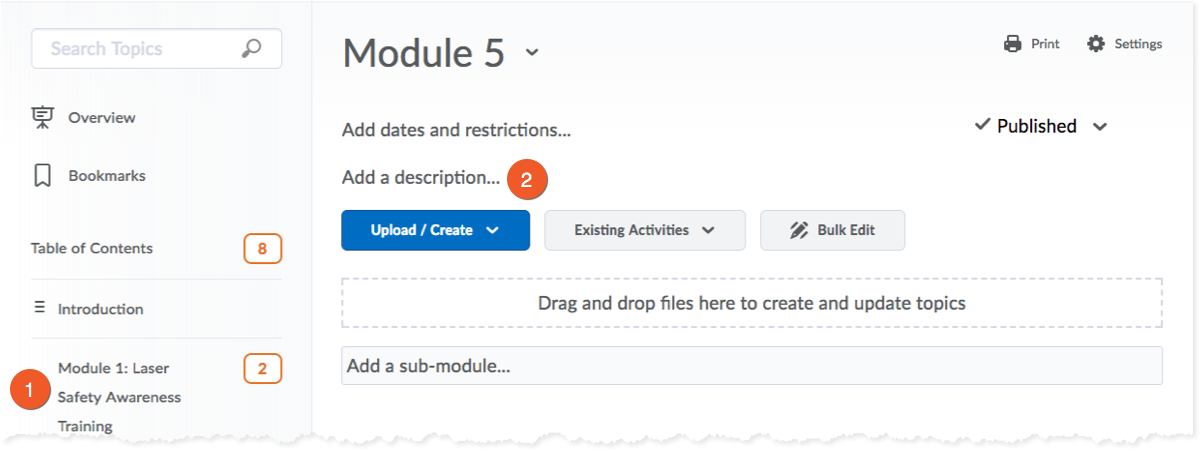
1. To add or update the description for a module, go to the Content section of your course, and in the left navigation, click on the module name, so that module will load in the main area of the page.
2. Click on "Add a description..."
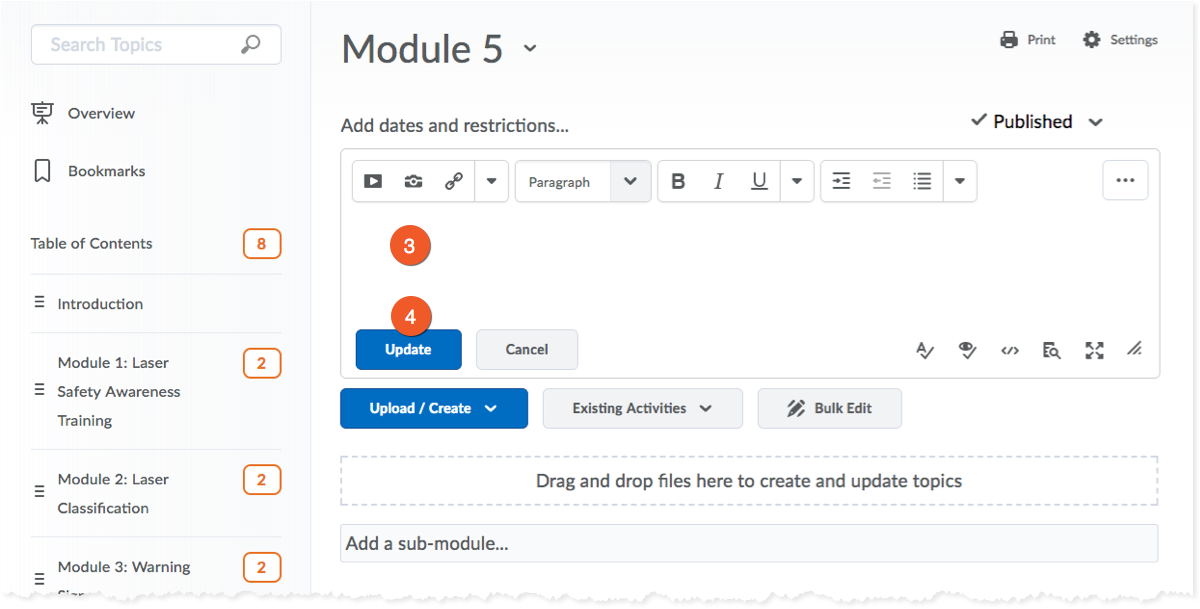
3. A text editor will load. Type or paste in your content, and perform basic formatting, such as bolding text.
4. Click on "Update" to save your changes.
An excellent way to gauge learning progress in a course is a quiz because it tests the student's understanding of the concepts in the learning module.
Also, when it comes to safety concerns, which the EHS courses address, the completion of a quiz provides documentation of the student's understanding.
The Quizzes tool in D2L Brightspace has many features, including the ability to provide a variety of types of questions, feedback, hints, etc.
Find the Quizzes tool in the top menu bar, under Assessment. If it isn't there, review how to enable course tools.
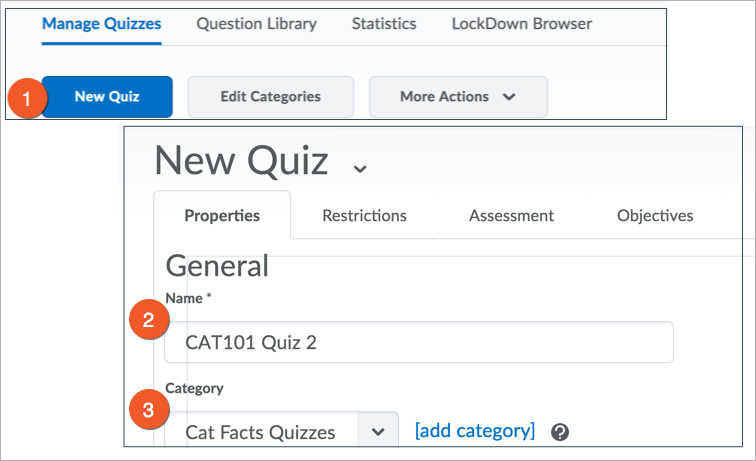
Three steps to creating a quiz:
Settings
Quiz Names
- Keep quiz names really simple, such as "Module 1 Quiz".
Quiz Questions
- Question Enumeration
- Select lowercase alphabet (a, b, c).
- Do not randomize answers.
Feedback
Each question will have full feedback entered into the answer feedback for the correct answer only. This ensures that users will only see the full feedback if they get the answer correct.
Student cannot attempt a quiz until they have visited the lesson for that module. See the instructions for Content - Learning Modules for details.
See our tutorial for Create a Quiz > Change assessment settings > Attempts settings to set the number of quiz attempts to 3.

Once you have set the quiz attempts setting to 3, you need to control what the student sees after each attempt, depending on their performance. You can learn how to do this in our tutorial for Create a Quiz > Change assessment settings > Set submission view.

To edit a submission view:
- Go to Quizzes.
- Click on the downward-facing arrow beside the name of your quiz and choose Edit.
- Choose the Submission Views tab.
- To edit an existing view, click on the name of the view.
- To add an additional view, click on the Add Additional View button.
Recommendations
When adjusting the settings, you'll want to consider a few things.
Message: What message do you wish to display once the student submits their answers? Consider letting the student know whether they've passed or not, if they are allowed to attempt again, and any other details to direct them to the next logical step.
Date: When do you want the students to see the content in the submission view? Do you want them to see as soon as they submit, or perhaps after a particular interval of time has passed, or on a particular date.
Attempt: If the student is allowed multiple attempts, you can show the student something different each time, depending on how they perform. This setting notes which attempt these settings apply to.
Min score/Max score: Indicate the lower and upper scores that apply to this view.
View Details: Choose whether to show the student all of the questions they answered, all they did not answer, only those that were correct, only those that were incorrect, show the answers, and/or show how they scored. Or, you can show none of these details. You also have the option to show the class score or score distribution, if you wish.
Here are examples of how we've set up submission views for EHS courses:
Attempt #1
If student gets >80% (PASS):
Message: You passed this module! Please proceed to the next module in the Content tool.
What do they see? All of the details, including the answers
Additional attempt? No
Proceed to the next module? Yes
If student gets <80%:
Message: You achieved less than 80% on this quiz, and must try it again to advance to the next module.
What do they see? Whether they got questions correct or incorrect, but not the answers. They will only see the feedback associated with their specific answers to the questions.
Additional attempt? Yes
Proceed to the next module? No.
Attempt #2
If student gets >80% (PASS):
Message: You passed this module! Please proceed to the next module in the Content tool.
What do they see? All of the details, including the answers
Additional attempt? No
Proceed to the next module? Yes
If student gets <80%:
Message: You achieved less than 80% on this quiz, and must try it again to advance to the next module. Please review the learning module before making your next attempt. You have only 1 attempt remaining, and must pass it in order to complete the course.
What do they see? All of the details, including the answers.
Additional attempt? Yes
Proceed to the next module? No.
Attempt #3
If student gets >80% (PASS):
Message: You passed this module! Please proceed to the next module in the Content tool.
What do they see? All of the details, including the answers
Additional attempt? No
Proceed to the next module? Yes
If student gets <80%:
Message: You achieved less than 80% on this quiz, and unfortunately cannot complete the course. Please contact irm@torontomu.ca to discuss options.
What do they see? All of the details, including the answers.
(We anticipate that this should be a very small number of people, and we can reassess the situation if it is more than expected.)
Additional attempt? No.
Proceed to the next module? No
D2L Brightspace provides a number of ways to see how your students are progressing through the course. You can use the Class Progress tool to see how many items students have completed, as well as export a completion report through the Grades tool.
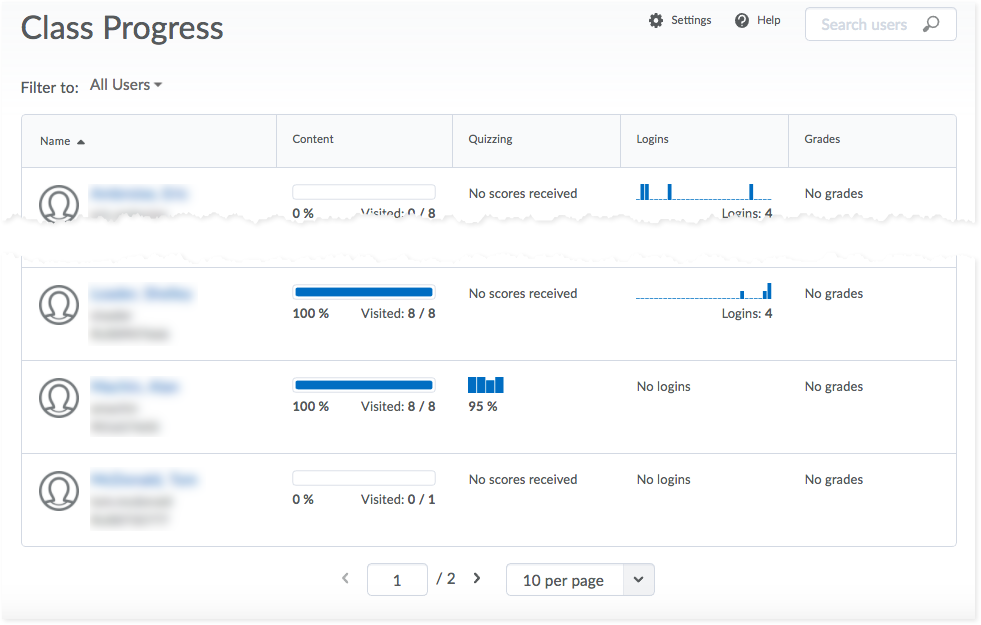
To see progress information for either a full list of your students or to look up individuals, in the top nav, go to Progress (or, if you don't see that item, go to Course Admin > Learner Management > Class Progress). Here you can see a list of students, how many content items each student has visited and their score for quizzes taken so far.
You may download a report from D2L Brightspace that includes a list of students in your course and their final grades (complete/incomplete), as well as their grades for each quiz, if you wish.
Report Instructions
See the instructions below to download the completion data from the D2L Brightspace course shell. Here is an example of the report: Example-Completion-Report-File.xlsx (external link)

1. In your D2L Brightspace shell, go to the Grades tool (in the menu bar, or Course Admin > Assessment > Grades, if you don't see it in the menu bar).

2. Click on Enter Grades (found near the top of the tool, just below the menu bar).

3. This is where you will see a list of all of the students, along with their grades.
4. Click the Export button (found below the "Enter Grades" link).

5. Here are the settings to select:
- Export Grade items for: All users
Key field: Username
Grade values: Grade Scheme (this will give you percentages and "Complete" status)
User Details:
Last Name
First Name
Note that you will not need to check Email if you use the Username to match up with the Learner Profile data.
Choose grades to Export:
Select Final Calculated Grade (this will indicate course completion as "Complete" or "Incomplete")
Check the quiz columns, if you would like to see their individual values.

6. Click on the Export to Excel button, at the bottom of the page.
7. Follow the on-screen instructions to download the resulting file.
Please note that if you have a large number of students in the course, it may take some time for this process to complete - please be patient and don't close your browser window.
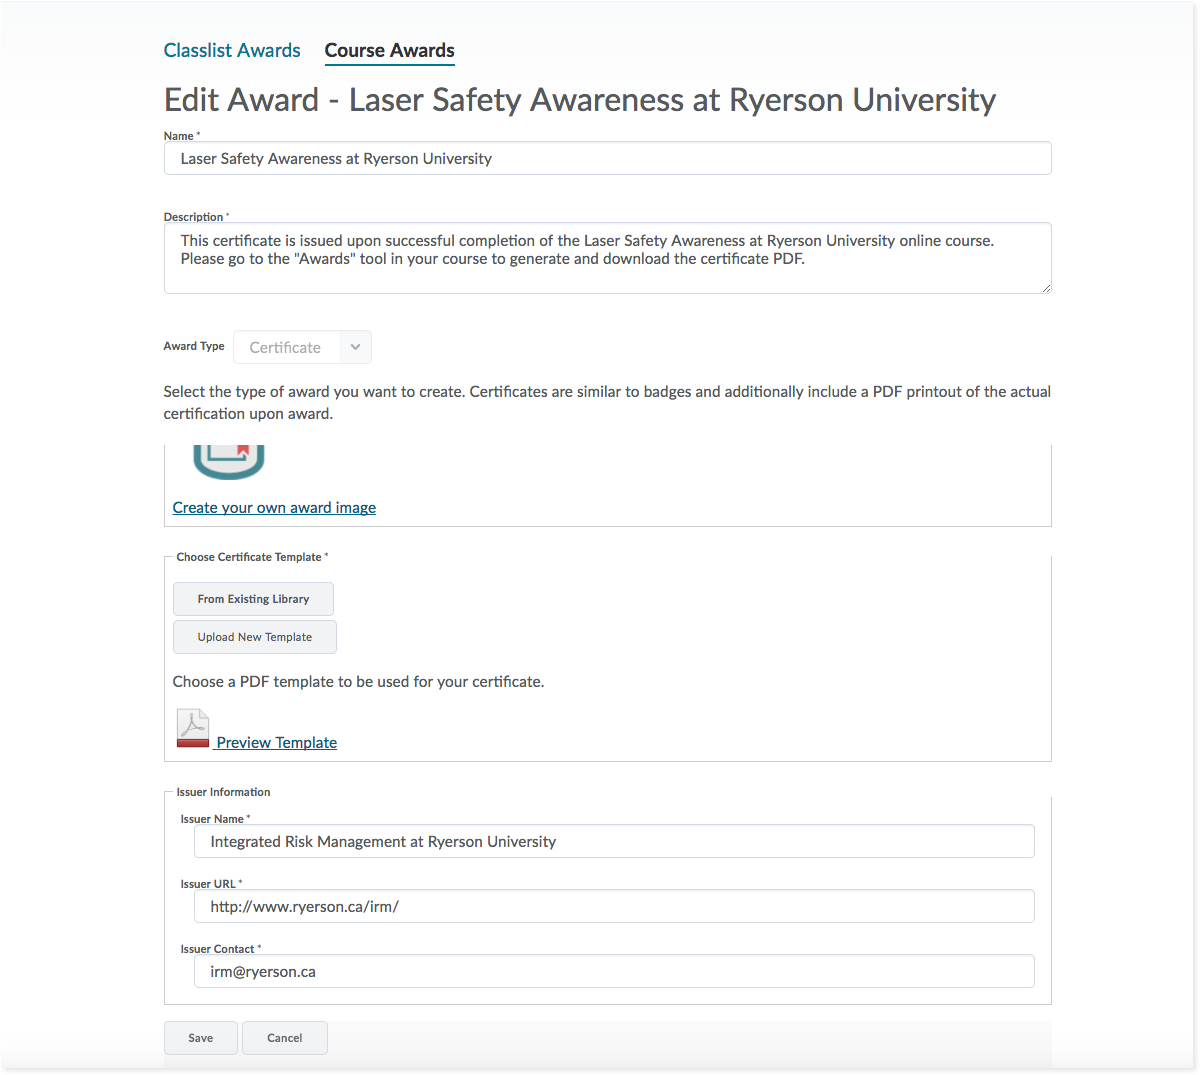
A completion certificate has been created for all existing EHS courses. However, if you are setting up a new course, you will need to create a certificate/award.
Please consult our tutorials to learn more about the Awards tool, how to create and manage awards, and how to issue awards to your students. You will need to use the settings listed below to set up your award/certificate.
Settings
Name: [Course name goes here]
Description: This certificate is issued upon successful completion of the [Course name goes here] at Toronto Metropolitan University online course. Please go to the "Awards" tool in your course to generate and download the certificate PDF. This certificate will be valid for 3 years from the date of issue.
Award Type: Certificate
Availability: "Restrict award to this course name and its child org units"
Expiry:
Relative time period after earning the award: 3 years
Notify before expiry: 4 weeks
Award Image: use the certificate image that comes w D2L
- Certificate Template: use this file that includes the expiry date (EHS_Cert_wExpiry-Universal-Oct-2017.pdf (external link, opens in new window) ) (or use this file, which does not include an expiry date, if your course does not require one: EHS_Cert-Universal-Oct-2017.pdf (external link, opens in new window) )
- Issuer Name: Environmental Health & Safety at Toronto Metropolitan University
- Issuer URL: https://www.torontomu.ca/ehs/
- Issuer Contact: ehs@torontomu.ca
Release Conditions
These will be based on what is considered "completion" of a course.
Where there are quizzes, student must achieve over 80% on all quizzes to "pass"
- Where there are no quizzes, it will at least be based on student having clicked on the module lesson.
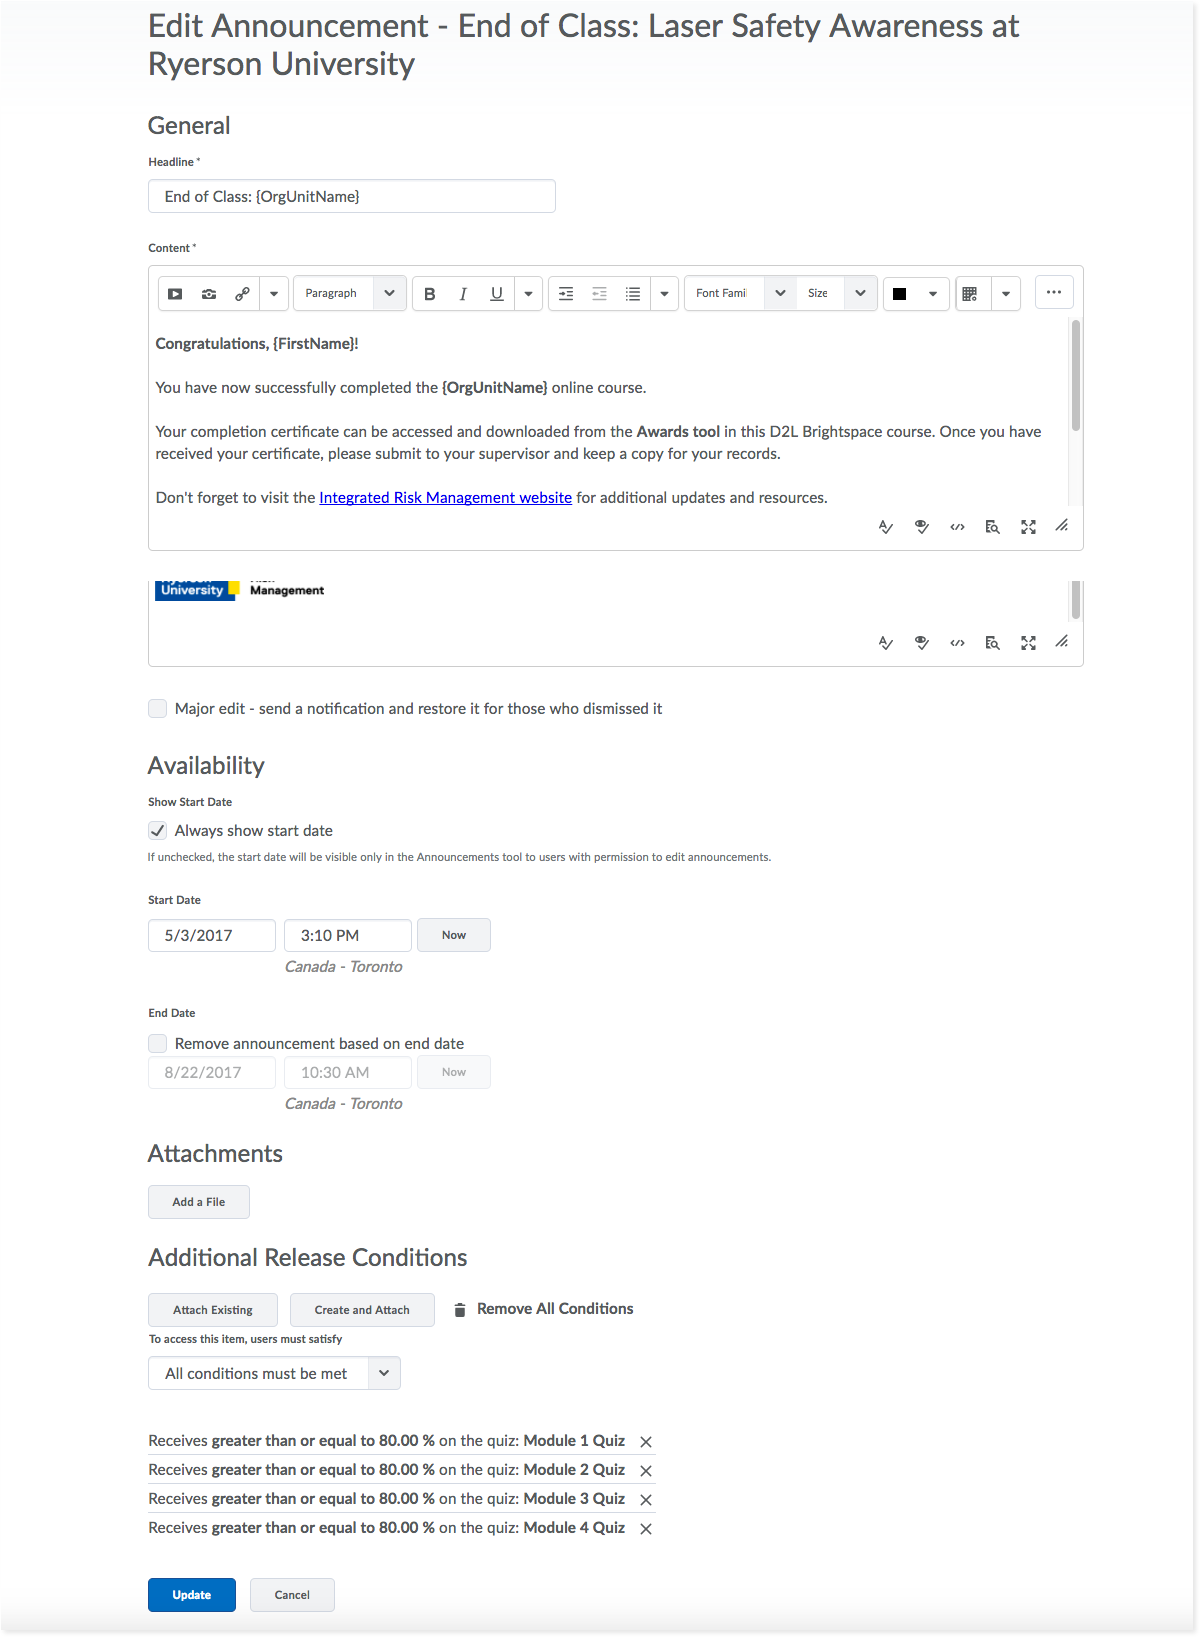
Similar to the welcome announcement, we recommend that you set up an automated announcement that will appear when students have successfully completed all course requirements.
Settings
Can use the same code for all courses, as {OrgUnitName} will put the name of the course into the message.
- Uses the same release conditions as the certificate (see previous tab on this page).
Content
Headline: End of Class: {OrgUnitName}
Body (enter this in HTML source code mode):
<p><strong>Congratulations, {FirstName}!</strong><br /><br />You have now successfully completed the <strong>{OrgUnitName}</strong> online course.<br /><br />Your completion certificate can be accessed and downloaded from the <strong>Awards tool</strong> in this D2L Brightspace course. Once you have received your certificate, please submit to your supervisor and keep a copy for your records.<br /><br />Don't forget to visit the <a rel="noopener" href="https://www.torontomu.ca/irm/" target="_blank">Integrated Risk Management website</a> for additional updates and resources.</p>
<p> </p>
<p><img src="/shared/ryerson-logos/RU-IRM-rgb.png" alt="IRM Logo" title="IRM Logo" height="51" /></p>
