My Brightspace essentials

First, log in to my.torontomu.ca (opens in new window) , and then click either
- The Online Courses & Organizations tab, or
- In the Online Courses and Organizations Portlet, click Your courses in D2L Brightspace.
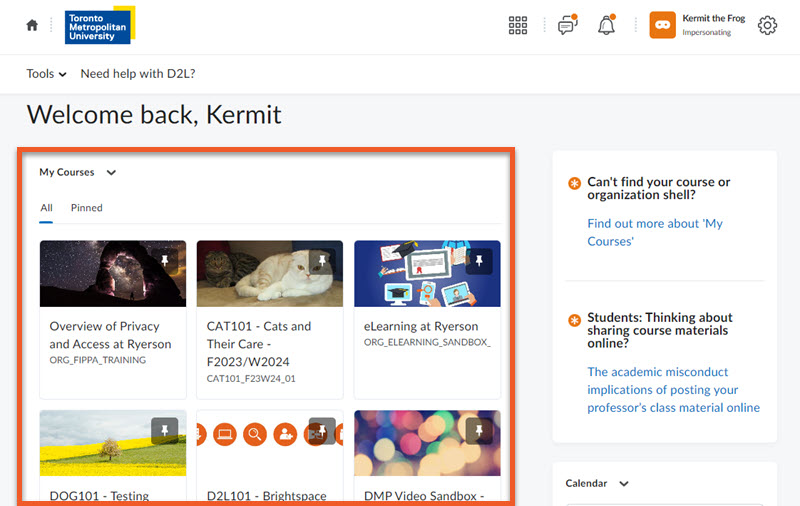
On the D2L Brightspace homepage, you can see "My Courses".
You will see any Brightspace shells that are currently available to you, in the following order:
- pinned shells
- current (but unpinned) shells
- future shells.
Find out more about "pinning" below.
Students can only see current shells that have been made visible by their instructor. Students can also see current shells for a short time after the end of the course (they will disappear automatically).
Simply click on a course image or name to view the course.
I don't see any courses listed here!
If you don't see any course shells listed, and you don't see any message in the "My Courses" section, it is possible that the "My Courses" section is closed.
To open the "My Courses" widget: Click on the arrow to the right of "My Courses", then click "Expand this widget".
I can't find the course I'm looking for!
There are a number of reasons you may not see a course you expect to see here.
- If you are a student, there is currently no course shell for that course that is available to you. This doesn't mean that one won't be made available to you - please check with your instructor for details.
- If you have a lot of shells listed, the one you are looking for may be lost in the mix. Please see the info about the course selector below for an alternate way to list your shells.
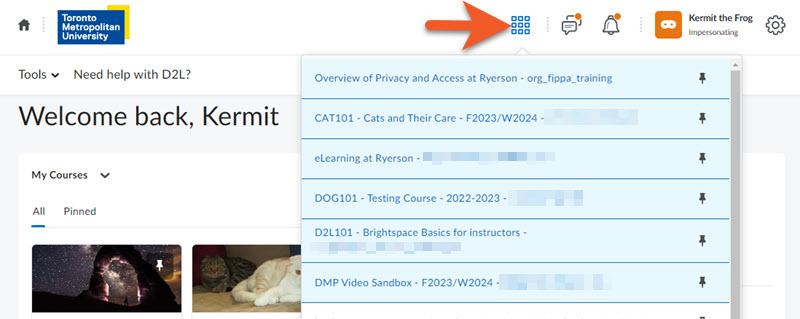
List all of your shells using the course selector
You can always access all of your courses using the Course Selector drop-down menu (from the top nav), which shows manually pinned courses, followed by current enrollments, then future enrollments (if they are “active”), and finally, past enrollments (if they are “active”). Please see the "How to pin..." section below for an illustration of how to pin courses using this feature.
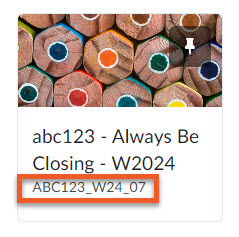
If you are ever asked to provide the "shell code" for your Brightspace course, you can find it in a few places.
The Brightspace homepage (all users)
Look in the "My Courses" section of the homepage.
If the shell is visible on your homepage, the shell code will be displayed right below the title.
If the shell is not visible on the homepage, you can click the icon at the top of the page that looks like a grid of 9 squares. This is the "course selector", and will list ALL of the shells you have access to - the shell code will be listed after the title.
Course Admin (Instructors & TAs only)
If you have an Instructor or TA role in the shell, you can also find the shell code by going to:
Course Admin > Course Offering Information > Course Offering code
"Pinning" is the act of moving courses to the top of your "My Courses" D2L homepage.
You can control which courses appear at the top of the list, and you can "unpin" courses that you access less frequently, so they appear further down the page.
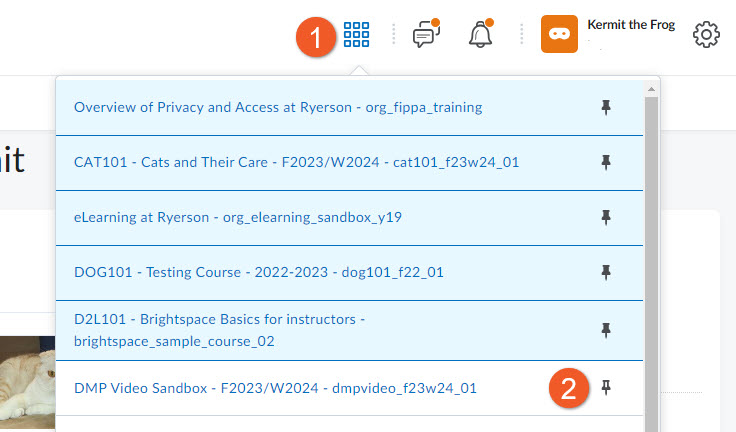
"Pin" courses using the Course Selector
- At the very top of the page, click on the "Course Selector" icon. All of the courses you currently have access to are listed here.
- Locate the pin icon to the right of the course in question.
- If it is solid, the course is "pinned" and appears in the My Courses area.
- If the pin icon is merely an outline, the course is "unpinned" and may appear lower in the My Courses area, if there is room.
- Click on the pin to switch its state.
You will see the course with a pin icon located with other pinned courses near the top of "My Courses".
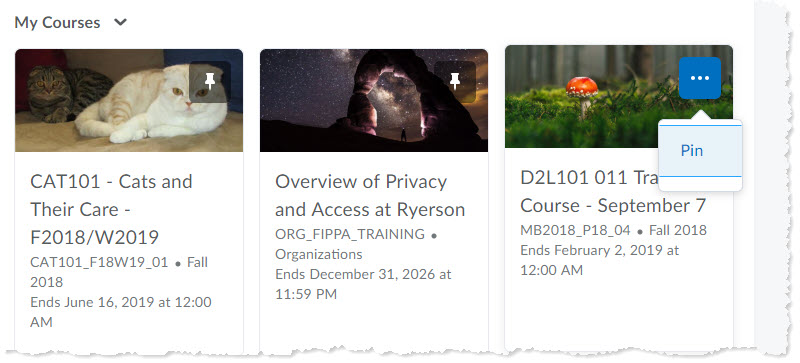
Quick pinning
There is an even quicker way to unpin a course directly from My Courses.
Hover your mouse over the course you wish to pin, and click on the "three dots" icon, and then from the resulting menu, click Pin.
You will see the course moved near the top of the "My Courses" area of your homepage, with other pinned courses. It can also still be accessed using the "Course Selector" dropdown menu at the top of the screen.
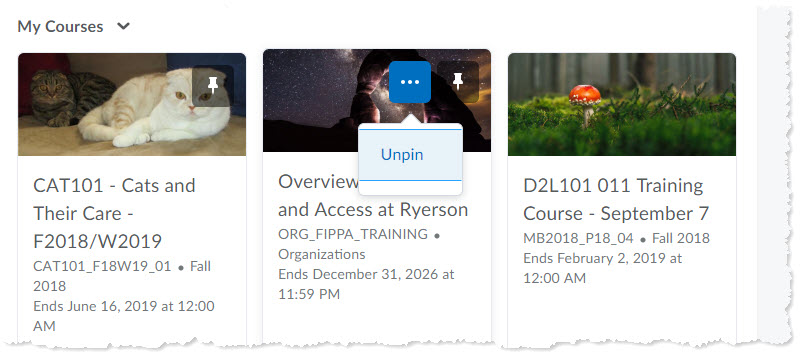
Quick un-pinning
There is an even quicker way to unpin a course directly from My Courses.
Hover your mouse over the course you wish to unpin, and click on the "pin" icon, or hover your mouse over the course you wish to unpin, and click on the "three dots" icon, and then from the resulting menu, click Unpin.
You will see the course removed from the "My Courses" section of your homepage. It can also still be accessed using the "Course Selector" dropdown menu at the top of the screen.
Course instructors may notice a couple of visual cues when you have courses within the Start and End dates that have not been made "active" (and therefore aren't yet visible to the students).
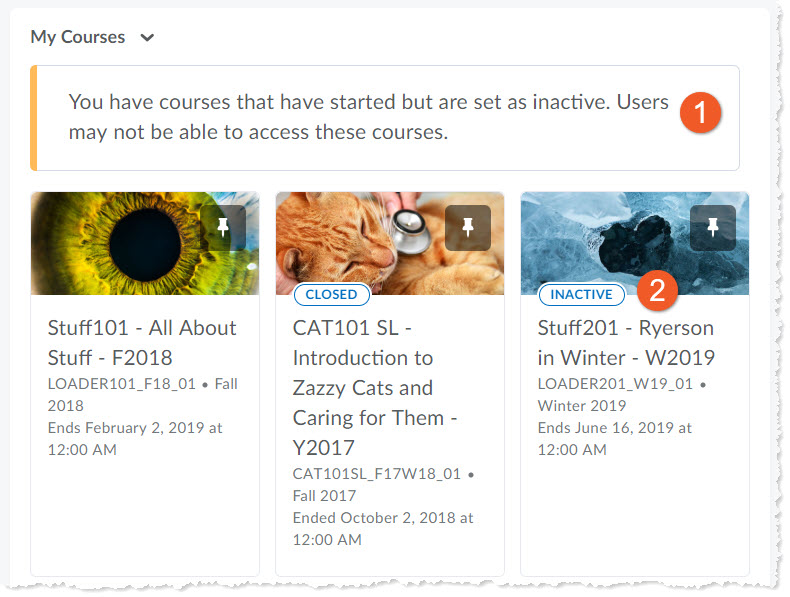
- There will be a message above the list of courses in the My Courses area, to indicate that at least one of your pinned courses is inactive.
- Any pinned course that is inactive will have a small label near the bottom of the image that indicates the course is inactive. If you are the instructor, you will need to make your course shell active if you want your students to access it.
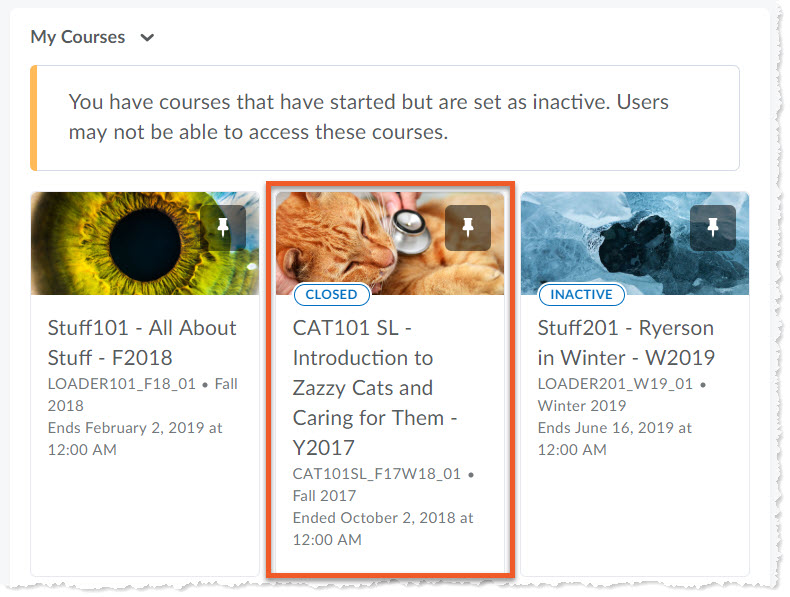
After a course has passed its End Date, only the Instructor will retain access. If the course is still pinned for the Instructor, it will appear with a label near the bottom of the image indicating that the course is closed, and below you can see the end date.
If you have a lot of courses (ie. >12), you may not see these courses in the My Courses area. They can still be accessed using the "Course Selector" dropdown menu and can be re-pinned if needed.
Warning: As of July 2024, SMS (text message) notifications will no longer be available. Read more about this upcoming change.
If you wish to receive an email notification to let you know about updates to your Brightspace shells (new announcements, content, upcoming due dates, etc.), you can enable the Notifications tool in your account.
Notifications is a user-specific feature - meaning it cannot be enabled by the course instructor, but must be enabled by each individual person.
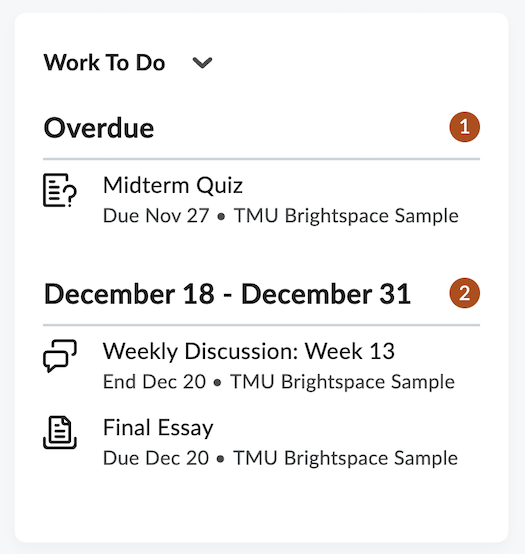
The Work To Do widget, found on your course homepage, displays upcoming or overdue work in that D2L Brightspace course. It includes the following learning activities:
- Assignments
- Checklists
- Content
- Courses
- Discussions
- Surveys
- Quizzes
In your course, click on the activity to access it. Activities due or ending in the upcoming 2 weeks, and overdue work from the previous 12 weeks are shown.
Missing an activity?
Activities only appear in the widget for activities that are visible to you, and if a due date or end date is set in D2L Brightspace.
Check with your instructor if you are expecting to see an assessment that is not listed, as their settings for the activity in the course may prevent it from appearing.
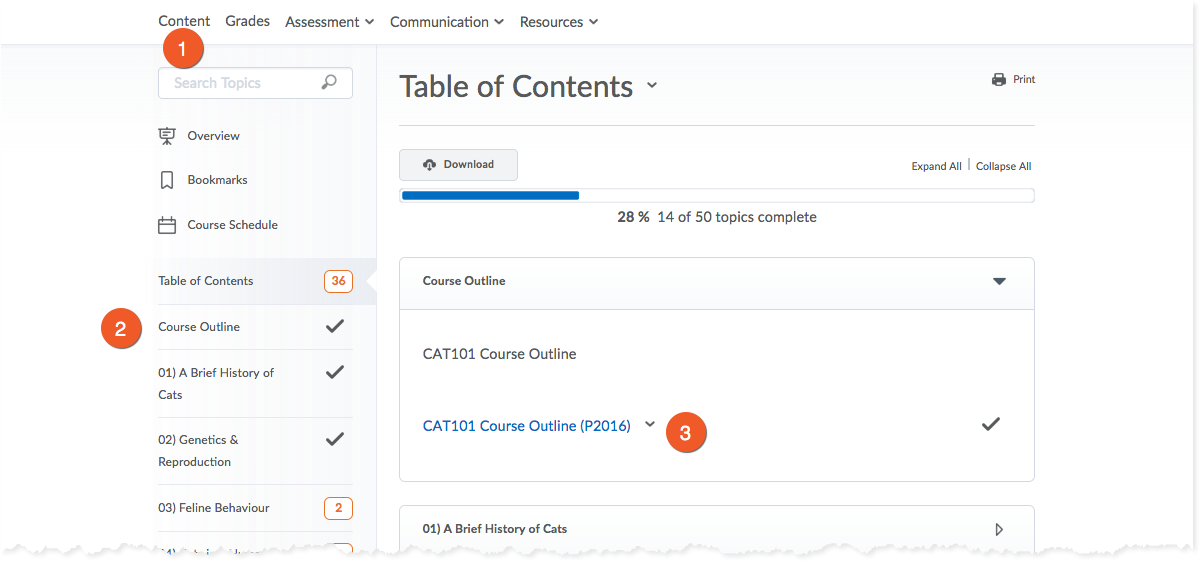
- When you log into your course in Brightspace, click Content from the navbar.
- On the left, you’ll see the course table of contents. The modules for your entire course are listed here. Click on a module to open it up.
- The module will display in the center of your interface. There may be files, links and reading materials displayed in each module. Modules may also contain sub-modules, which are an added folder structure to house content.
D2L's "tracking progress" feature allows you to see your progress in completing your coursework. Completing is defined as clicking through an item. As you work through content such as files, videos, etc., progress indicators will show green checks for topics and modules completed, gray circles for topics not yet completed, a progress bar for progress within a module and a progress bar for overall course progress when viewing the table of contents. This will help identify the items you have already clicked through and reviewed.
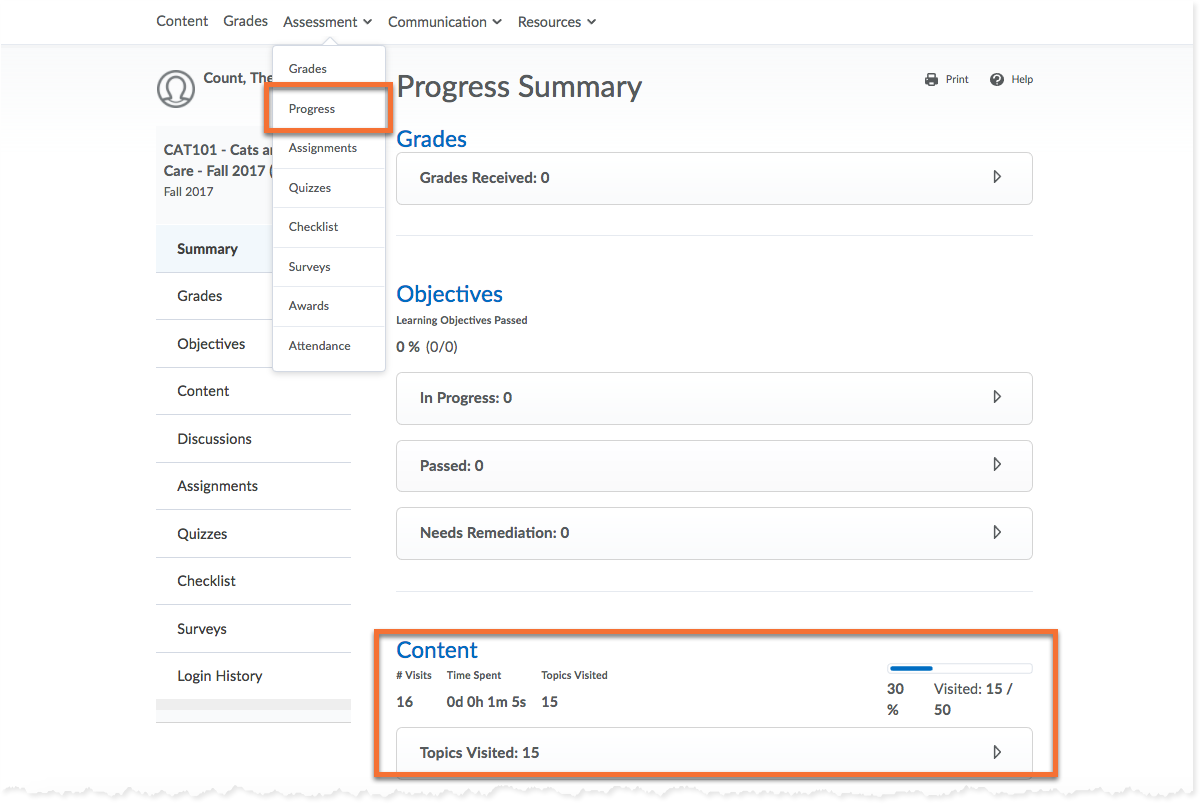
- For most of you, progress tracking will occur automatically when you click through a content topic. This is the default setting in D2L.
- If you see a blank checkbox underneath the content with the message “Task: View this topic”, you have to check the box for your progress to be tracked.
- If you don’t see a progress bar whatsoever, your instructor may have disabled progress tracking from the course.

