Quizzes
Deliver online tests and activities using the Brightspace quizzes tool.
The quizzes tool offers many flexible options, including:
- Offer either synchronous or asynchronous assessments.
- Leverage a variety of question types.
- Randomize quiz questions, so students don't all receive the exact same test.
- Control the flow of results and feedback after a test is completed.
- Accommodate individual students' need for extra time.
On this page:
- The new create/edit Quizzes interface
- The main panel
- Availability Dates & Conditions panel
- Timing & Display panel
- Attempts & Completion panel
- Evaluation & Feedback panel
- The bottom panel: Save and unhide your quiz
- Next step: Add some questions!
- Try the quiz by completing a "preview" quiz attempt
- How do I... (and other questions)
- Related topics
Find the Quizzes tool in the top menu bar, under Assessment. If it isn't there, review how to enable course tools.
Three steps to creating a quiz:
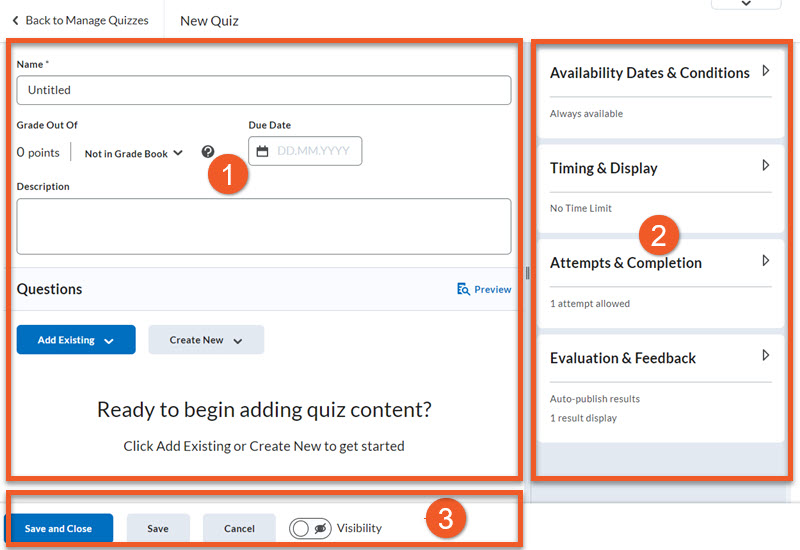
D2L has updated the create/edit quiz interface, to match the create/edit assignments interface. This ensures that it’s easier for those who are new to Brightspace to use.
This will take a little adjustment for experienced users to adapt to, but you can find all of the same settings in the new interface.
When you go to Assessment > Quizzes and either create a new quiz, or edit an existing quiz, here’s what you’ll see:
- The main panel contains the bare essentials for creating a quiz. For most quizzes, you will also need to adjust a few other settings.
- The side panel contains expandable panels where you can find more settings. Click on the panel name to expand it. Many of the default settings will be fine for your quiz, but you will probably need to set start/end dates, adjust timing, add special access students, etc.
- The bottom panel is where you will save your work and make the quiz visible.
NOTE: If you have set a start date/time, you also need to make the quiz visible to ensure the start time works.
Warning: If you have copied quizzes from previous terms, please review all details in the copied quizzes.
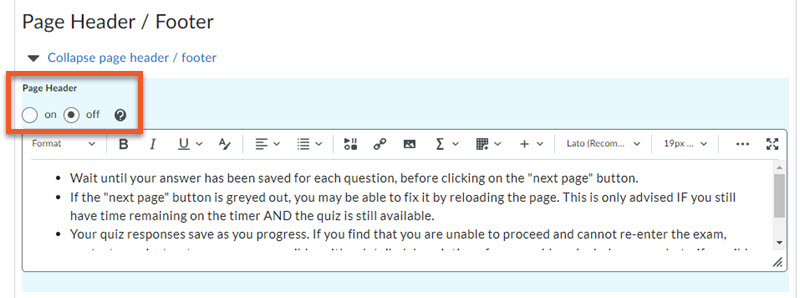
Headers and Footers
In the old interface, you may have entered text into the Page Header or Footer field, but had the display turned off.
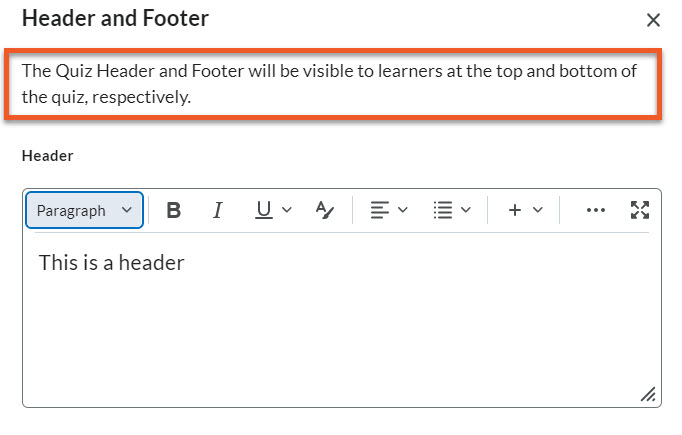
In the new interface, if there is any text in this field, it is automatically displayed, with no option to turn it off. You need to delete this text if you don't want students to see it.
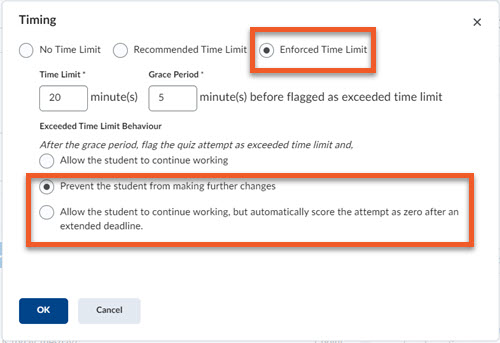
If your quiz had an enforced time limit
Quizzes that were previously set to ‘prevent students from making further changes' or ‘automatically set score to zero’ when the time limit is exceeded will now be auto-submitted when the clock runs out. There is no longer a grace period to allow time for students to submit their quiz attempt. These settings no longer exist because they are not needed.
Students will see a warning at 5 minutes and 1 minute to go, so they can finish up what they’re doing.
Before you create your new quiz, it’s strongly recommended that you go to Grades, and create the grade item for the quiz first, and hide it from users. This will make it easier to ensure you have correctly set up the grade item, and can quickly connect your quiz to the gradebook.
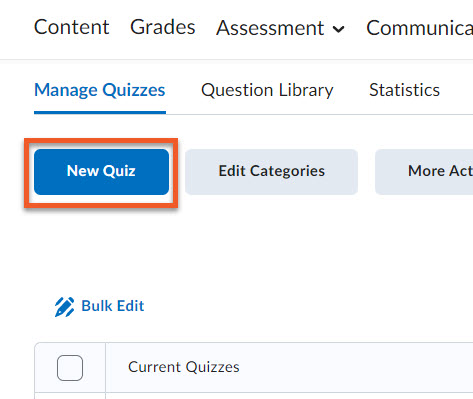
When you’re ready to create your quiz, in your course shell, go to Assessment > Quizzes, then click on New Quiz.

Enter a Name for the quiz.
It’s not necessary to include your course code/name, but if you will have multiple quizzes in your course, the name should be clear.
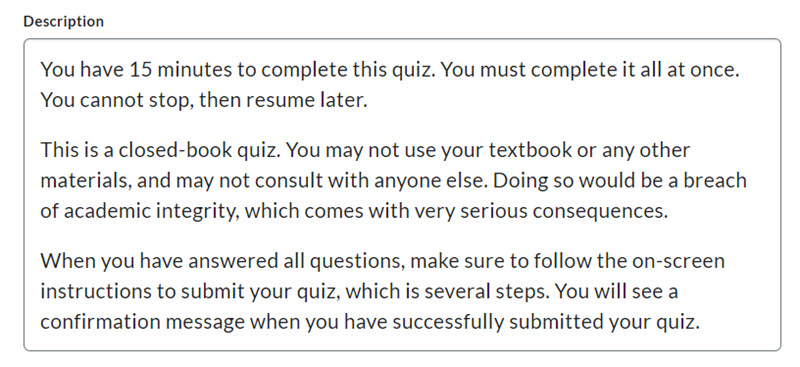
The description is a way that you can convey important information about the quiz before the student officially begins the quiz.
This is a great place to provide information that the students need to ensure they complete the test correctly, even if you have previously shared that information in class or in an announcement.
You can remind students of the quiz guidelines, what to do in case of technical problems, and their responsibilities, such as a reminder about academic integrity, etc.
Keep in mind that students can also view this information during the quiz, so do not include any information they should not see during the quiz.
NOTE: Previously, there were two separate fields: Description and Introduction, but these have been merged into one field. If you have copied course shell materials from Spring/Summer 2021 or earlier, you may want to review the content in this field, in case it requires some cleanup or an update.
As previously mentioned, this is the recommended method. It’s best if you create your grade item in Grades before you create your quiz, as you will have access to all settings, and it’s easier to connect the two items using this process.
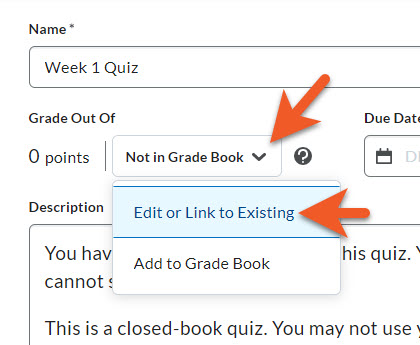
If you will be grading the quiz, and you have already created a grade item in the gradebook for it, click on the dropdown to the right of the “Grade Out Of” field, and click on “Edit or Link to Existing” to select an existing grade item from Grades or change which existing grade item you are associating with this quiz.
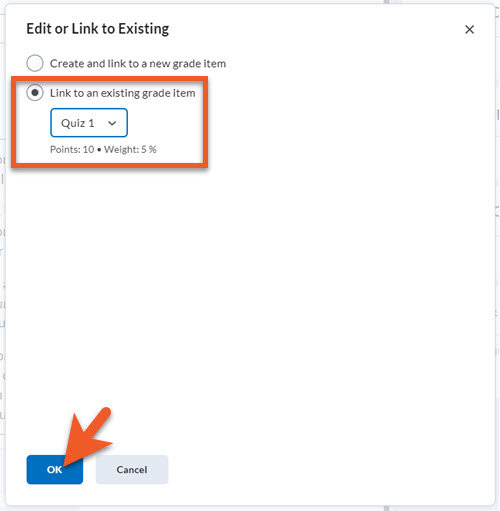
In the popup window, choose the second option, Link to an existing grade item.
In the dropdown menu that appears, choose the appropriate grade item from the gradebook (which you previously created). Note that only grade items that are not connected to an assessment will appear in this list.
Click on OK.
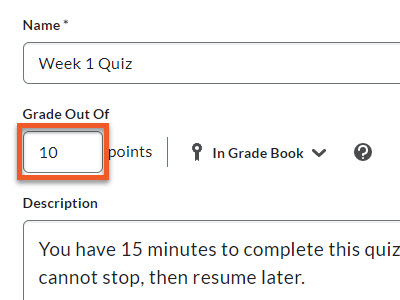
The Grade Out Of field should now appear populated with the same points value that you previously entered when creating the grade item in the gradebook.
NOTE: If, for some reason, the points value is incorrect (perhaps you changed your mind or add more questions), you will need to change it here, AND after you have finished creating your quiz, go to Grades, and edit the grade item to update this number. If the two do not match, your students will receive inaccurate grades when either Brightspace or you grade their quiz. Please make sure these values are correct before the first student starts writing the quiz.
If you did not follow the recommended method (above), where you created the grade item for this quiz beforehand, it is possible to create the grade item from within the quiz tool, but you will not have access to all of the grade item settings. If you follow this method, after you finish creating the quiz, we strongly recommend that you go to Grades, and check the details of the grade item, to make sure everything is correct, you’ve hidden the grade item, etc.

Click on the dropdown to the right of the “Grade Out Of” field, and click on “Edit or Link to Existing”.
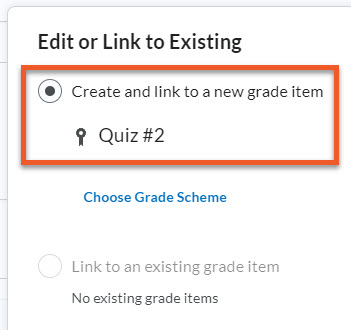
In the popup window that appears, select the first option, Create and link to a new grade item.
You will notice the name of your new quiz will also be used for the new grade item.
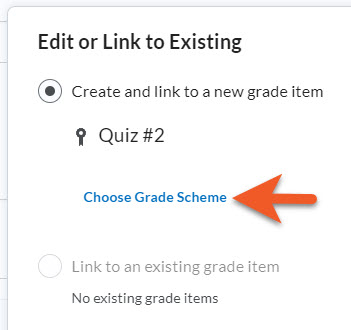
Grade Scheme (optional)
If your gradebook doesn’t use the typical percentage grade scheme, click on Choose Grade Scheme to select the appropriate scheme. The majority of courses at TMU use the default, and can skip this step.
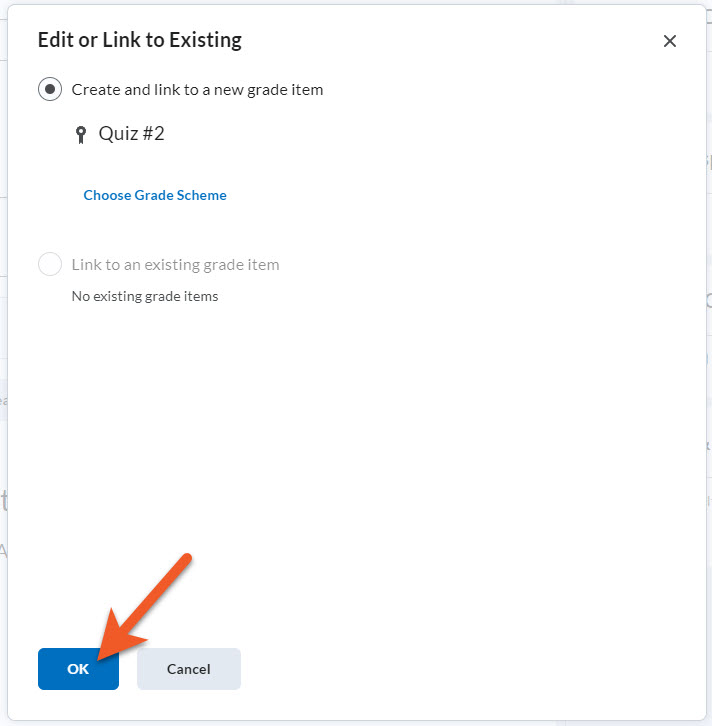
Click on OK to create the new grade item.
The grade item will be created in the gradebook, using default values. You will return to the quiz edit page.
You do not need to enter the Grade Out Of points value. Later, as you add questions to your quiz, the Grade Out Of value will be automatically updated.
IMPORTANT:
If you have created your grade item using this method, when you are done setting up your quiz and adding all questions, it is very important to go to Grades, edit the grade item, and fix some of the settings so they match your quiz (weight, points), hide the grade item, etc. If you neglect to fix this, your students’ grades will be calculated incorrectly.
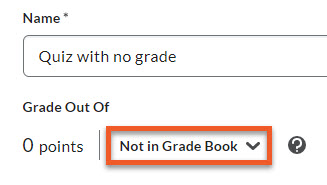
If you will not be grading this quiz, perhaps because it is just for practice, or you are using it for a less typical purpose, there is no need to enter a Grade Out of value or connect the quiz to the gradebook.
Just leave the setting as Not in Grade Book.
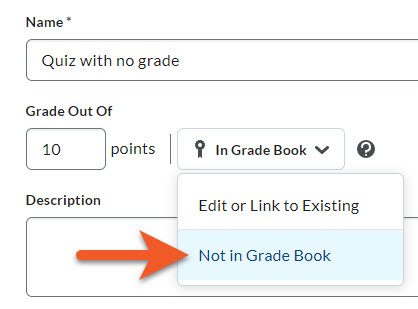
If you have previously set up this quiz connected to the gradebook, you’ll need to click on the dropdown to the right of Grade Out Of, and change it to Not in gradebook.
NOTE: If you previously created a grade item for this quiz, once you’ve made this change and saved, you need to go to Grades, and remove the grade item from your gradebook (if you won’t be using it for another assessment).
The due date field is optional. You are not obligated to use it.
The due date does not limit a student’s access to a quiz in any way. It serves as a reminder of when the quiz is due, and if the student submits after this date/time, their submission will be highlighted with red text, to draw your attention to it.
NOTE: If you create a synchronous quiz, the due date will be greyed out, because the quiz will be automatically submitted by D2L Brightspace when time runs out (so a due date is unnecessary).
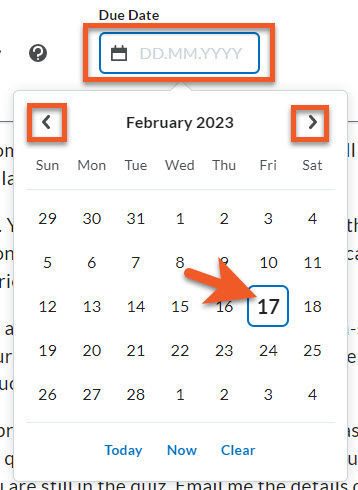
To set a Due Date for the quiz, click on the Due Date field.
A calendar displaying the current month, with today highlighted will pop up. Use the arrows to move to a different month, if necessary, and pick the date by clicking on the day.
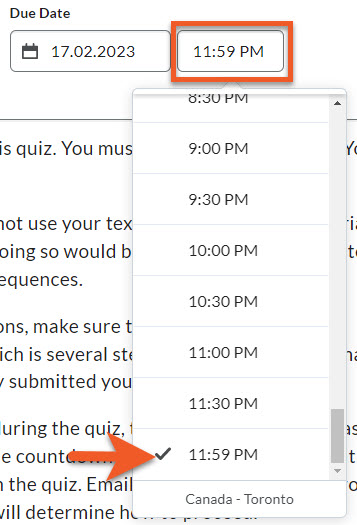
The calendar will collapse, and you will now see a time field. Click on the field, and you will see a dropdown list of times. You can select a time from the list, or type in the time you wish. Click outside of the box to close the picker.
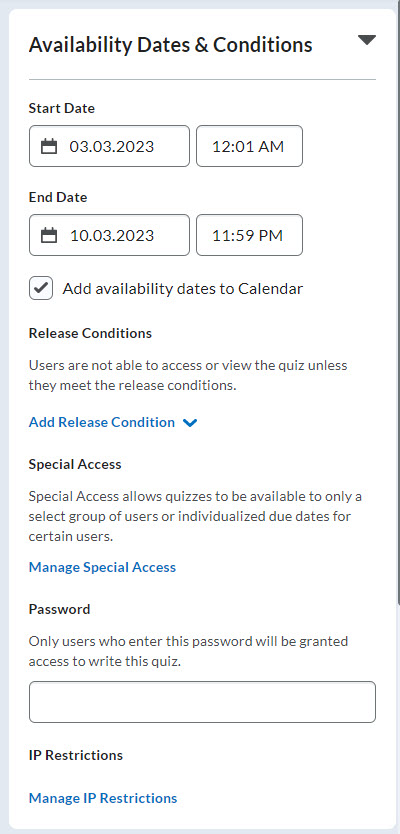
To see all Availability Dates & Conditions settings, click on the name of the panel, in the upper-right area of the page, to expand it.
Start/End Date/Time
The start and end date and time determine the window of time that students can enter (or re-enter) the quiz. You can use one or both.
Release Conditions (optional)
You can use Release Conditions to control access to the quiz, depending on some other factor, such as enrollment in a particular group, completion of another assessment, or viewing certain content first.
Special Access (optional)
Provide a different window of time or time limit to certain students (for academic accommodation, or other reasons).
Password (optional)
Students need to know the password to enter the quiz. This is not used by many instructors. If you use this, take great care when copying your course shell in the future, to remove or update the password.
IP Restrictions (optional)
It is possible to limit access to the quiz to students who have connected to the internet via a specific IP range. If you are running your quiz in an on-campus lab, and are able to obtain the IP range in advance from the lab technician, this is possible. If students are taking the quiz from outside of a lab, due to the complexity of the on-campus network, it’s not possible to capture an accurate IP range.
If you create a synchronous quiz (see instructions further down this page), timing is straightforward.
All students must start at the start time, and finish before the timer runs out. When the timer reaches zero, all quiz attempts are automatically submitted by the system.
If a student starts late, the timer shows the time remaining, and they have a reduced amount of time to complete the quiz.
If the end time for the quiz is the same time as the start time+time limit (recommended!), students can re-enter anytime during that period, if they have technical problems. Keep in mind that the timer continues to count down during any technical problems.
If you create an asynchronous quiz (see instructions further down this page), access to the quiz is controlled using a number of settings in the Availability Dates & Conditions and Timing & Display panels of the quiz editor, and is a little more complicated.
Students' access to the quiz is governed by two main concepts:
- Quiz availability (determines the start of the quiz)
This determines whether a student can view and begin the quiz.
Note that the availability end date/time does NOT determine the end of the quiz - just the last possible moment that a student may start the quiz.
In the event of technical problems, it will also permit the student to re-enter a quiz, provided they are still within the availability window AND have not exceeded their time limit.
- Enforced time limit (determines the end of the quiz) This determines how many minutes a student has to complete the quiz, and determines what happens once that time has ended.
Once they begin the quiz, the time limit begins. It does not stop if they leave the test.
Note that if your time limit settings permit students to continue working past the time limit, and they exceed that limit, their completion time will be marked in red.
Only the enforced time limit (and related settings) can control the end of the quiz.
- To avoid student confusion, don't set the time to midnight.
- Understand that the date & time is based on the displayed time zone (i.e. Canada - Toronto).
Availability start: 9:00
Availability end: 10:00
Due date/time: set to the same as the availability end (10:00)
Time limit: 60 minutes
9:15 - a student enters the quiz
(9:15 + 60 = 10:15)
After 10:15, they will be past their maximum time limit.
If you have selected “Automatically submit the quiz attempt” in the timer settings, the student does not need to remember to submit their quiz - Brightspace will automatically submit it.
If you selected any other options in the timer settings, the student must submit their quiz attempt. Brightspace will not kick them out. If the student neglects to submit their quiz, you will need to find and submit it on their behalf.
What about the due date/time?
This doesn't change how long the student is permitted to complete the quiz, but if they submit past the due date, their completion time will be marked in red for the instructor to consider when grading.
- Due date/time (flags submissions)
The due date and time on a quiz does not affect a student's access to the quiz, or change how long they are permitted to be in the quiz.
It does, however, flag any submissions made after the due date/time. Late submissions will have a completion time marked in red.
If you choose to enforce a due date and time, please be sure to make it clear to the students that you will penalize submissions made after that time. If the penalty involves a mark deduction, you will manually edit the student’s score. It’s also a great idea to add a note in the student’s feedback, explaining this.
For most quizzes, you need to set a start and end date and time. This controls the window of time when students can enter a quiz (or re-enter a quiz in progress, if they experience technical problems).
Note: See the "How D2L Brightspace controls access to asynchronous quizzes with availability and time limit" section just above this one for a detailed explanation and example of how start date/end date/timing controls a student’s access to a quiz in D2L Brightspace.
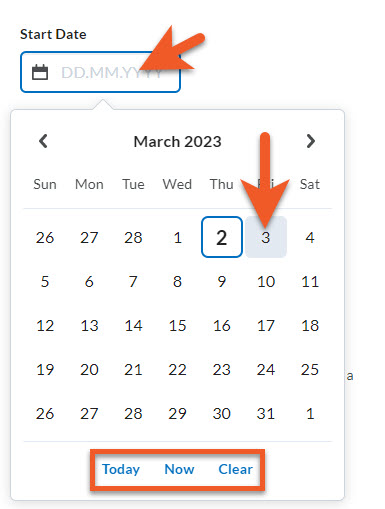
Select the start date and time
The start date and time determines when the student can first access the quiz.
To set the start date, click on the Start Date box. A calendar will pop up. Click on the desired date.
If the date is in the future, use the arrows to advance the months.
At the bottom of the popup, you also have the option of selecting Today, Now (the current day and time), or Clear (if you wish to remove a start date that you have previously set).
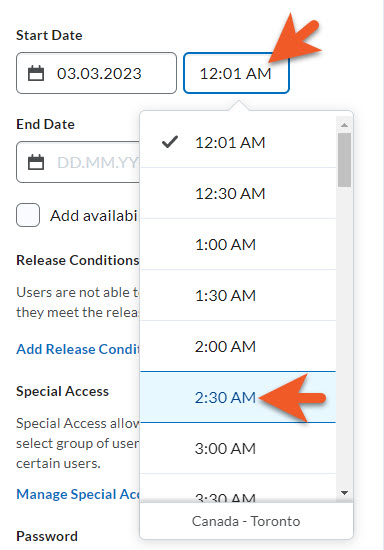
Once you have made a date selection, the calendar popup will collapse, and you will see a time field appear to the right of the date field.
Click on the Time field, and either select a time from the dropdown list, or type in the desired time.
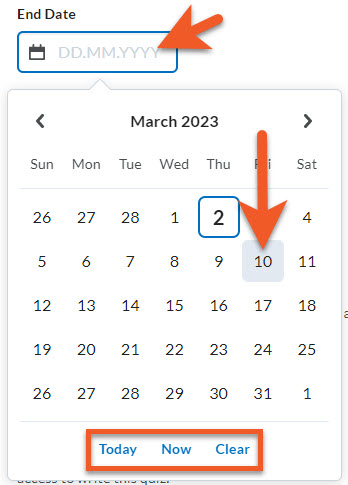
Select the end date and time
To set the end date, click on the End Date box. A calendar will pop up. Click on the desired date.
If the date is in the future, use the arrows to advance the months.
At the bottom of the popup, you also have options to select Today, Now (the current day and time), or Clear (if you wish to remove a start date that you have previously set).
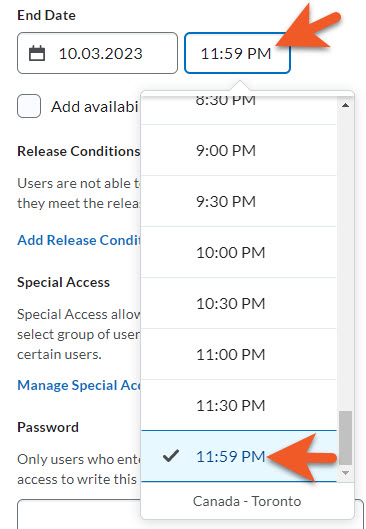
Once you have made a date selection, the calendar popup will collapse, and you will see a time field appear to the right of the date field.
Click on the Time field, and either select a time from the dropdown list, or type in the desired time.
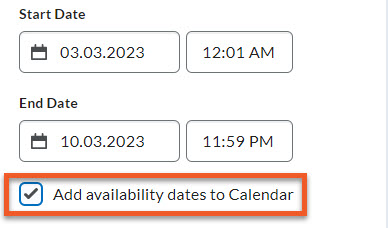
Add to calendar (optional)
Once you have set the start and end dates, you can select Add availability dates to Calendar, if you want these dates to appear in the course shell calendar, which is available from the landing page in the course shell.
For most quizzes, you do not need to use release conditions.
Add new release conditions if, for example, you want the quiz to be available to users only after they complete other specific tasks, or if they belong to a particular segment of students who will write this quiz.
You can edit and change existing release conditions by clicking the Remove icon or Remove All Conditions.
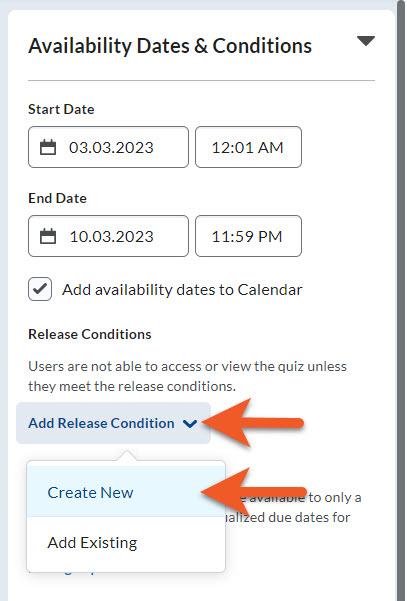
To add a new condition, click on Add Release Condition, then select Create New.
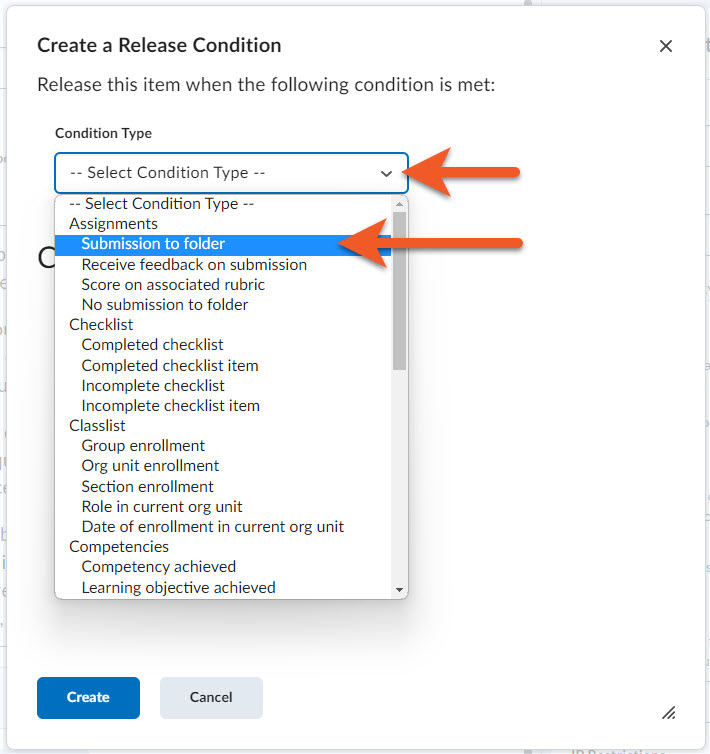
In the popup that appears, click on the Condition Type dropdown, and select the type of condition that applies (ie. enrollment in a certain group, or submitted a particular assignment or quiz).
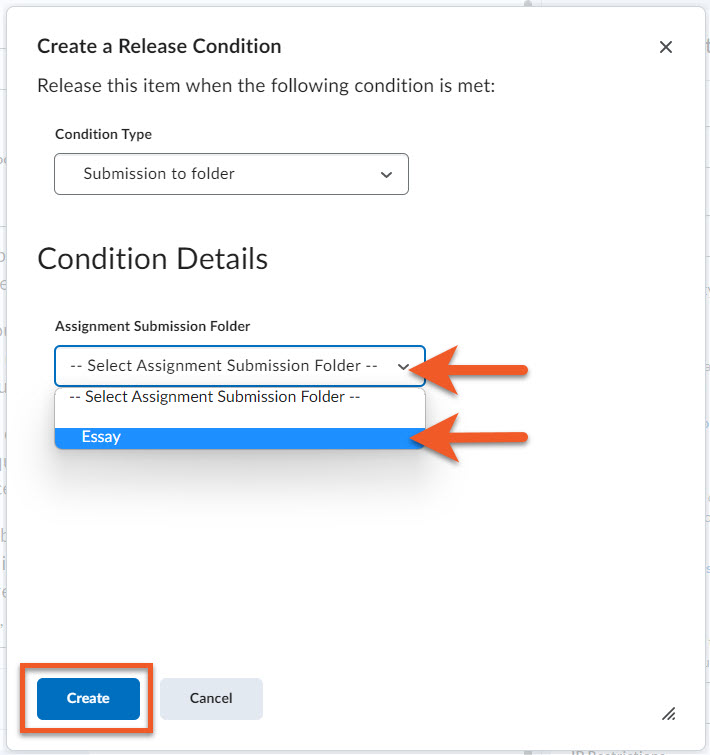
A Condition Details dropdown will now appear. Click on the dropdown, and select the specific detail that applies (ie. which group, piece of content, assignment or quiz).
Click on the Create button to create your release condition.
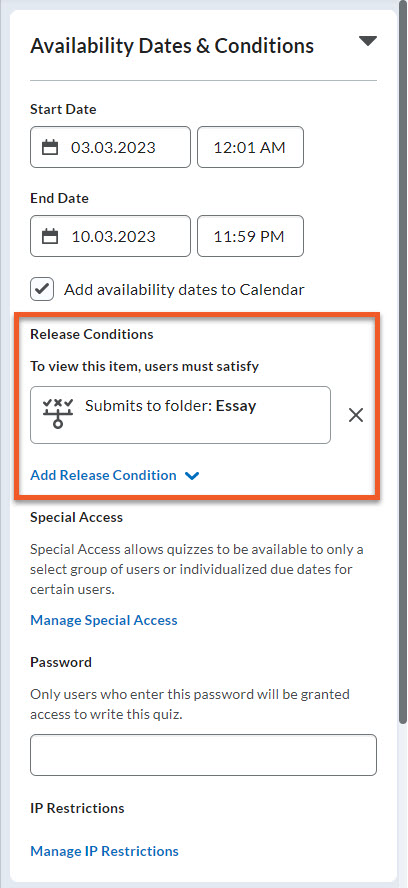
You will now see your release condition listed in the Availability Dates & Conditions panel.
If you realize you made a mistake, click on the X to the right of the release condition, to remove it.
If you wish to add an additional release condition, click on Add Release Condition.
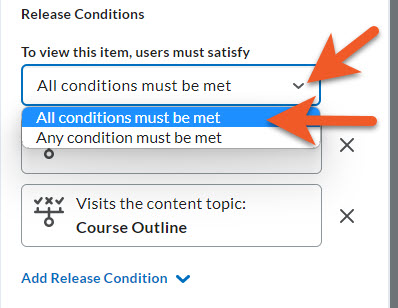
If you have added more than one condition to a quiz, you will see a dropdown appear above those conditions. You must decide whether the student should only see the assignment if:
- All conditions must be met
(ie. they submitted the essay AND have viewed the course outline)
OR
- Any condition must be met
(ie. they submitted the essay OR have viewed the course outline)
NOTE: Sometimes, if a student can’t view a quiz, this setting may be preventing them, even though they have met the condition you intended, but this setting has been set too strictly.
NOTE: It’s recommended that you finish setting up the rest of your quiz before adding students to Special Access, as all settings may not be available to you until you do so.
The "Special Access" setting enables you to allow individual students different rules for the completion of their quiz. This is invaluable in providing time-based accommodations.
- Create a longer time limit for students that require extra time.
- Set a different quiz availability window (date & time) for students that cannot complete on the same day as the rest of the class.
- Make the quiz available to just your demo student while you are developing it.
- In the event of technical problems during the exam, provide a student with a longer availability window and/or more time.
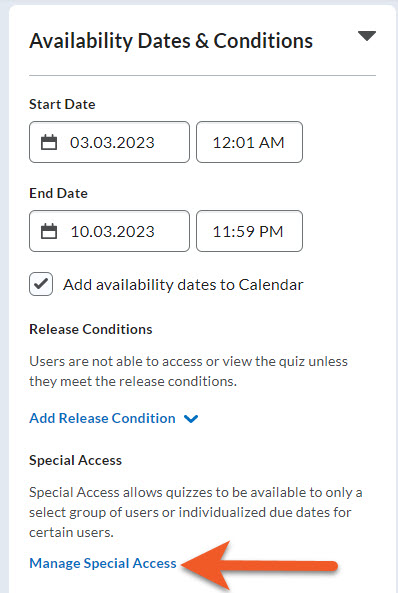
The Manage Special Access settings can be found in the Availability Dates & Conditions panel of the quiz editor.
Release Conditions take precedence over Special Access. Keep this in mind when determining how to give someone access to a quiz.
Use special access to add time to a student's in-progress quiz attempt! The timer will update at the end with the additional time.
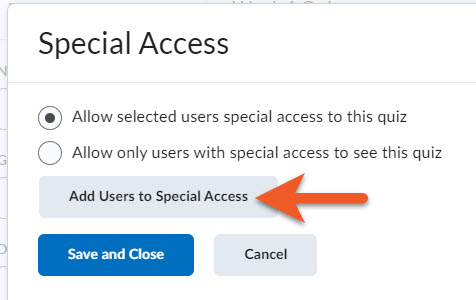
In the popup that appears, for most quizzes, you will leave the first setting as it is, Allow selected users special access to this quiz. This will mean that most students will submit the assignment during the regular start/end window, and the students you add here will submit with alternate conditions.
If you select the second option, Allow only users with special access to see this quiz, this means that most students in the class will not have access to this quiz, and ONLY students you add here will have access to this quiz, each with their own conditions. (An example of this might be a make-up test, where only certain students need access.)
Click on Add Users to Special Access to add students and their conditions.
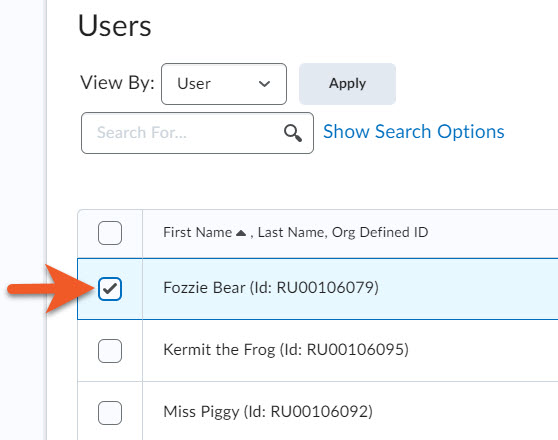
You may find it easier to do the next few steps in the following order, instead of the order the items appear on the page.
First, scroll down to the lower part of the page, and use the checkbox to select the user(s) whose quiz will take these Special Access settings.
If more than one student will receive the same settings, you can select all the names that apply. If each student has different settings, you will need to go through this process once for each student.
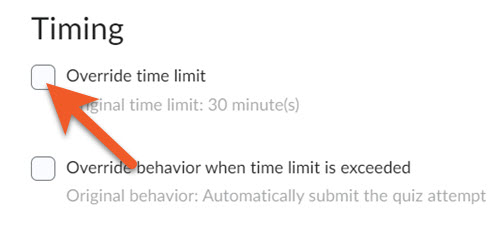
Next, scroll up to the top portion of the page.
If the student requires more time
If the student requires more time, adjust the timing settings first. Select Override Time Limit.
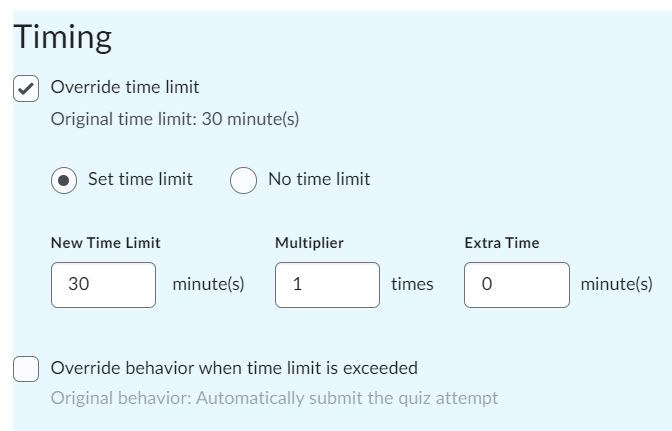
More timing options will appear.
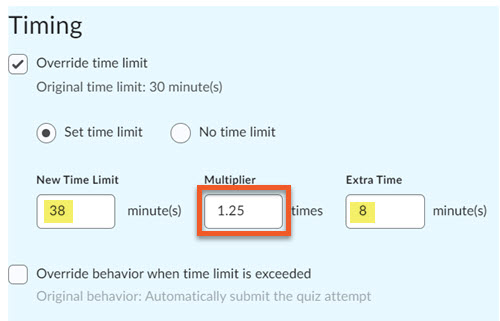
If the student requires a % increase of time OR % increase of time + breaks
If the student requires both a percentage increase in time and break(s), start by adding the percentage.
In this example, the student requires a 25% increase in time, so in the Multiplier field, type “1.25”.
Then, click somewhere outside of the box, to see the Extra Time and New Time Limit fields have been updated.
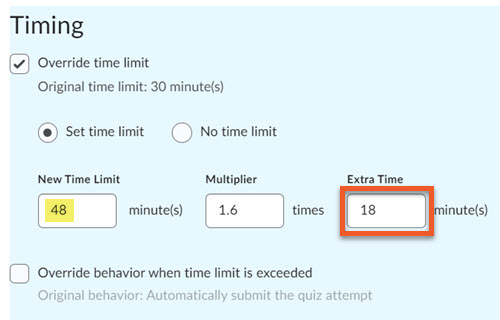
If the student requires breaks
After the multiplier of original quiz time has been edited, you can edit the Extra Time field, to add any breaks that the student requires.
In this example, the student requires one 10-minute break per hour. In the Extra Time field, edit the existing number (8) to include the break, and type “18”.
Then, click somewhere outside of the box, to see the New Time Limit field has been updated. This is the new time limit that this student will have to complete the quiz.
NOTE: If you tried to add breaks first, then a time multiplier, the calculation would not work correctly.
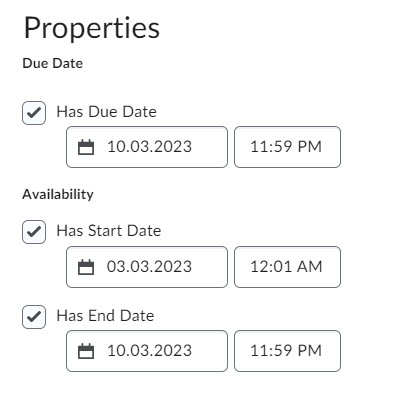
Update the Due/Start/End Dates and Times
Now that you know the new time limit that the student requires, you need to adjust the availability of the quiz for this student.
Scroll up to the top of the window, to see the Due Date and Availability settings for this student.
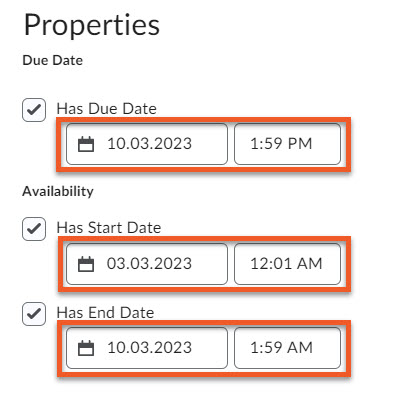
Update the dates and times
If the student will be writing on a different day and/or time, adjust all three: Due Date, Start Date and End Date to match their New Time Limit.
If the student is writing at the same time as the rest of the class, but is given additional time, adjust only the time for the Due Date and End Date, to reflect their New Time Limit.
NOTE: It is important to adjust the due and end times, to ensure that the student is able to re-enter the quiz if they have technical problems during the quiz, and so that they are not tagged as late when they have been provided with accommodations.
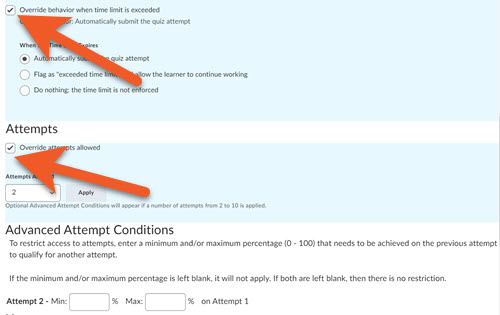
Optional settings
Most students with accommodations do not require additional changes, but if needed, you can scroll further down the page, and also adjust the Override behaviour when time limit is exceeded, and the Override attempts allowed settings, if needed, for this student.
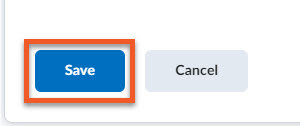
In the lower-left of the window, click on Save to save the Special Access settings for this student.
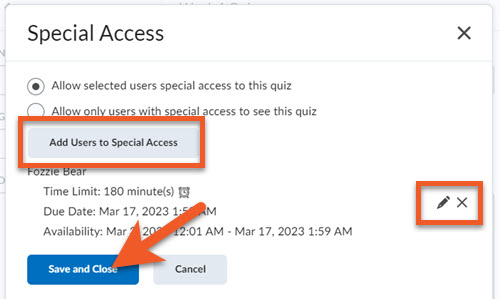
You will now see the main Special Access window again.
Review the details of the student you just added, to make sure they are correct.
If you need to edit or remove a student in Special Access, click on either the pencil icon or the X to the right of their details.
If you need to add more students to Special Access, click on Add Users to Special Access, and repeat the process described above.
If you are finished adding students to Special Access, click on Save and Close.
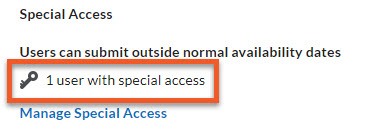
You will now return to the main quiz edit screen. You can see the Special Access information has been updated to reflect your changes.
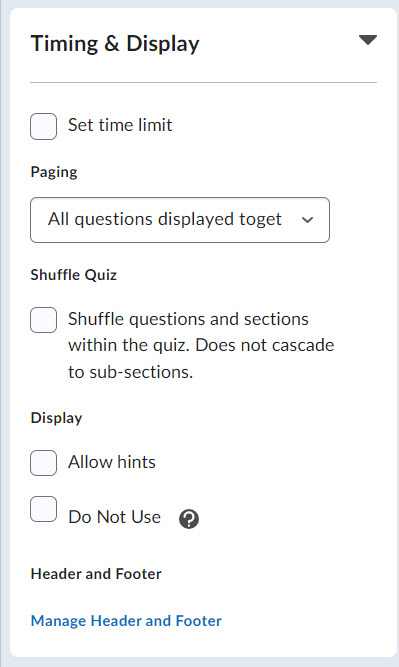
To see all Timing & Display settings, click on the name of the panel, in the right-hand area of the page, to expand it.
Timing
In this section, you can determine whether your quiz will be:
- Synchronous: All students start and end at the same time. If they join late, they have less time to write. This most closely mimics the “in-person” experience.
OR - Asynchronous: Students must start sometime between the start and end time and have a set amount of time to spend writing the quiz, once they click on “Start Quiz”.
You can set the time limit for your quiz and several related conditions. Detailed instructions are included in a section below, depending which type of quiz you wish to create.
Paging
Control how many questions appear per page.
For precise control over which questions appear together on a page, create your questions in the question library, in sections, then import those questions into sections in your quiz, before selecting the “Add page break after each section” option.
Shuffle Quiz
You can shuffle all questions/sections within your quiz, so that no two students see the questions or sections in the same order.
Display
In the Display section, please leave these two options unselected. They do not work the way you will expect. TMU does not use D2L Brightspace’s Email or Instant Message functionality.
Header and Footer
If you would like some information to appear at the very top and/or bottom of every page of your quiz, please use Manage Header and Footer. Detailed instructions are included in a section below.
If you create a synchronous quiz, this most closely mimics the “in-person” experience. All students can start the quiz at the exact same time, and when time runs out, their quiz attempts will be automatically submitted. If a student joins late, they will have less time to complete the quiz. If a student experiences technical problems, the timer keeps going, but as long as there is time left on the timer, they can re-enter anytime between the start/end times.
Make sure you have set up the start and end dates and times (see the “Set start and end dates” section above on this page).
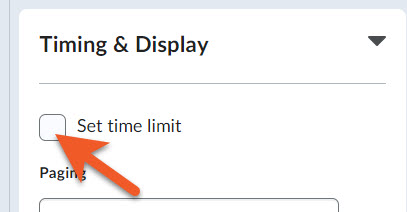
Click on the name of the Timing & Display panel to expand it.
Select Set time limit.
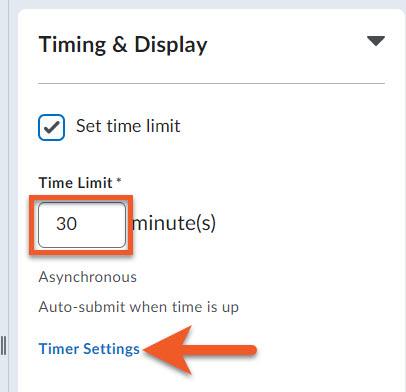
More options will appear.
In the Time Limit field, type the number of minutes that students will have to write the quiz.
Click on Timer Settings.
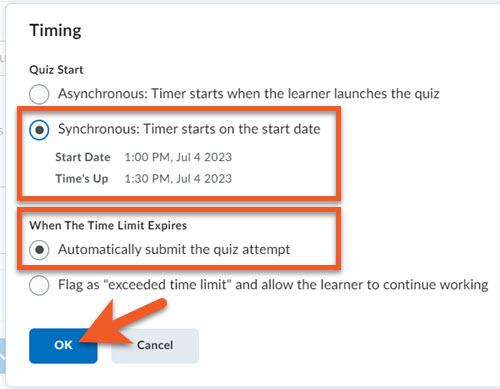
In the popup window that appears, select Synchronous: Timer starts on the start date. You will see the “Start Date” and “Time’s Up” date/time appear below this.
Please leave When The Time Limit Expires set to “Automatically submit the quiz attempt”.
Click on OK to save these settings.
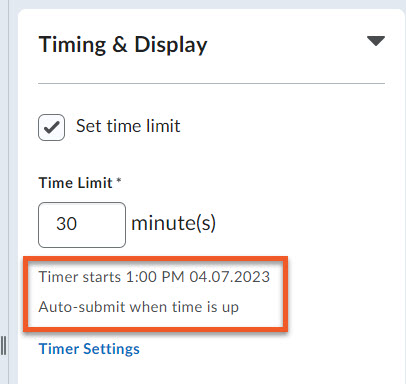
You will see your settings indicated in the Timing & Display panel.
Proceed with setting up the rest of the quiz.

If you create an asynchronous quiz, students can start the quiz anytime between the start and end dates. The timer starts for each student when they click on “Start Quiz”. When the countdown timer for each student runs out, their quiz attempts can be automatically submitted (recommended in most cases), or you can choose to allow the student to keep working.
If a student experiences technical problems during the quiz, the timer keeps going, but as long as there is time left on the timer, they can re-enter anytime between the start/end times.
This is a good option if you want to give students a little flexibility.
Make sure you have set up the start and end dates and times (see the “Set start and end dates” section above on this page).
Click on the name of the Timing & Display panel to expand it.
Select Set time limit.

More options will appear.
In the Time Limit field, type the number of minutes that students will have to write the quiz.
Click on Timer Settings.
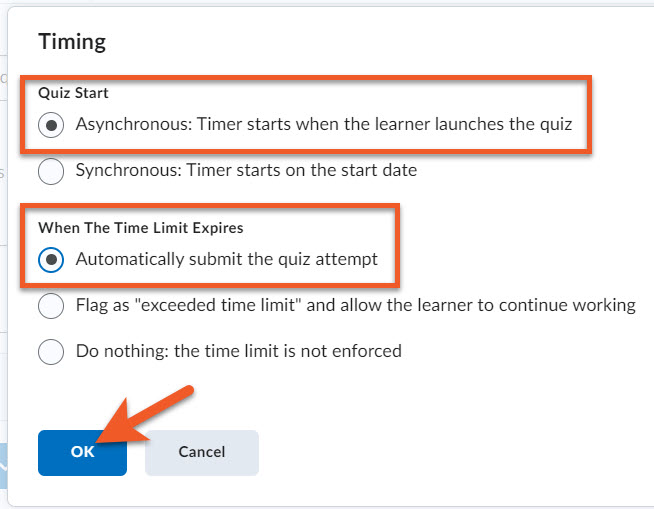
In the popup window that appears, select Asynchronous: Timer starts when the learner launches the quiz.
For most quizzes, for the When The Time Limit Expires option, select “Automatically submit the quiz attempt”. If it doesn’t matter how long students take to write the quiz, you can choose one of the other options.
Click on OK to save these settings.
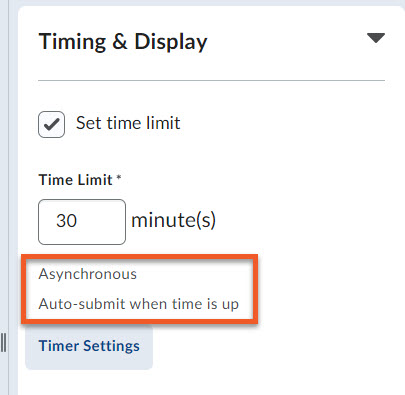
You will see your settings indicated in the Timing & Display panel.
Proceed with setting up the rest of the quiz.
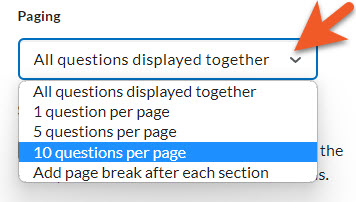
The Paging setting allows you to control how many questions appear per page. Options include:
- All questions displayed together
This means the entire quiz appears on one page.
- 1 question per page
This can result in slower performance, because Brightspace will save every time a student moves from page to page.
- 5 questions per page
This is a popular setting. It’s a good compromise between performance and a focused experience for the student.
- 10 questions per page
This is also a popular setting, particularly for short questions.
- Add page break after each section
For precise control over which questions appear together on a page, create your questions in the question library, in sections, then import those questions into sections in your quiz, before selecting this option. This can be a great option if you have a case study and several questions related to that case study, so that students can avoid paging back and forth, to review details.
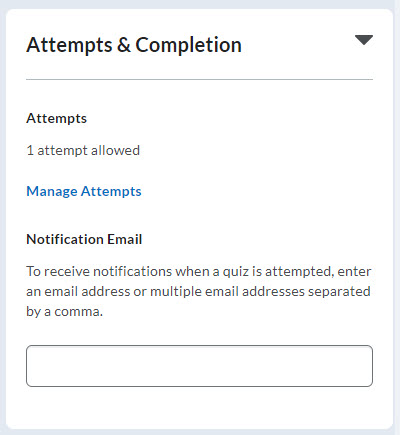
To see all Attempts & Completion settings, click on the name of the panel, in the right-hand area of the page, to expand it.
This section only contains 2 settings, and typically, you will not need to change either of these settings.
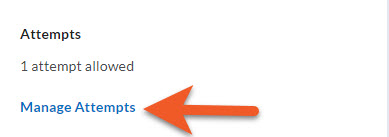
If your quiz is standard, and students are only allowed to attempt it once, you will not need to adjust the Manage Attempts setting.
If you want to allow students to attempt the quiz more than once, click on Manage Attempts.
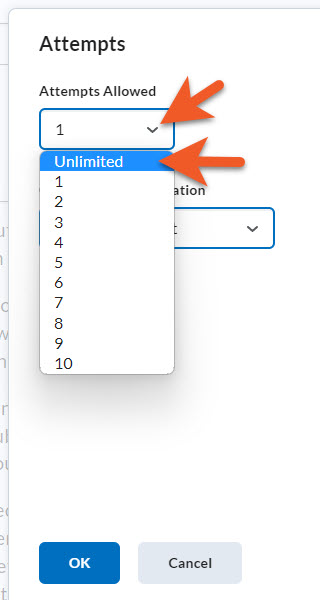
Click on the Attempts Allowed dropdown to select the number of attempts. You can choose a number between 1-20 or “Unlimited”.
If you selected a value other than 1
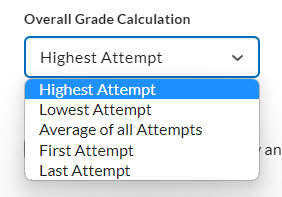
Next, if you’ve selected a value other than 1, click on the Overall Grade Calculation dropdown to determine how the grade is determined among the student’s multiple attempts.
Options include:
- Highest Attempt
- Lowest Attempt
- Average of all Attempts
- First Attempt
- Last Attempt

Retake Incorrect Questions Only
If you selected a value of 2-10 or “Unlimited”, you have the option of selecting On new attempts, only allow answers for previously incorrect questions. This means that in subsequent attempts, students will only see the questions they previously answered incorrectly, which will make it possible for them to complete additional attempts faster, and only review the materials they struggled with.
If you select this checkbox, keep in mind that you should make sure you select an appropriate option in Overall Grade Calculation, based on how you want the student’s additional attempts to impact their grade.
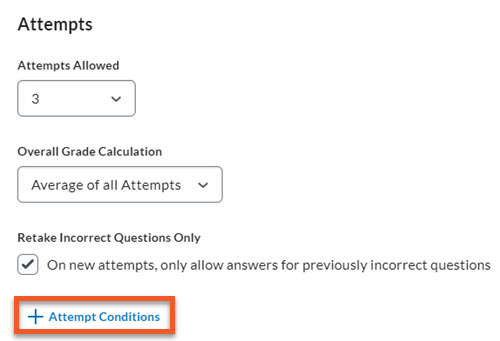
If you selected a number of attempts between 2-10, you will also notice + Attempt Conditions below the other options.
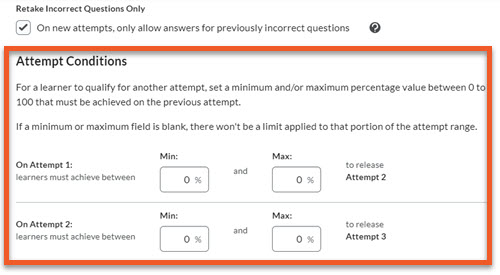
If you click on + Attempt Conditions, you will see additional options for releasing the additional attempts to each student.
For example, perhaps you only want students to be able to attempt the quiz again if they scored below 80% on their previous attempt. Once the student has scored high enough to demonstrate their understanding of the materials, they won’t be able to attempt the quiz again.
Click on OK to save your changes to quiz attempts.
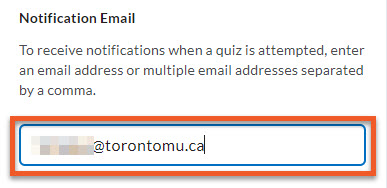
If you type your email address into the Notification Email field, you will receive one email each time a student submits their quiz.
If you have a large class, or students are completing the quiz many times, this will result in many emails. In most situations, this is not desired.
If you enter an email address other than your own, please make sure that person has an appropriate role at TMU and in your course, which allows them to view private student information, or you will be violating university privacy policy.
You can enter multiple email addresses, by separating each address with a comma, ie. example@torontomu.ca, test@torontomu.ca.
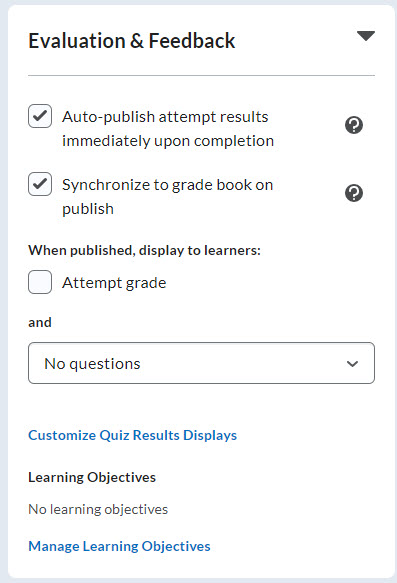
To see all Evaluation & Feedback settings, click on the name of the panel, in the right-hand area of the page, to expand it.
This section focuses on controlling auto-grading of the quiz, auto-publishing to Grades, and what students see, both upon submitting their quiz, and (potentially) later, once you have finished grading or reviewing the quiz results.
At TMU, the Learning Objectives tool isn’t really used, so we do not provide instructions for that here.
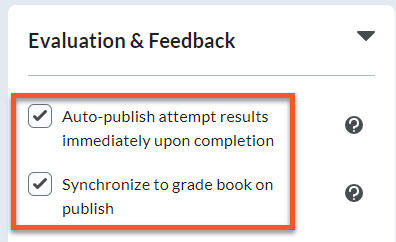
We recommend that before you make your quiz available to students, you go to Grades, and hide the grade item. Then, once everyone has taken the quiz, and been graded, you can release the mark to all students at the same time.
The first two settings in Evaluation & Feedback control auto-grading of questions, and synchronization with the gradebook.
Select Auto-publish attempt results immediately upon completion. We recommend enabling this setting regardless of whether all questions will be auto-graded by D2L, only some will be auto-graded, or all will be manually graded by you. This ensures that any questions that can be auto-graded will be, and the grade-in-progress will be synchronized with the gradebook (which is why we recommend hiding the grade item until all questions have been graded).
Select Synchronize to grade book on publish. This setting ensures that the gradebook is kept updated anytime grades are updated and published, regardless of whether D2L is auto-grading questions, you’re manually grading questions, or you need to regrade any answers.
NOTE: If you do not select both of these checkboxes, it is easy to overlook inconsistencies between the grade in the quiz and the grade in the gradebook.
Previously, this was referred to as “Submission views”, but can now be found under “Customize Quiz Results Displays”.
Quiz results display determines how learners can view their published quiz attempt results, both immediately following submission, or later when reviewing their attempt.
The Primary View is shown to learners as the default, and Additional Views will override the Primary View based on the set parameters.
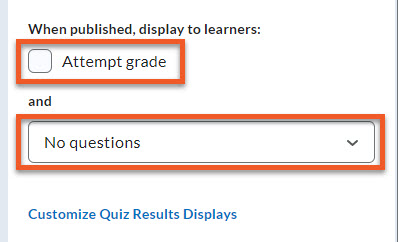
For typical quizzes/tests/exams, our recommendation is that upon submission of their quiz attempt, students DO NOT see their grade, and do not see any questions/answers. This ensures that students are slightly less able to share information about the quiz (based on their known grade) while other students are still writing the quiz. This is especially important if you tend to reuse quiz questions every term. (Note: We recommend that you avoid reusing questions, if possible, to maintain the integrity of your assessments.)
To ensure this, make sure that you deselect Attempt grade, and in the dropdown, select No questions.
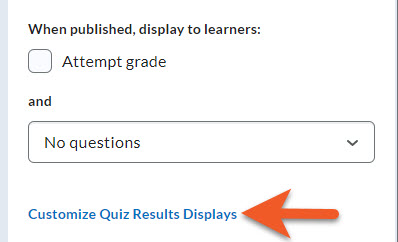
If, once all students’ quiz attempts have been graded and reviewed, you wish to allow students to see the questions again, and review which answers were correct/incorrect, you can set up additional submission views, by clicking on Customize Quiz Results Displays.
Note: Again, if you tend to reuse quiz questions each term, you may not want to do this. Instead, you might spend time during class or provide a document to review concepts that students struggled with, rather than showing the exact questions.
Also, please note that if you hide the quiz, students will not be able to view these quiz results, including any rubrics for Written Response questions.
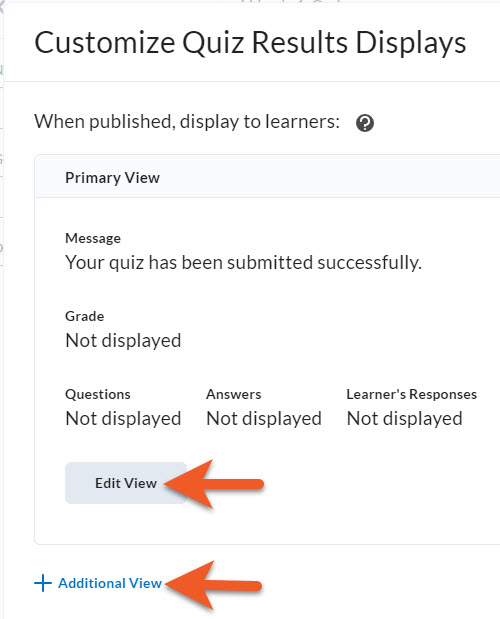
A popup window will open, indicating what students see immediately when they submit their quiz attempt. If you wish to change anything, click on Edit View.
If you wish to set up an additional view, so students can review their results later, after all students have written the quiz and it has been fully graded/reviewed, click on + Additional View.
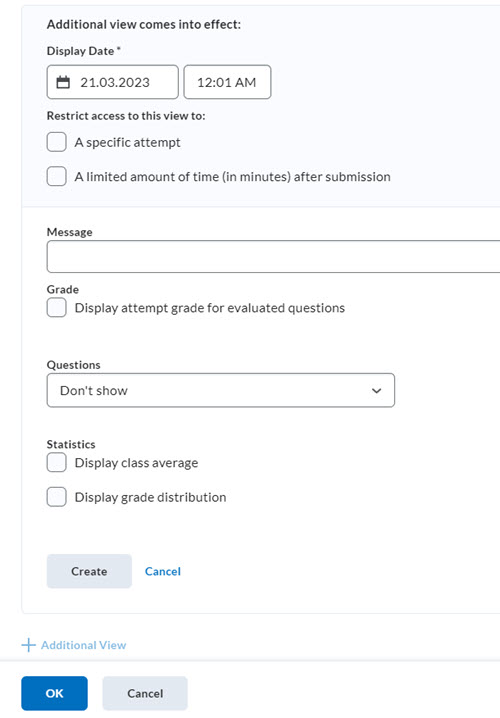
You will see some additional options appear at the bottom of the popup window.
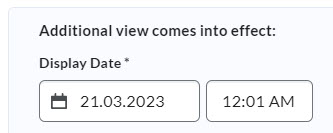
Select the Display Date and time that the additional view will be available to students.
Typically, this date should be after all quizzes have been graded and grades have been released to students. If you’re not sure, you can click on Cancel, and add this view later.
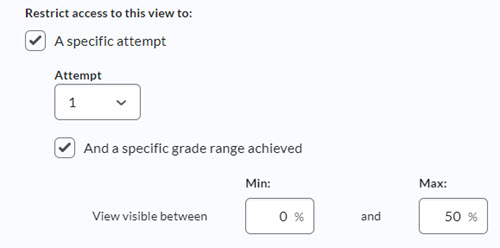
If your quiz allows students to make multiple attempts, you can set up different views for specific attempts/grade ranges, if you wish to show students a different message or different information before they try again.

We DO NOT recommend using the A limited amount of time (in minutes) after submission setting, as it has limitations and does not work as expected. You need to calculate the availability time of the submission view in minutes, from the moment of submission by the student.
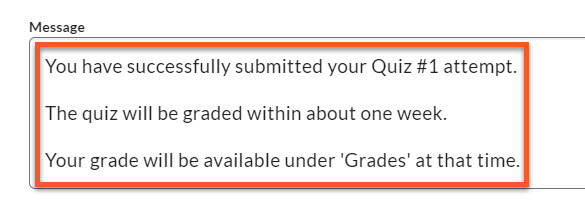
In the Message field, you can customize the message that students see. This can include instructions about when the quiz will be graded, where to find the grade, etc..

Select Display attempt grade for evaluated questions if you want students to see how they scored on each question.
Keep in mind that if a question hasn’t been marked yet, students will see a zero. D2L only auto-grades certain kinds of questions.
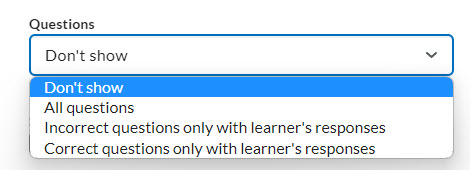
Click on the Questions dropdown to choose whether you wish to show questions and answers.
Options are:
- Don’t show
- All questions
- Incorrect questions only with learner’s responses
- Correct questions only with learner’s responses
If not all students have written the quiz yet, or you plan to reuse the questions in future terms, you may want to be somewhat strategic about what you show.
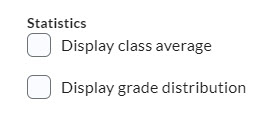
It is possible to display class Statistics to students, but most instructors do not turn these options on.
Click on Create to save the settings for the new submission view.
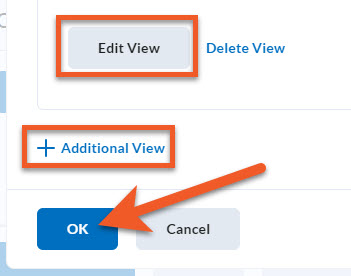
If needed, you can return and click on Edit View to make changes.
Also, if you need to create even more submission views, simply click on + Additional View.
Click on OK to save all changes to Customize Quiz Results Displays, and return to the main edit screen for your quiz.
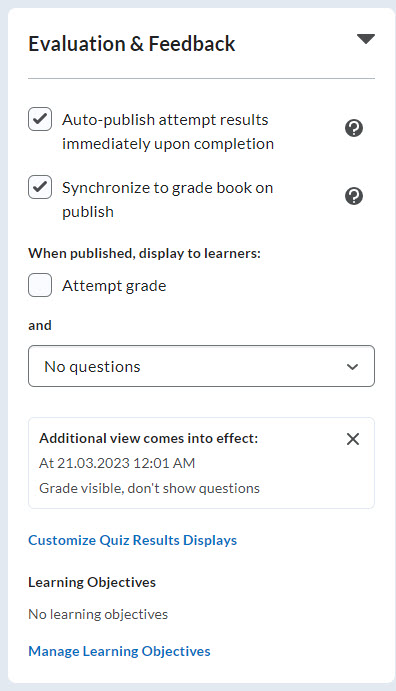
You can see your saved changes in the Evaluation & Feedback panel.
Reminder: If you hide the quiz, students will not be able to view these quiz results, including any rubrics for Written Response questions.

By default, upon creation, your quiz is hidden, to ensure you finish setting it up before consciously making it visible. This setting overrides all other availability settings.
This option should only be set as “Hidden” while you are still working on the quiz.

If the students are to ever see this quiz, you must click on this toggle to switch the quiz from “Hidden” to “Visible”.
The settings in the availability dates & conditions panel control when students can view/access the quiz, so as soon as you are done setting up your quiz, you should change this setting to “Visible”.

If you are working on your quiz for a long time, it’s a good idea to occasionally click on Save (grey button) to save your work-in-progress. If you will be switching tabs in your browser to do something else (email, teach a class, etc), please click on Save, as your D2L session may expire while you are away, and you could lose your work.
When you are done making changes, make sure to click on Save and Close, to save your quiz and return to the Manage Quizzes page.
If you haven’t done it already, you may find it easier to set up the other details of your quiz first, then return to the instructions for adding questions, because creating and arranging the questions in your quiz can be the most time-consuming part of the process, which requires some planning and organization. Setting up the rest of your quiz usually only takes a few minutes.
Now it's time to make some questions and consider how you want to deliver them to students.
Some things to think about:
- Do you want to pull a random number of questions from a larger pool of questions? (If so, you will need to create the questions in a section of the Question Library)
- Do you want to randomize the questions, so students get them in a different order from their peers?
Take the time to try a quiz before releasing it to the students. Make sure to carefully review the wording of all questions and answers. This process allows you to see the quiz, as well as grade it. By taking the time to do this, you can find and resolve issues before they impact your students.
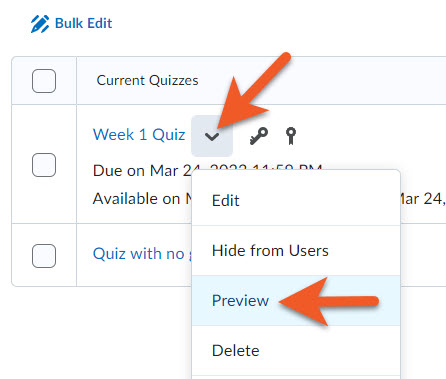
In Quizzes, select Preview from the context menu of the quiz you wish to attempt.
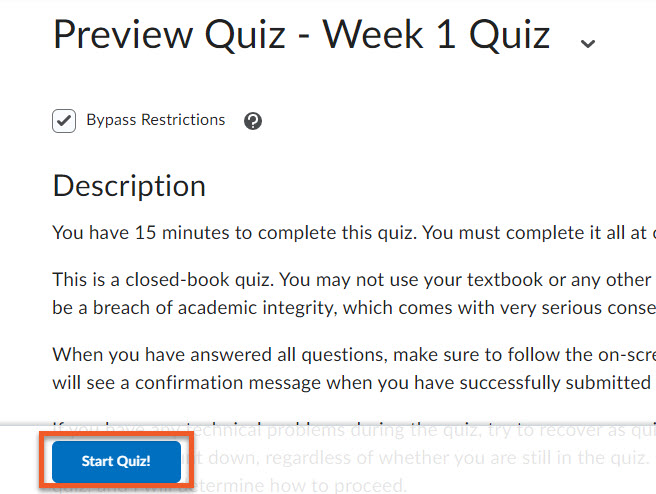
Click Start Quiz!
The quiz will open. If the quiz has a time limit, the countdown timer will begin counting down.
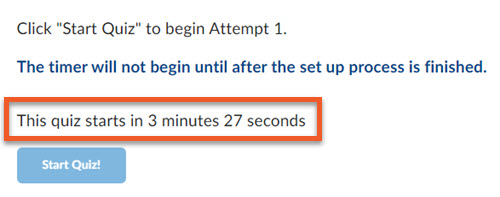
NOTE: If you have created a synchronous quiz (all students must start and end at the same time), please note that on this page, near the “Start Quiz” button, students will see a countdown timer, starting 5 minutes before the beginning of the quiz. When the countdown reaches the start time, students will be able to click on the Start Quiz button.
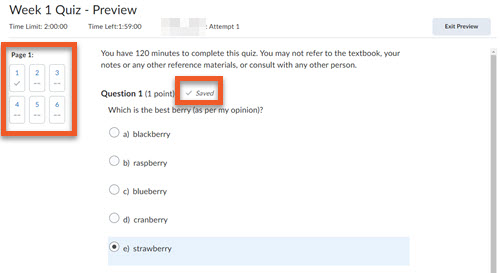
Complete the quiz questions, and notice that quiz responses are saved within about 10-15 seconds, or when you click outside of a text input field. You can see that a response has been saved by looking for the checkmark icon in the left navigation.
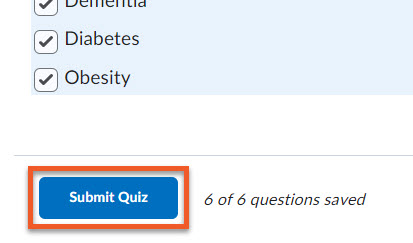
When done, click Submit Quiz.
You may also see a warning popup box. Click it to continue.
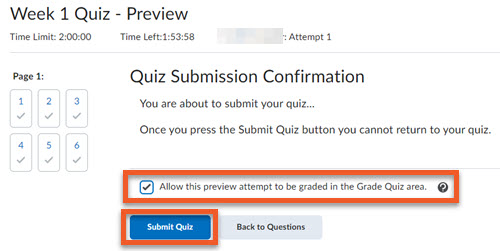
On the Quiz Submission Confirmation page, be sure to click the checkbox to "Allow this preview attempt to be graded in the Grade Quiz area".
Click Submit Quiz.
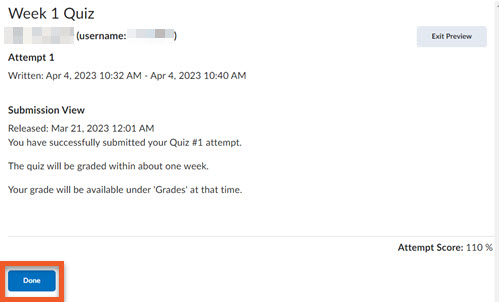
On the confirmation page, you should see a message that your quiz has been submitted successfully. Depending on how you have set up the default view for this quiz, you might also see the questions, your answers, your score, or the grading status. Please note that this page may look somewhat different for your real students.
Scroll to the bottom of the page and click Done.
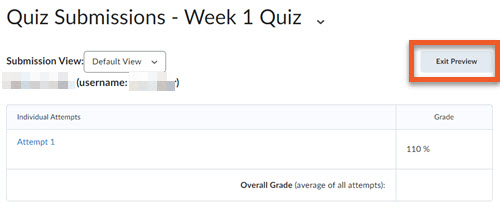
You can click on Exit Preview to return to your list of quizzes.
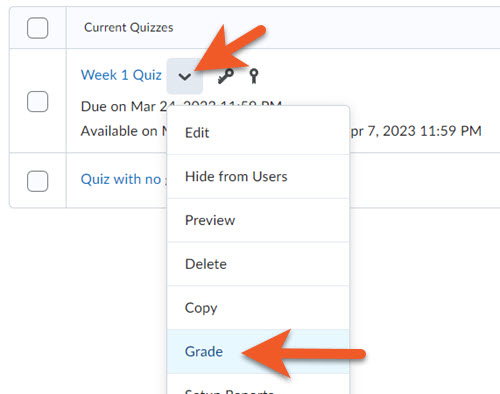
In Quizzes, click Grade from the context menu of the quiz you attempted.
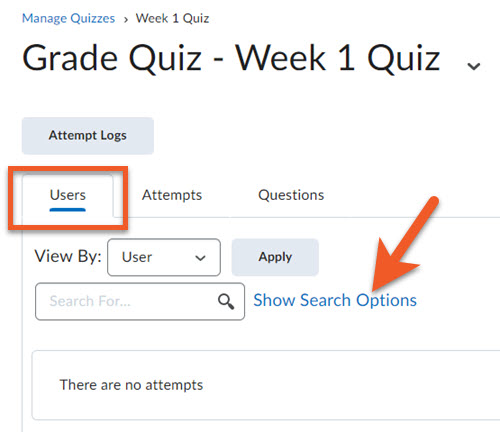
Make sure you are on the Users tab.
If you do not see all of the filters, click on Show Search Options to reveal them.
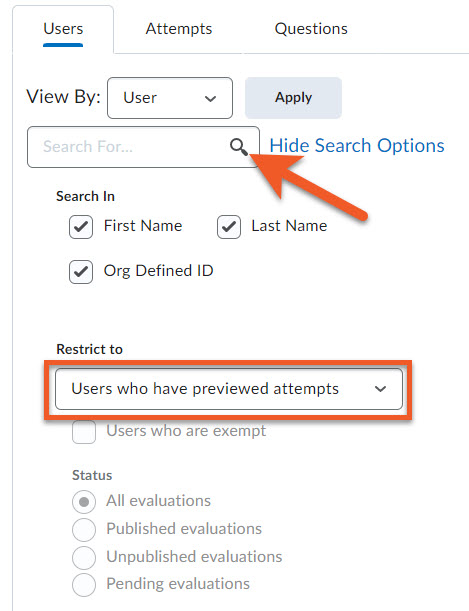
Find the Restrict to dropdown, and change it to "Users who have previewed attempts".
Click the magnifying glass icon in the "Search For" field to complete the search.
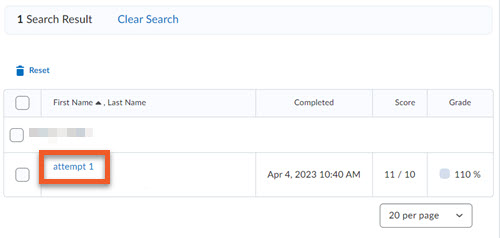
You should see the name listed below, with their attempts listed. Click on an attempt to review the answers. From there, you can grade your attempt. See Grading Quizzes for more information.
If a part of your exam includes a question that requires longer-form writing, it can be challenging to decide whether to use the Assignments tool or the Quizzes tool in D2L Brightspace. Here are a few points of comparison that may help.
Quizzes
- Written and edited within the Brightspace Editor, which is fully-featured.
- No uploads necessary. Work is automatically saved.
- Can connect a rubric to Written Response (WR) questions.
- Brightspace Quizzes have NO access to Turnitin.
- Written Response (WR) questions can be a part of a larger quiz with a variety of question types, so the assessment is all in one place, with one setup for timing and access.
Assignments
- Written using software that the student must have access to on their computer (ie. Google Docs, Microsoft Word).
- Upload any file format, ‘though formats such as .doc, .pdf are preferable.
- Can attach a rubric to a Brightspace Assignment.
- Brightspace Assignments can be Turnitin-enabled for similarity checking.
- If you also have a more traditional kind of quiz for the exam, you will need to manage the access and timing of the quiz and the assignment.
You may also find our Online quiz tool comparison guide helpful for online exams that are more typical.
Ensure your students are prepared to take the quiz!
We have some helpful tips for students on the Prepare to take a quiz in Brightspace page.
It’s also a great idea to provide information about the quiz in multiple locations (ie. in class, in the description of the quiz, in an announcement, etc). Information should include:
- Whether the quiz is synchronous or asynchronous. Do all students have to start at the same time, similar to an in-person quiz? Or do they have a wider window of time to attempt the quiz?
- Start date/time
- Due date/time
- Time limit
- If the quiz is “open book” or no reference materials are permitted
- What to do if students encounter a technical problem
(Hint: if the end date has not passed, students should try to re-enter the quiz. If that doesn’t work, students should contact you, and provide details. If you (the instructor) are unable to solve their problem, you should contact our team, and we can work with you on a solution. Please DO NOT direct students to contact us.)
The Special Access setting enables you to allow individual students different rules for the completion of their quiz. This is invaluable in providing time-based accommodations.
- Create a longer time limit for students that require extra time.
- Set a different quiz availability window (date & time) for students that cannot complete on the same day as the rest of the class.
- Make the quiz available to just your demo student while you are developing it.
Find instructions for adding a student to Special Access, above, under Availability Dates & Conditions, in the section called “Provide Special Access to students with accommodations (optional)”.
Release Conditions take precedence over Special Access. Keep this in mind when determining how to give someone access to a quiz.
Use special access to add time to a student's in-progress quiz attempt! The timer will update at the end with the additional time.
Previously, you could control what information students see about their quiz results by using “Submission views”. In Brightspace, this is now called “Customize Quiz Results Displays”.
Find instructions for how to release quiz results to students, above, under Evaluation & Feedback, in the section called “Control what students see after the quiz is complete”.
The release will happen for all students at the same time, so if you have an assessment set to open at 3PM EST and close at 6PM EST, each student will need to adjust the time for their own time zone.
Have the students confirm the assessment times for their time zone in advance
There are two areas that will display the availability times in advance, provided they are not set to be "hidden from students":
- Assignments (under Assessments > Assignments)
- Content (under Content > locate the content)
In each of these areas, you will see the release date and time and the due date (if applicable), if they are not hidden from students. Each user will see it reflected in their own time zone.
Quizzes (under Assessments > Quizzes), unfortunately, do not always display the availability and end dates in advance. As such, it may be best to add the link to the quiz in the Content tool, where the dates will be displayed in advance (as described above). Quiz links can be added to Content using the Existing Activities feature.
Include the time zone if you reference assessment times in your communications
When posting information to your students using tools like Announcements, be sure to always include your local time zone when referencing the availability and due dates and times for your assessments.
For example, specify that a quiz will be available to start between 3:00 PM EST and 4:00 PM EST.
One popular situation is that you may require students to complete another assessment before you give them access to a quiz.
For example, perhaps they have to complete an academic integrity quiz, or you require students to complete a practice quiz beforehand, to ensure they understand how to write quizzes in Brightspace.
- First, you must very clearly communicate to students what you expect them to do. Provide detailed instructions, including the exact name of the assessments you require them to complete, where to find the assessments (ie. Assessment > Assignments or Assessment > Quizzes), when they must be completed by, and if one must be completed first, make it very clear that they will not have access to the second assessment until they do so.
- If both assessments will count toward the final grade in the course, create grade items for each assessment.
- Create both assessments, with the desired settings, including start/end/due dates, and connect each assessment to the correct grade item.
- The second assessment will require a Release Condition, to control student access to it. Go to Assessment > Quizzes, and edit the second assessment. You can find instructions for adding a Release Condition, above, under Availability Dates & Conditions, in the section called “Add release conditions (optional)”.
Instructors often use a variety of methods to combat cheating on quizzes. We strongly recommend the use of the question library and question pools, where students are shown a select number of questions from a larger pool of questions, because each student will see a different selection of questions, and they will see those questions in a different order.
Learn more about creating questions in the question library, and how to create question pools.
However, sometimes, for various reasons, instructors may decide to give different versions of a quiz to different groups of students in the same class. We do not recommend this as an anti-cheating measure, but you may have other reasons.
To do this:
- Use the Groups tool (found under Communication > Groups) to create a group category with the number of groups you wish to split students into.
Learn how to use the Groups tool.
- Enroll the students into those groups.
See our instructions for how to assign users to groups.
- Go to Grades, and create a category for this quiz, with the correct weight, then create a grade item inside that category for each version of the quiz. When you have created all of the grade items, edit the grade category, and select the "Distribute weight evenly across all items" option, then enter the number of lowest items to drop. For example, if you have 4 versions of your quiz, you will want to drop the lowest 3, so that only the version of the quiz that the student actually wrote will count toward their final grade in the course.
Learn how to create grade items and categories.
Learn how to drop the lowest or highest grade in a category.
- Edit each of the new grade items, to add a release condition (found under the Restrictions tab), limiting access to that grade item to only those students enrolled in the group assigned to that version of the quiz.
Learn all about release conditions.
- Go to Assessment > Quizzes, and create the different versions of the quiz (see instructions near the top of this page). Connect each quiz to the correct grade item, created in step 3 (above).
- Edit each version of the quiz, and add a release condition (found under the Restrictions tab), limiting access to that version of the quiz to only those students enrolled in the group assigned to that version.
Learn all about release conditions.
Have the students complete a sample quiz to get used to the way Brightspace quizzes work - before it is required for a real test or exam. You can create your own, or use a sample quiz, which we've provided below.
Download a quiz pack
These course packs contain Quiz tool items that can be imported into your course shell and customized to your requirements. The details of each pack will describe what is contained in the pack.
To import a course pack to your course shell:
- Go to the Content tool and click "Table of Contents" in the sidebar on the left.
- Look to the right, and click the "Import Course" button below the Table of Contents title, then click "Import Course Package".
- Follow the on-screen instructions to upload the downloaded course pack zip file (do not unzip it), and proceed to "Import All Components".
- When the import is complete, the contents of a "quiz pack" will appear in the Quizzes tool.
Sample quiz pack
Have the students complete a sample quiz to get used to the way Brightspace quizzes work - before it is required for a real test or exam.
This pack contains the following components to import into the Quizzes tool:
- A short sample quiz


