Provide access to students

When setting up your Brightspace shell, you will "connect" your student section number(s) so that the students automatically get added to the shell based on their enrollment in your section.
When you are ready for the students to access the shell, you will set your shell to "active".
These are the two things required for your students to access your shell:
- The course section number(s) for your courses (found in MyServiceHub) must be added to your course shell (to load the students).
- The course shell must be made "active".
Here are some guidelines for setting this up.
On this page:
Find your students in the Classlist tool, in the menu of your shell.
Review strategies for respecting your students' privacy in Brightspace
What is a section number?
Each course is divided into sections - this way, students can be identified as a group. Even if there is only one group of students, there is a section number.
Section numbers are usually 3-4 characters long, and can be all numbers, or a combination of numbers and letters. Section numbers can look like 011, 061, 2J0, 701e and 801i.
Students cannot be added to your D2L course shell without the section number(s), so this is a very important step.
Where do I find my section numbers?
ALWAYS confirm your section numbers in MyServiceHub first. If your section numbers do not appear in MyServiceHub, it may be too early to add your sections to your course shell.
How do I associate my D2L shell with a section?
This can be done in one of two ways:
- Section numbers can be identified when you fill out the course shell request form.
- If you weren't able to identify the section numbers in the course shell request, and your section numbers are now available in MyServiceHub, you can use the Manage Shell Student Sections feature in Self Service to add them to your course shell.
Once the section number(s) have been associated with your course shell, the students registered in that section will automatically be added to your D2L course shell. If a student drops the course, they will automatically be dropped from your course shell.
How do I know once my sections have been added?
You can go into your D2L Brightspace course shell and check the Classlist tool. Your students will be listed here, and can be filtered by section.
When a D2L Brightspace shell is first created, it is "inactive". This gives the instructors and course developers time to set everything up properly before releasing the course shell to the students.
When it is inactive, "course admin" users (like Instructor, TA, Grader, Course Builder) can access the shell, but "learners" (like Students, Auditing Participants or Attendees) don't even see the shell in their My Courses list.
Once you are ready, you can make the shell "active". Here are two methods for making your shell "active".
Set your course to "active" from the D2L homepage
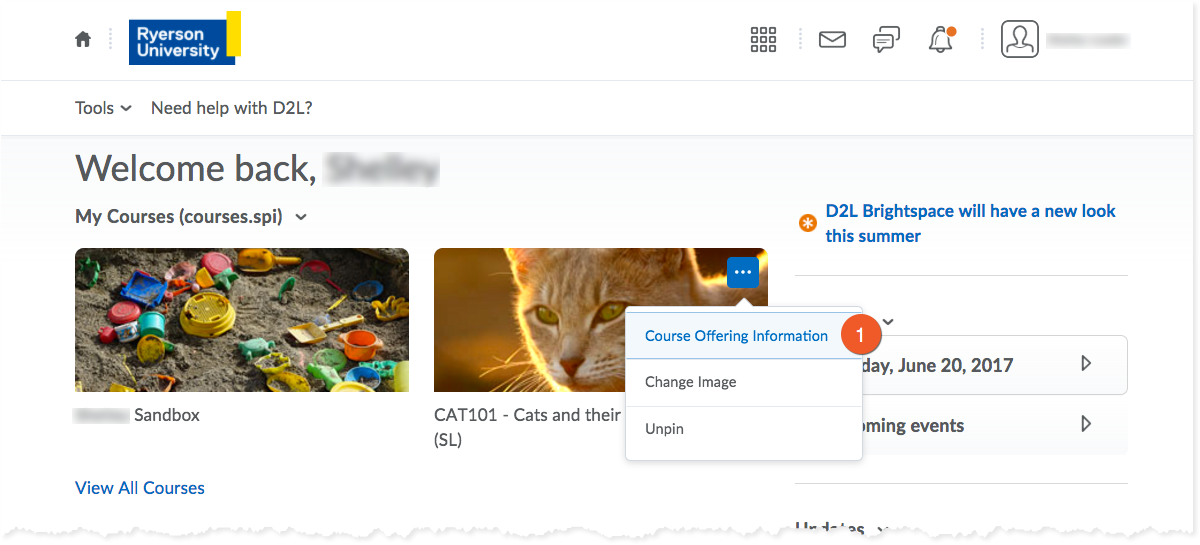
- From the D2L Homepage, roll your mouse over the image for your course, click on the "..." icon and select Course Offering Information.
- Check the Course is active box in order to activate the course for students.
- Click the Save button.
Set your course to "active" from within your course shell
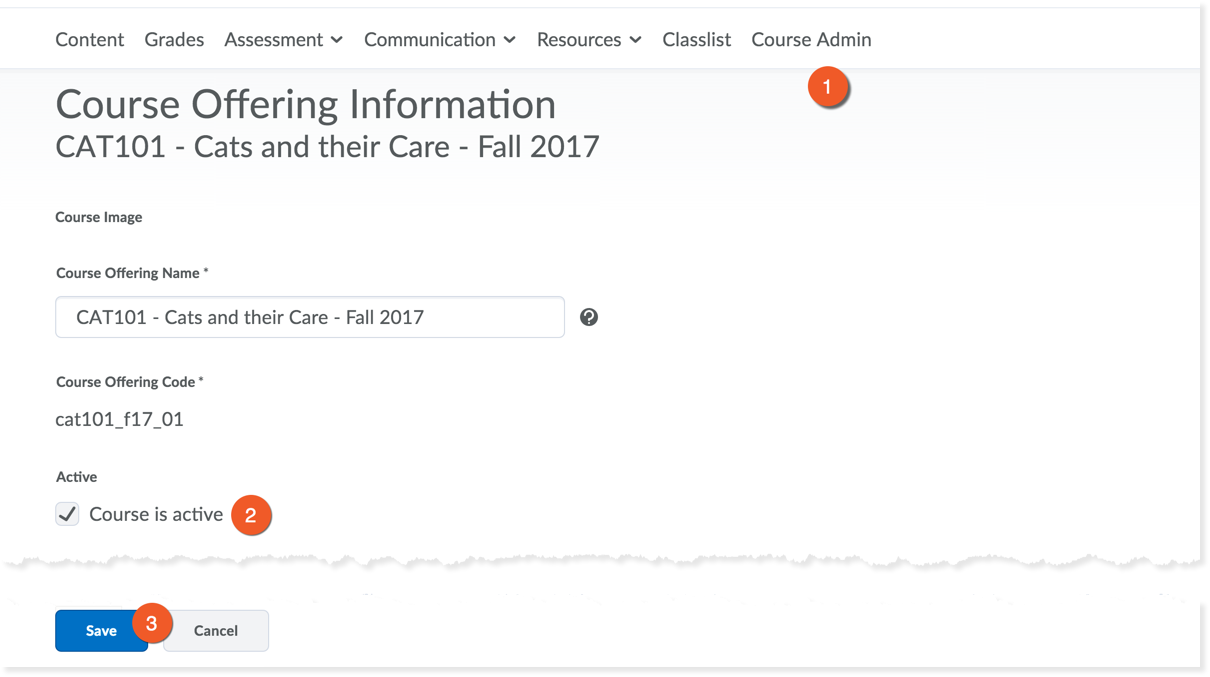
- Inside your course shell, select Course Admin from the navbar. Under Site Setup, click Course Offering Information.
- Check the Course is active box in order to activate the course for students.
- Click the Save button.
What is a demo student?
A demo student is a separate Toronto Metropolitan University account that an instructor can add as a student to their course in order to test/navigate the course from a student’s perspective. The instructor would logout of the university’s systems and login with their demo student account.
If you already have a demo student it will automatically be added to any new course shell you request.
Testing your course using the demo student is a great way to make sure tests and assignments have been made available, as well as to see the process students go through when submitting tests and assignments.
Use a demo student to:
- Submit a quiz or assignment.
- View a quiz attempt or a file submitted to an assignment.
- View items with restrictions or release conditions set such as Discussions, Quizzes, or Assignments restricted by date, or released by group.
- View actual scores in Grades.
Note: If you use Google Drive to share resources with your students, you can enable Google Workspace access for your demo student. See the instructions below.
How do I get a demo student?
If you don't already have a demo student account, you can request one by going to Self Service in the my.torontomu.ca portal
- Login to my.torontomu.ca, find the Self Service section, and click on Courses and Organizations.
- Click Request and Manage Course Shell, then "Request your demo student account".
We recommend submitting the request and immediately following the on-screen instructions to activate the account. If you don't have time to complete the activation, please be sure to follow the activation instructions sent to you via email.
Once activated, your demo student account will be added to all Course Shells where you have a role of "Instructor".
- If you don't see the request option listed in Self Service, it means that you already have a demo student account.
- If you already have a demo student account, but do not remember the password, contact help@torontomu.ca for assistance.
Once you have a demo student account, as long as you are an active Toronto Metropolitan University user, you will continue to be able to use this account. You do not need to request it again.
Enable Google access for your demo student
If your course makes use of Google Workspace to share resources and facilitate group activities, we recommend enabling Google for your demo student account as well.
- Login to my.torontomu.ca as your demo student.
- Go to the Self Service section of the portal, and click "Personal Account".
- From the "Personal Account" menu, click "Manage My Online Resources".
- Here, you will see a list of resources available for the demo student account. Find "G Suite" in the list and click the button so that it switches "On".
This change may take some time to complete.
Add a demo student to your course shell
Your demo student will automatically be added to any new course shell you request, but you may want to add someone else's demo account to your shell.
This account can be added to any of your Course Shells using the Manage Shell Members tool.
We recommend giving demo students the 'Auditing Participant' role. This will be sufficient for testing content, assessments and grading. If you need to test Discussions or Groups as a student, please contact our support team, at courses@torontomu.ca, and include a detailed explanation of what you wish to do. Our team can help you find an alternative option.
"Role Switch" provides a quick look at your course from a student-like perspective.
This is ideal for getting a general idea of how the course appears to a student, but cannot give you the full access of a student, as all user access is tied to an indvidual's account. Some of what you see in the course (including edit options) are not an accurate view of what your students see - they represent features available to you.
As such, this is not our recommended method of experiencing the course as a student.
Use this with caution.
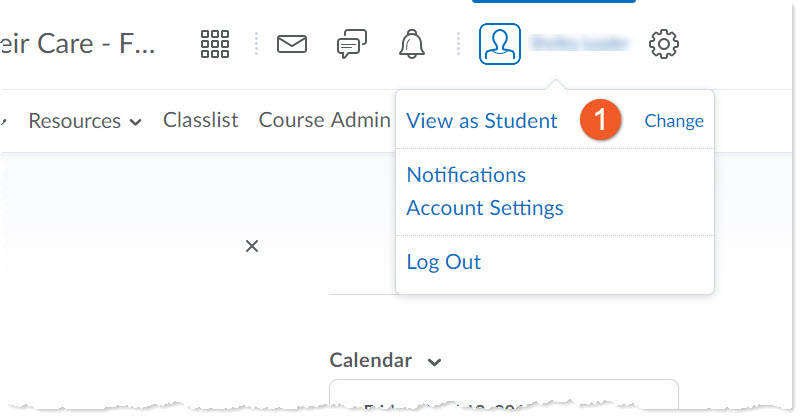
1. In your Course Home page, locate your name at the top right of the screen in the minibar and click the drop down arrow to the right of your name to see the menu. Click on the View as Student button.
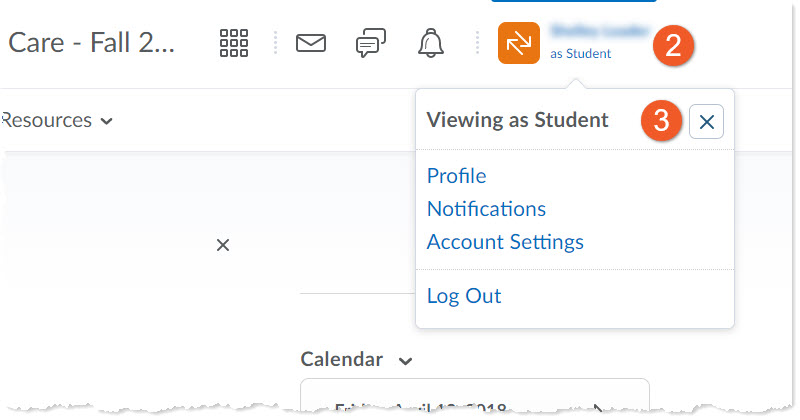
2. Now when you click the drop down arrow to the right of your name, you will see “Viewing as Student”, and now you will now be able to preview your course as a student.
3. When finished, follow the steps above but click “x” beside the Viewing as Student to return to the instructor view.
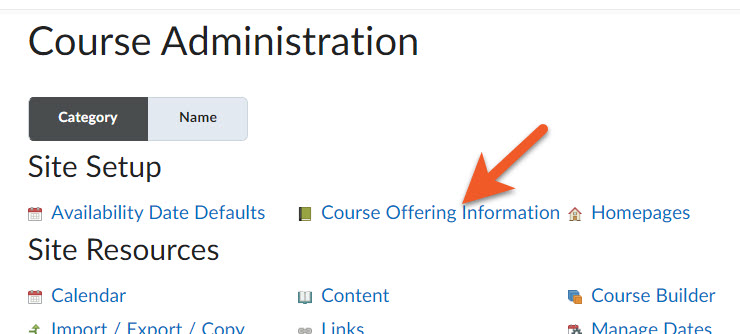
If you realize that you made your course shell "active" (visible to students) before you were ready, or if you need to hide the course shell from students for some reason, you can make the shell "inactive".
In your course shell, click on Course Admin > Course Offering Information.
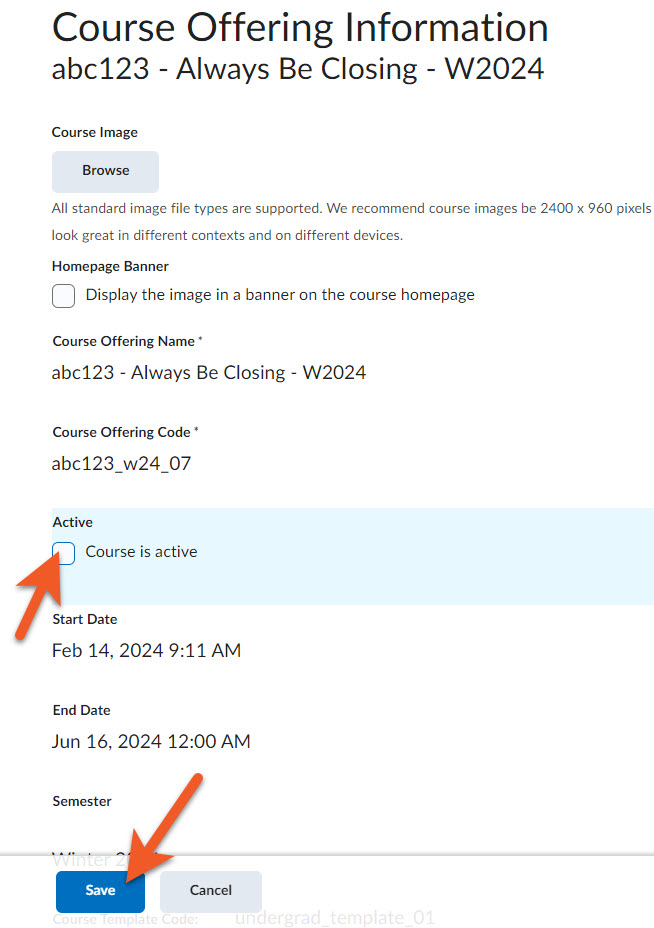
Deselect the checkbox in front of "Course is active".
Click on Save.
NOTE: You do not need to make your shell "inactive" at the end of each term. Around 6 weeks after the last class (after the appeal period is over), your course shell will automatically expire. Your students will no longer see it, and your access will change to read-only.
Where do the students find out how to login to D2L?
- Their instructor: We highly recommend that instructors take the time to introduce their students to their course site by showing it to them in class.
- The support website: Many students know that they have online components on D2L, and can find out the URL for the website from many sources (including www.torontomu.ca, some school communications, etc.). Here, they are given information on how to login, how to determine their username and what technical requirements are needed to access D2L from home or school.
Where do students get technical support for D2L?
As students and faculty receive support from different groups at Toronto Metropolitan University, we ask that you do not direct students to contact the Faculty & Staff support team or the DMP.
These support people will simply forward them to the student support, which may add frustration and wait time to the process for the student.
If you just want a list of your enrolled students, it’s probably best to download your class list from MyServiceHub, as it is the most up-to-date.
Alternatively, you can download the list of students from the Grades tool.
Note: If you do not see Grades in the top navigation, please review our tutorial to learn how to enable course tools.
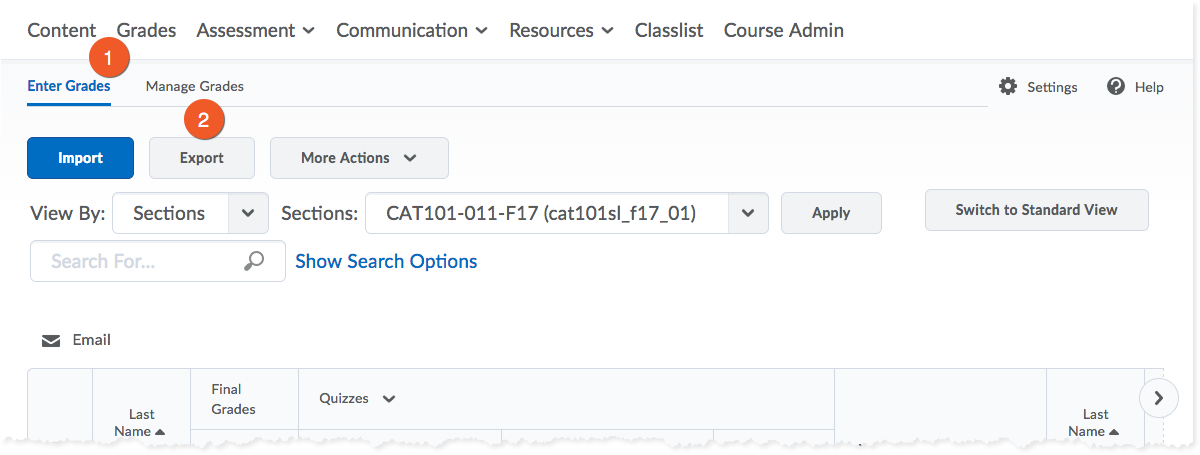
- In your course Grades tool, go to Enter Grades.
- Click the Export button.
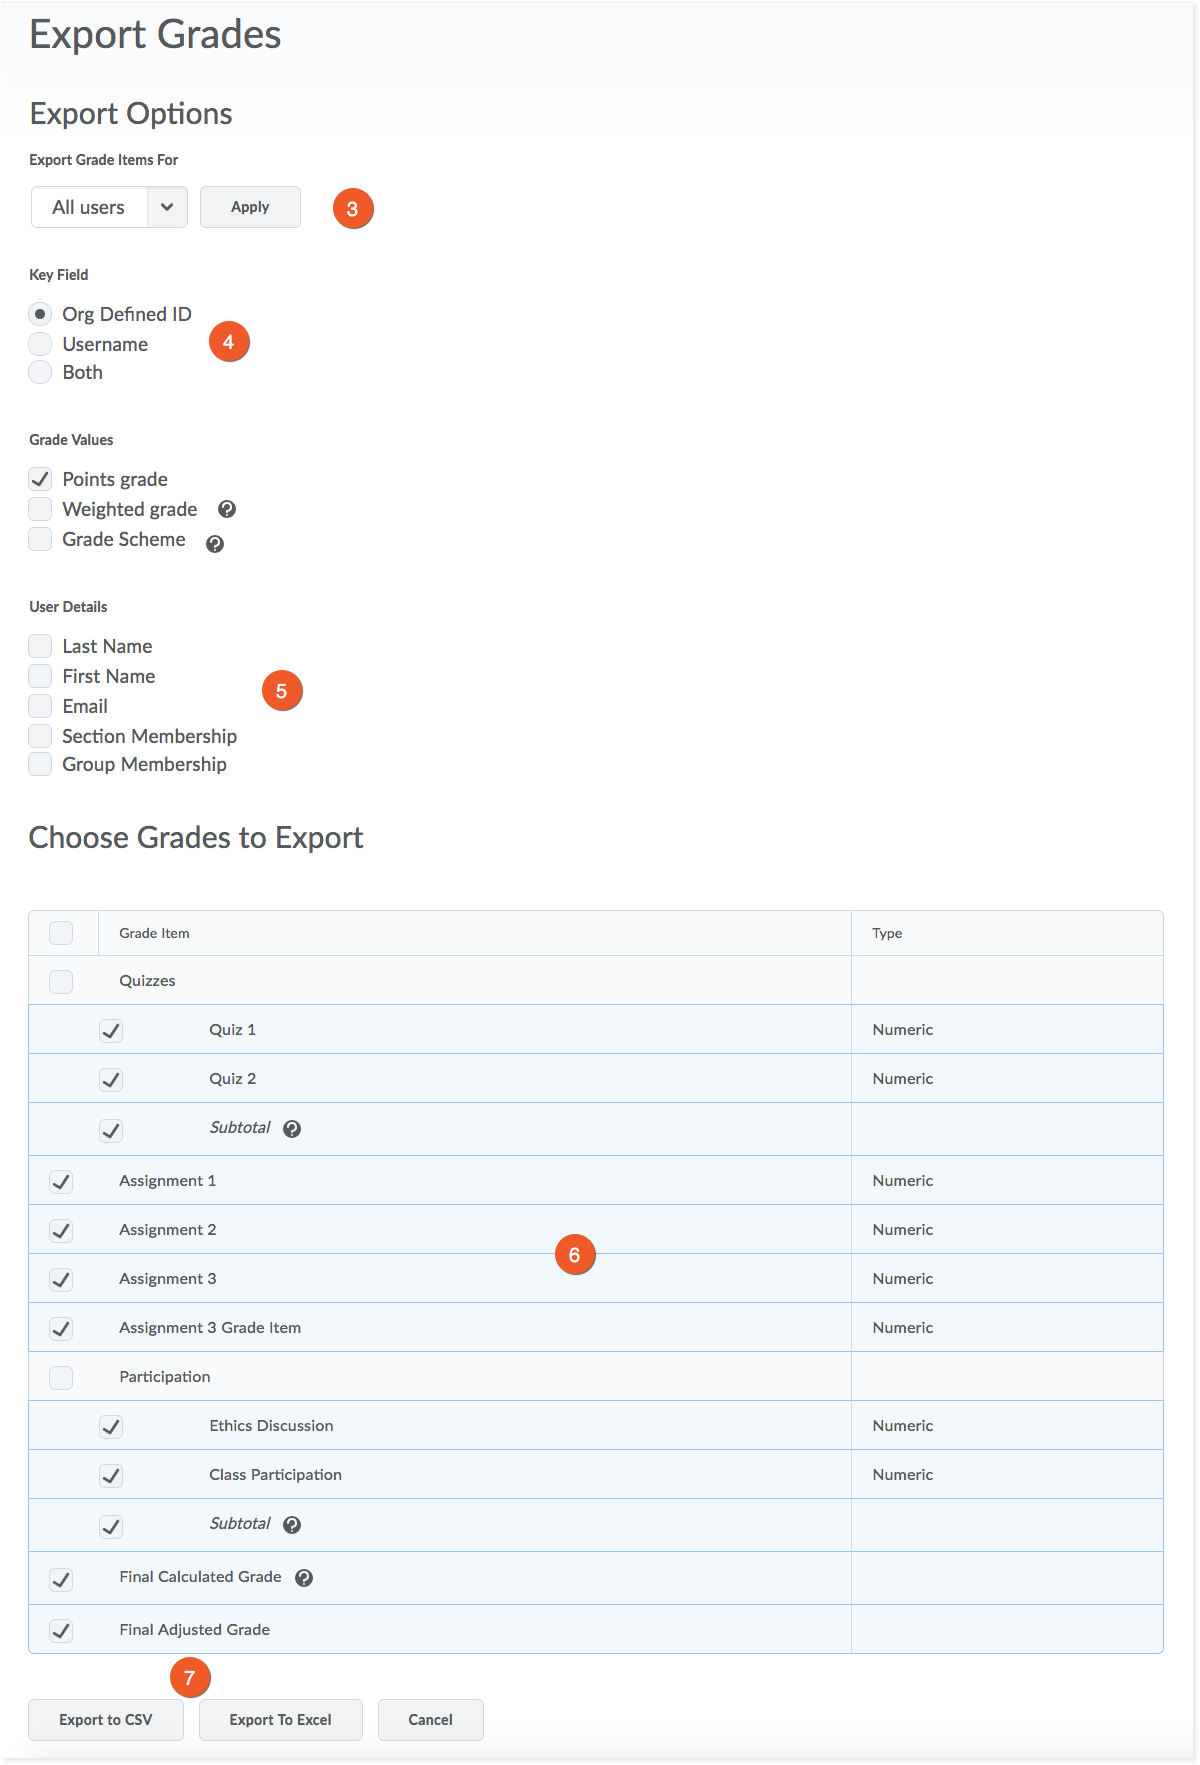
- Export Grade Items For:
- All - will download all users, regardless of section. (Note that section information is NOT included in this download file).
- Section - selecting this option (then clicking Apply) will give you the ability to isolate the students from a specific section. Select the appropriate section from the dropdown menu.
- Key Field - choose whether you want the Student Number (Org Defined ID) or Username or both displayed.
- User Details:
- Student's Information, like First Name, Last Name and Email.
- Student's group or section affiliations can also be included.
- Select or Deselect any grade items as needed.
- Export options:
- If you plan to use this file to upload new grades into D2L, you must select Export to CSV.
- If you are only using this data offline, you may choose to Export to Excel.

- A new window will pop-up, and it will take a minute to process. Once it has completed processing, click the export file to download it to your computer.
Some of the data appears with a pound prefix (#). The email addresses appear as expected, however.